Tempo Game Clock : User's Guide
 Contents
 Language
 Product Home
Quick Start
 Page Bottom
This is all you really need to know to start a game. A Controller window (Figure 1.) operates the program. The Game Display windows shows the clocks and other game information. There is a lot more advanced function available which is detailed in other sections of this Help document.
Game Set Up
- Pick the Game Type - Click File - Load New Game Type . Chose from Chess, Checkers, Go, Scrabble, Boggle or generic Board Game. Some games have multiple time controls to chose from.
- Set Number of Players - If you need to change the number of players, click Edit - Set Number of Players and pick a number (1 to 16 players).
- Set the Period Length - Click Edit Current Period button on the Period toolstrip. In the resulting dialog, set the amount of time for the period. Each player gets this amount of time.
- Game Reset - Click Game Reset button to reset the clocks and game controls.
 Period toolstrip
 Game Reset
 To Page Top
Play a Game
-
Start the Game- Click the
Start
button on the
Game
toolstrip. This begins the game and the White players delay clock starts.
 Game buttons
- Move to Next Player- When a player has completed a moved, he presses the keyboard Space bar (or click the Move to Next Player button ) which will stop his clock. The next player's clock starts immediately to begin her move.
- Stop/Pause the Game- Click the Stop button at any time to pause the game for a rest break. All clocks are stopped. Click the Start button to resume play where you left off.
-
Game Log and Stats- A log of all moves, scoring and events are recorded in a game log. Almost all button clicks on the Controller will produce a log entry. Click the
View Log
button to view, print or save the log contents for a future record of the game. You can also
View Game Statistics
which shows a summary of scoring only without the move by move log entries.
 Game Log toolstrip
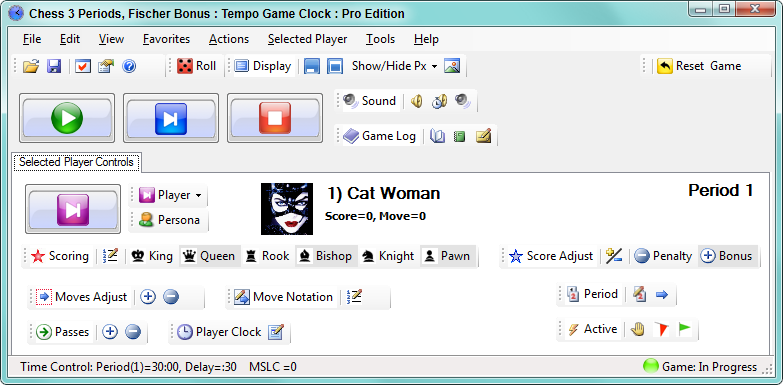
Player Controls
-
The Player Controls panel contains various controls for scoring and recording game events.
-
Select a Player - First select a player by clicking the
Select Player
button . Any buttons clicked on the Player Controls panel apply to the currently selected player. The current selected player name appears to the right of the
Select Player
button.
 Player Select buttons
-
Scoring - To register scores , click one of the score buttons on the
Scoring
toolstrip. You can edit the list of scores by clicking the
Edit
button remove a score. For some games, like chess, scores are of only theoretical interest.
 Scoring toolstrip (scoring buttons vary by game type)
Game Over
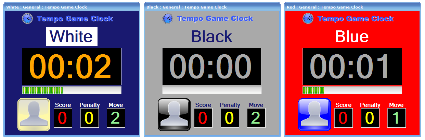
Play continues until a player wins by a game rule (ex. a checkmate) or until all player clocks except one have expired. When a player's clock expires, the game display changes to clock expired state. If it is the last period of play game display typically changes to player eliminated state. See Figure 3 for clock states appearance. You can manually
indicate game dispostion with the
Resign
(loss) or
Draw
buttons on the
Active
toolstrip.
 Active toolstrip
New Game
To start another game, click Reset Game button to reset the clocks and game controls.
Time Controls
See details of time controls for each specific game type in the related Game Type Help section. When you select the game type, the time controls are set to the official rules for that type of game.
Scoring
See details of Scoring for each specific game type in the related Game Type Help section.
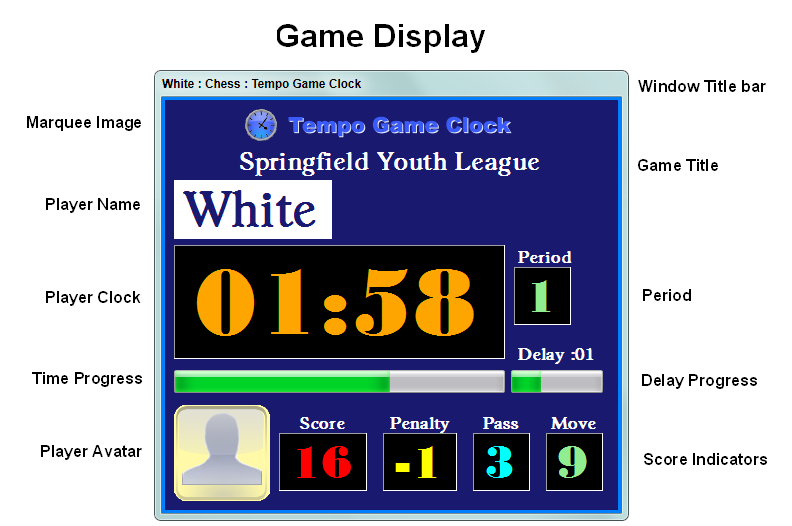
Game Display Features
You can show or hide almost all of the Game Display Features (see Figure 2) by settings in the Options dialog Game Display tab.