
 Video Mill : User's Guide
 Contents
 Language
 Product Home
Automator - Touch Screen and Tablet Operation
 Page Bottom
Overview
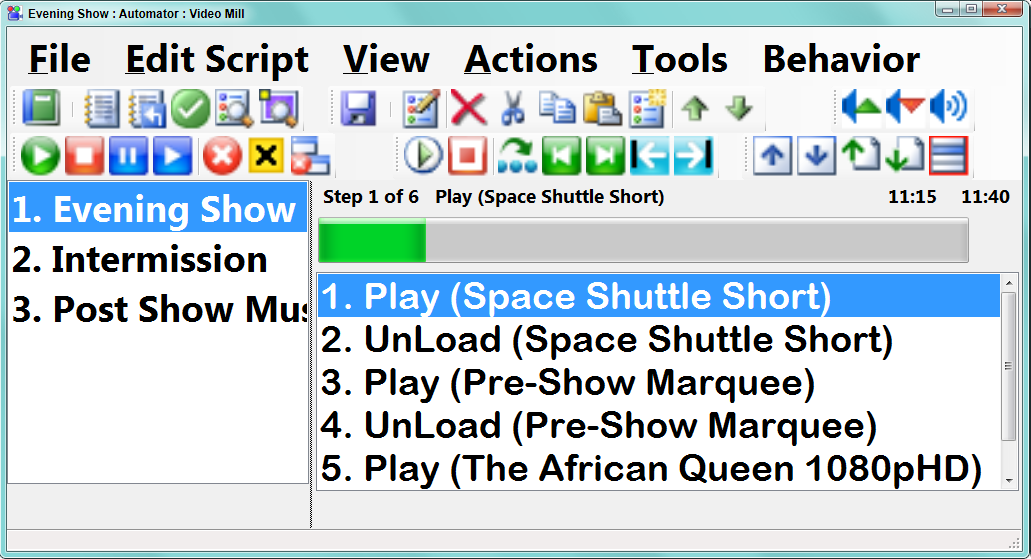
The Automator can be operated via Touch Screen devices during a performance by modifying the user interface to scale up some controls and hiding some panels that you don't need. This interface is also useful when operating the Automator via a wireless remote controller. Under the View > User Interface Favorites > Pick UI Favorite menu, you can swap the interface between Tablet Touch Screen mode (Figure 2) and Standard mode (Figure 1, mouse and keyboard operation). There are also some items used to quickly customize the interface as desired and save the changes as a User Interface (UI) Favorite .
Even if you plan to use the Touchscreen UI mode during a performance, you will still want to the Standard UI mode when editing your media designs. None of the edit dialogs are available as Touchscreen interfaces.
 To Page Top
Automator UI Controls and Panels
The following UI (User Interface) Controls and Panels can be modified ( shown/hidden, resized, font changed) to enable customized touchscreen operation by resizing controls to fit your finger size; Or resized for easy viewing from a distance when using a wireless remote controller.
- See View menu below for details.
- Show/Hide Panels - Show or hide the main control panels in any combination via View > Show/Hide Panels menu.
- Change Fonts - Change some control's fonts via View > Controls Layout menu. Use any font on your computer, any size, any style.
- Scale/Resize - Scale the size of some control's via View > Controls Layout menu.
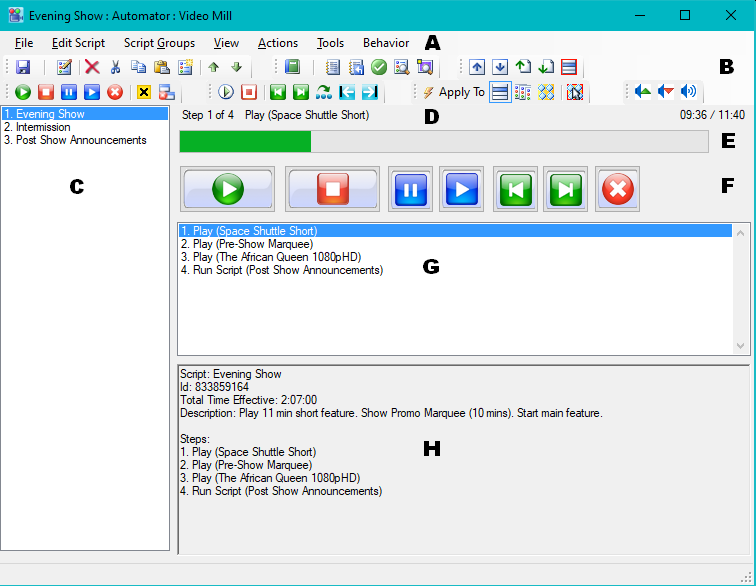
Automator Control Panels
- (See Figure 1).
- A. Main Menu - Set the font size to any desired size.
- B. Toolbars - Can be hidden; Scaled in size via the View > Tool bars menu.
- C. Script List Selector Panel - Can be hidden; Set the font size to any desired size.
- D. Progress Readouts - Can be hidden; Set the font size to any desired size.
- E. Progress Bar - Can be hidden; Scale the Bar height any desired height.
- F. Run Controls - Can be hidden; For touchscreen, use the associated toolbar buttons.
- G. Steps List Selector Panel - Can be hidden; Set the font size to any desired size; Set the number of items to show which will also change the panel size based on the font.
- H. Script Description - Can be hidden; Set the font size to any desired size.
Automator View menu
-
Tool bars
- Show/Hide Toolbar(s) - Toggle visibility (Show or Hide) for one or more toolbars.
- Scale Toolbars - Scale the size of one or more toolbars using the Toolbar Scale Factor. You are prompted to select the toolbar(s).
- Set Toolbar Scale Factor - Sets the scale factor to be used for scaling the size of Toolbars. (ex. 1.0 = 100%, normal size, 2.0 = 200%, 2X normal size, 0.5 = 50%, half normal size)
- Reset Toolbars to Standard Size - Reset all toolbars to standard size.
- Show/Hide Panels - Toggle visibility (Show or Hide) one or more Automator control panels.
-
Controls Layout
- Steps List - Number of Items to Show - Sets the number of items to expose in the Steps List Selector panel.
- Progress Bar - Size Scale Factor - Increases the height of the Progress Bar. (ex. 1.0 = 100%, normal height, 2.0 = 200%, 2X normal height, 0.5 = 50%, half normal height)
- Change Fonts - Multiple panel's fonts can be changed. This is primarily useful for resizing for touchscreen (to match finger size) or wireless remote usage to be able to read controls at a distance. Font Family/Style can also be changed to any available on your computer.
- Script List Panel Width - Script List Panel Width can be resized by clicking on its right-side edge and dragging it with the mouse.
-
UI User Interface Favorites
- Pick UI Favorite - Pick a Favorite from a popup list. The Automator UI will be reset to the settings of the selected Favorite.
- Save Current Settings as a UI Favorite - Saves the current configured Automator settings as a Favorite. You are prompted to name the Favorite.
- Replace a UI Favorite with Current Settings - Replaces a current Favorite with the current configured Automator settings. Select the Favorite from a popup list. You are prompted to confirm or rename Favorite if desired.
- Add a Predefined UI to Favorites - You can add any or all of the Predefined UIs (below) to the list of Favorites.
- Delete UI Favorites - Delete one or more UI Favorite(s).
- Focus on List Panel - Puts program input focus on the Scripts List box panel. Useful for remote controller operation.
- Menu Bar - Toggle Show/Hide - Toggles the visibility (show/hide) of the menu bar. If you hide it, you'll need the keyboard shortcut (Ctrl + Alt + M) to restore it.
UI Favorites
UI (User Interface) Favorites provides a way, in a couple clicks, to swap from Touchscreen mode to Standard mode (or any custom UI mode you have saved). You can save any customizations you make to the Automator UI as a UI Favorite. Then when you start the program in the future, you can restore the Automator UI via View > User Interface Favorites > Pick UI Favorite menu.
There are some UI Favorites created automatically that you can use without having to customize any UI features.
Predefined UI Modes
- UI Standard Mode - Restores the UI for standard mouse and keyboard operations. (Figure 1) Note: You can use Standard UI on a tablet, but the buttons will be too small to press with a finger.
- UI Touchscreen Mode - Sets the UI for Tablet and Touchscreen devices by scaling some controls and setting larger font sizes. (Figure 2)
- UI Remote Control Mode - Very similar to the UI Touchscreen mode with subtle differences tailored for remote control devices .
Useful Touchscreen Controls
Script List Item Selection tool bar
This toolbar may be especially useful for navigating and selecting a Script to run. These buttons moves the list cursor to change the current Script selection in the list. Buttons (Figure 3, from left to right): Up One, Down One, Page Up, Page Down, Focus List Items.
