
 Video Mill : User's Guide
 Contents
 Language
 Product Home
Resize / Relocation Tool
 Page Bottom
The Size / Location Tool provides functions to resize and relocate an Element rectangle within a Container rectangle. Resize the tool window as needed to ensure that the full size of the container is exposed.
Mouse Operation
- Relocate - Click on the Element rectangle with the mouse and drag it to relocate its position within its container.
-
Resize - Click on the resize handle with the mouse (
 red square at the bottom, right corner of the Element rectangle) and drag it to resize the rectangle.
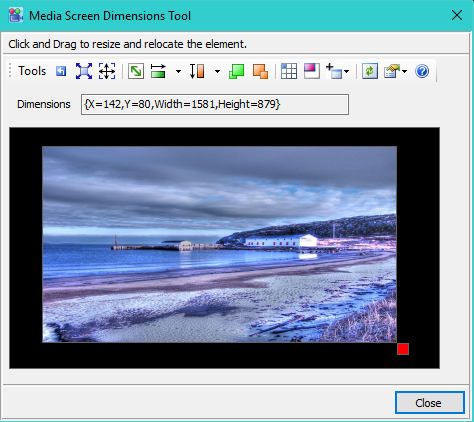
Figure 1. Size / Location Tool
Tool Bar Functions
- Reset to Original - Resets the Element rectangle to its original Location and Size before editing was performed.
- Fill Container - Set the Element rectangle to the size of the Container.
- Fit, Preserve Aspect Ratio - Fits the Element rectangle to fit the width of the Container while preserving the Element's Aspect Ratio*. The Element's height may not fill the container height.
- Resize to Aspect Ratio - Resizes the Element's height based on the current Element's width. The resulting rectangle's aspect ratio will equal the Current Selected Aspect Ratio*.
-
Set Width - Various functions to set the Element's width.
- Width 25%, 50%, 75%, 100% - These set the Element's width to the specified percent of the Container's width.
- Set Width in Percent - You specify a width in percent, expressed in decimal format (via input dialog). The Element's width is set to the specified percent of the Container's width.
- Set Width in Pixels - You specify a width in pixels (via input dialog). The Element's width is set to the specified value in pixels.
- Set Width and Height in Percent - You specify a scale factor in percent, expressed in decimal format (via input dialog). The Element's size (width AND height) is set to the specified percent of the Container's size. A percent greater than 1.0 (=100%) increases the element to a size larger than the container size.
-
Set Height - Various functions to set the Element's Height.
- Height 25%, 50%, 75%, 100% - These set the Element's Height to the specified percent of the Container's Height.
- Set Height in Percent - You specify a Height in percent, expressed in decimal format (via input dialog). The Element's Height is set to the specified percent of the Container's Height.
- Set Height in Pixels - You specify a Height in pixels (via input dialog). The Element's Height is set to the specified value in pixels.
- Expand Size - The Element is increased in size in both Width and Height in pixels. The amount of pixels can be set in the Preferences menu.
- Contract Size - The Element is decreased in size in both Width and Height in pixels. The amount of pixels can be set in the Preferences menu.
- Align to Container - Will change to location of the Element based on the alignment selected via the Alignment Selection Tool.
- Move to (0,0) - Move the Element location to X,Y (0,0) -- the upper left corner of the Container.
-
Move Location - Functions to move the Element's location a small distance in a horizontal, vertical or diagonal direction. Press an hold the assigned keyboard shortcuts to repeat the move continuously.
- Up, Down, Left, Right, and Diagonal Moves - The amount of pixels to move with each key press can be set in the Preferences menu.
- Move to X,Y Location - - You specify the location in pixels (via input dialog). The Element's location is moved to the specified location.
- Refresh - Click this button if the obejcts you are resizing and relocating need to be refreshed with the current values of this tool.
-
Preferences
- Change Expand/Contract Amount - Changes the number of pixels used by the Expand/Contract functions.
- Change Move Amount - Changes the number of pixels used by the Move Location functions.
- Set Sample Image - You can select a Sample Image to fill the Element's rectangle if desired. (via File Browse dialog).
- Clear Sample Image - Resets the Element rectangle back to a solid colored box.
- Sample Image Layout - You can change how the Sample Image is rendered inside the Element rectangle. Some values may produce a flicker effect when resizing the Element.
- Set Color Scheme - You can change the colors used to fill the Element (Foreground color) and the Container (Background color). (via color group dialog)
- Select a Popular Aspect Ratio - Sets the Current Aspect Ratio* to a common/popular aspect ratio (via selection dialog).
- Set a Custom Aspect Ratio - Sets the Current Aspect Ratio* to a custom aspect ratio that you enter via input dialog (decimal format, see terms below).
- Show Current Aspect Ratio - Shows the Current Aspect Ratio* that is in effect. (via status bar message).
- Apply App Toolbar Scaling - Turns on an off Toolbar Scaling for this tool. When turned on, the current scale factor from the App main View menu is used.
Terms
- * Aspect Ratio - The ratio of Width to Height expressed as a decimal number. (Width divided by Height)
 To Page Top