
 Video Mill : Knowledge Base
 Contents
 Language
 Product Home
USB Connected Displays
 Page Bottom
How Target Displays Are Acquired
When you attach a display to a graphics card port (ex. HDMI port) for the first time, Windows will search for the display's device driver information and will typically creates a device record in the Windows EDID database. Thus Windows will keep a permanent record of the display. VideoMill uses the EDID data to prime its Target Displays list. Whenever a new display is attached/detected, VideoMill will add a new Target Display to its list of displays.
 To Page Top
Special Consideration for USB Connected Displays
When you connect a Display via USB (or to a USB hub), Windows does not create a permanent EDID record as described above. Every time the computer is rebooted, Windows will assign a new, temporary device id for USB displays for the session. The result is that VideoMill will see it as a new device and create a new Target Display id for it.
Problems To Resolve
So if a new Target Display id is created for each USB display on every reboot, there are two problems to resolve.
First, any Media Items that references the display will need to assign the new Target Display id. If you have a lot of Media Items, that can be an unwanted chore. But you can mitigate the issue by using Virtual Display ids (see next section).
Second, Target Displays will accumulate in the Video Mill displays list. Target Displays from old sessions are no longer valid so you want to eliminate them from the list. To avoid accumulating Target Displays, go to Tools > Options. Pick the Screens(2) Options tab and UNcheck the Keep Record of Recent Displays option.
You can remove old Target Displays from the list manually by clicking Tools > Displays > Manage Physical Displays.
Using Virtual Display Ids
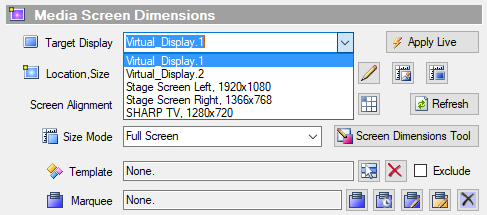
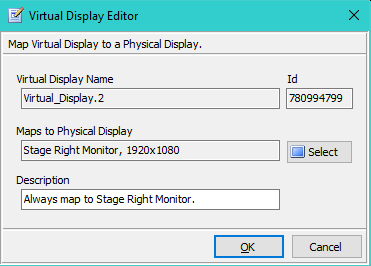
Virtual Displays allows you to create alias Target Displays that can be reassigned at any time. So in the Media Item's Media Screen Dimensions (Figure 1), you set the Target Display to a Virtual Display. Then the Virtual Display can be configured to point to any physical display (Figure 2, click Tools > Displays > Manage Virtual Displays). See the Virtual Displays Help page for full details and usage.
For example, let's assume you have 20 Media Items that use Virtual_Display.1 . If you want all those Media Items to be displayed on the Stage-Left display, you simply set the Virtual_Display.1 mapping to physical Stage-Left display. It just takes a few clicks instead of having to re-edit 20 Media Items.
 For More Information
November 12, 2021