
 Video Mill : Knowledge Base
 Contents
 Language
 Product Home
Synchronize Multiple Media Screens on 1 or 2 Computers
 Page Bottom
Requirement 1 - Sync 3 Videos on 1 Computer
You need to play multiple videos simultaneously and each video on its own display device. The videos need to be synchronized so that they start at the same instant. In this solution we will discuss syncing 3 videos, but the process of syncing any number of videos is the same. Assume the videos are named Video-A, Video-B and Video-C.
IMPORTANT - Make sure the program for set to Multi-Screen mode. Multi-Screen mode allows multiple screens to load and play simultaneously. Go to Behavior > Screens Mode. Clicking this menu item will toggle the mode between Single-Screen and Multi-Screen mode.
 To Page Top
Background - Separating Load from Play
Synchronizing videos has some special considerations. Unlike a hardware solution that can cost thousands, a computer can only do one thing at a time (or a few things at a time depending on how your CPU is threaded). When you Play a video with Videomill, it has several tasks to perform:
Load tasks
- Windows OS has to create a window for the Media Screen. This is the most time consuming task.
- The video file is read into memory (RAM) from physical storage media (storage drive).
- Your video's first frame is Loaded into a drawing surface in that window.
Play tasks
- Play operation waits for the Load tasks to complete.
- Playback code begins rendering pixels onto the drawing surface for each video frame.
If you do not pre-load a video before starting Play, Video Mill will automatically do the Load first. The Load tasks take time, so to sync multiple videos, you may need to separate the Load and Play tasks. You can Load all videos first. Then once all loads are completed, start the Play operation. This will improve the sync of your videos.
Other Load speed considerations
- Video format type - Some Klite codecs are better than others in terms of speed, efficiency and capability (the MP4 codec seems like the best, in our opinion).
- Video resolution - Higher resolution files take more time to load (ie 1080p vs 4K videos) and require pushing more data (pixels) from computer to display. If your displays are 1080p, convert any 4K videos to 1080 for faster processing.
- Device drivers - Each display type uses a different driver and some may be better than others.
- USB connection - USB connected devices may be slower than direct connected HDMI displays due to data transfer limits. Each USB version increased to faster transfer speeds, USB-C being the fastest at the time of this writing. And the number of displays connected to one USB port increases the data being transferred through the USB cable.
- Hardrive type - SSDs (solid state drives) will load video files faster than HDD (hard disk drives). It's a simple case of hardware read speed from physical storage media to memory (RAM).
- Network vs Local drive - Local drive files will load faster than a file that resides on a network.
- Apps running - An idle computer (only running OS housekeeping processes) will typically utilize 1-3% CPU and 0% Disk. Check this on the Performance tab of the Windows Task Manager (right-click on the Windows Taskbar to open it). If either of these utilization values is significantly higher, try closing any unnecessary apps that are running. A freshly booted Windows can take 10 minutes or more to finish daily OS housekeeping, so boot the system early so these tasks are completed before performance time.
What Shows After Pre-Load
When you Load a video, it is opened on the drawing surface of the Media Screen at the first frame of the video (assuming you set it to start play at the beginning). There may be cases when you want the Media Screen to be blank after Load. The easiest way to achieve that is to make the first few frames of the video a simple black background. Or you can make it a Title screen for the video.
Pre-Load Videos
The first step is to preload all the Media Screens before we begin playing. In the Automator, we create a script to load the videos (Listing 1). The time it takes to complete this pre-load script depends on several factors: The size/resolution of the videos (in megabytes and video width,height); The speed of your computer hardware (CPU, RAM memory and disk speed); Display device characteristics; other processes running on the computer that consume resources, etc.
Add the Load Steps
- In the Automator, create a new script. Menu: Edit Script > New Script.
- Edit the script. Select the script in the Automator script list (left column).
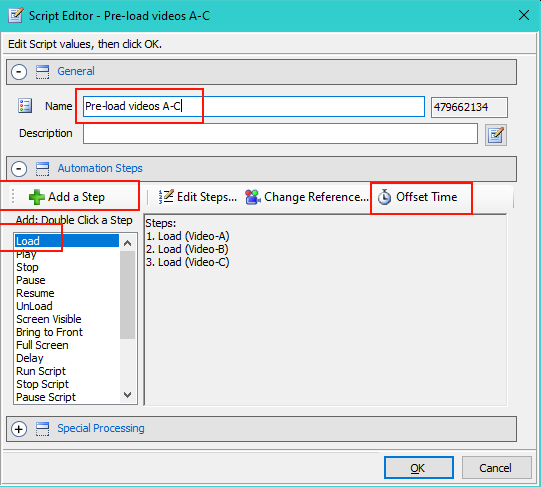
- Now click Menu: Edit Script > Edit Script. Opens the Script Editor. (Figure 1)
- Give the script a logical Name.
- Select the "Load" step type.
- Click "Add A Step" button. 'Select Media Items' dialog pops up.
- Select the videos you want to Load. Click Ok.
- Load Steps are now added. (Listing 1) Click Ok to close the Script Editor.
Listing 1. Pre-load videos A-CScript: Pre-load videos A-C Id: 706545749 Steps: 1. Load (Video-A) 2. Load (Video-B) 3. Load (Video-C)
Start Play Simultaneously
Once all the preloads are complete, when you start playback, the videos should start in-sync. The script in Listing 2 will start the 3 Plays simultaneously. The Offset time applied to a step, tells Videomill to execute a step, x seconds after the Script begins to run. 'Offset=:00' means execute immediately when the script starts. If you don't apply Offsets, the videos will play sequentially like a standard playlist.
Add the Play Steps
- Follow the instructions in the 'Pre-Load Videos' above. But for 'step type' select 'Play'.
- Once the Play steps are added, set the Offset Times.
- Click the Offset Time button. (Figure 1)
- Next the 'Apply Offset Time' dialog pops up. Click 'Enable'. Click OK.
- Next the 'Set Offset Time' dialog pops up. Leave the time at 00:00:00. Click OK.
- Next the 'Select Steps' dialog pops up. Pick the steps you want to enable. Click OK.
Listing 2. Play videos A-CScript: Play videos A-C Id: 647772154 Steps: 1. Play (Video-A), Offset: :00 2. Play (Video-B), Offset: :00 3. Play (Video-C), Offset: :00
Maximum Number of Simultaneous Videos
Each computer system has a limit on the number of simultaneous videos it can play. Depending of the system speed characteristics, one video may take under 5% of CPU (or 10% or more). Once the CPU utilization maxes out near 100%, videos will begin dropping frames to keep up (giving the videos a stuttered appearance). The only way to know the maximum number of videos you computer can play simultaneously, is to test it and watch the CPU utilization in the windows task manager. There are also some "Performance Tips" at that link for squeezing extra performance from your computer.
Use a Master Script to Combine the Pre-Load and Play Scripts
To coordinate the above scripts, we need use a master script to run them (Listing 3). The Delay(:05) step allows time for the videos to complete loading. You can adjust that number of seconds up or down based on how loading performs on your system.
Listing 3. Master PreLoad and Play A-CScript: Master PreLoad and Play A-C Id: 1694711896 Steps: 1. Run Script (Pre-load videos A-C) 2. Delay (:05) 3. Run Script (Play videos A-C)
Requirement 2 - Syncing Videomill On 2 Computers
You may want to sync playback between 2 (or more) computers. In that case, you would duplicate the above scripts on Computer2 (C2 Listing 4-6). Assume the videos on C2 are named Video-D, Video-E and Video-F.
Scripts on Computer2 (C2).
Listing 4. Pre-load videos D-FScript: Pre-load videos D-F Id: 2023637069 Steps: 1. Load (Video-D) 2. Load (Video-E) 3. Load (Video-F)
Listing 5. Play videos D-FScript: Play videos D-F Id: 535504733 Steps: 1. Play (Video-D), Offset: :00 2. Play (Video-E), Offset: :00 3. Play (Video-F), Offset: :00
Listing 6. Master PreLoad and Play D-FScript: Master PreLoad and Play D-F Id: 968301763 Steps: 1. Run Script (Pre-load videos D-F) 2. Delay (:05) 3. Run Script (Play videos D-F)
How to send the start command to Computer2.
Now that we have similar Videomill setups on Computers C1 and C2, we need to send a command to C2 to start when C1 starts.
So on C1, we revise 'Master PreLoad and Play A-C' Script (Listing 7). We added a Start Ext.Program (IPC Sendto) command. That sends an IPC command to VideoMill on C2 to run the script with Id=968301763 (Runscript 968301763).
Listing 7. Master PreLoad and Play A-C (revised)Script: Master PreLoad and Play A-C Id: 1694711896 Steps: 1. Start Ext.Program (IPC Sendto: VideoMill on C2), Var: Runscript 968301763 2. Run Script (Pre-load videos A-C) 3. Delay (:05) 4. Run Script (Play videos A-C)
IPC Setups on 2 Computers (C1/C2)
The IPC setup for this 2 Computer solution is shown in Figure 2. Your IP addresses will vary of course. The default port number for Videomill is 52011 but you can change the port if that port is already in use on your system.
 For More Information
- IPC: Inter-Process Communications User's Guide page.
- IPC Setup Demo video.
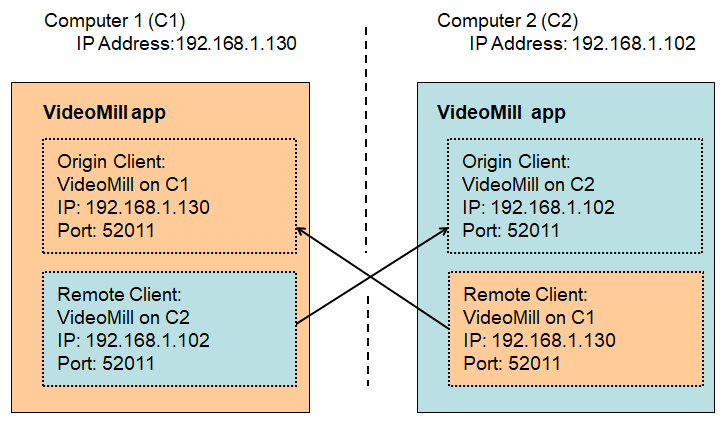
Figure 3 shows the IPC Client Editor for the Remote Client (bottom left) in Figure 2.
