Remote Media Manager (RMM) : User's Guide
 Contents
 Language
 Product Home
Cue Groups
 Page Bottom
Overview
 Cue Groups allow you to perform Play actions (Play, Stop, Pause, Resume) on multiple of Cues with one click. This will give you virtually simultaneous sync for starting multiple Cues at once on one or more remote computers.
How It Works
- Create a Cue Group - The group will contain multipe Cues (any number) from the Cuelist.
- Select the Group as Current Cue Group - When Cue Group Mode is active, actions will be performed using the Current Cue Group.
- Set Cue Group Mode to Active - This tells RMM to perform Play actions using the Current Cue Group.
- Click Play - When you click an action button, the action is performed on all Cues in the Cue Group.
Note on Player/Voice features: Cue Group Mode is not compatible with running the Player or Voice features. You will be prompted to confirm proceeding with Cue Group Mode and the Player or Voice features will be stopped if needed.
Performance
When we say Cue Groups offer "virtually simultaneous sync" we mean close to simultaneous. Benchmarks showed there is typically less than a millisecond (ms) between the play signals sent for each cue. Occasional cases of 1-3 milliseconds was measured. Windows system processes sometimes steal cycles from running apps. This is only the amount of time it takes to send the action command to a remote computer. How much time the remote computer takes to start media playback, is a separate (and probably a bigger) time consideration.
Benchmarks were done on an i5 CPU(2.5Ghz) computer. Every computer will vary based on CPU, motherboard speeds, Windows system load, etc.
 To Page Top
Cue Group Action Buttons
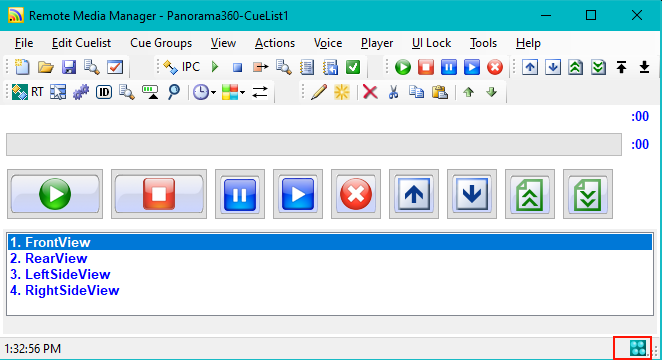
When Cue Group Mode is active these buttons will perform Cue Group actions (Figure 1, Play, Stop, Pause, Resume; Figure 2 Play Actions toolbar). This includes the associated Actions menu items and their keyboard shortcut keys. For example, click the Play button and all the cues in the Current Cue Group will play (Listing 1).


Note: Cancel All is NOT a Cue Group action (toolbar button: red circle with white 'X').
Cue Groups menu items
Menu items
- Cue Group Mode (toggle) - Clicking this menu item toggles Cue Group Mode between 'Active' and 'Off'. When Active the Cue Group icon will appear on the RMM status bar (Figure 3).
- Edit and Manage Groups - Pops up a list dialog to manage the Cue Groups. Add (create) new groups, Duplicate a selected group, Remove a selected group, and Edit a selected group. Edit will open the Cue Group Editor (below).
- Select Current Cue Group - Pops up a pick list of groups to select the Current Cue Group.
- View Current Group - Pops up a view dialog to see the contents of the Current Cue Group.
- Current Group Status - Shows the name of the Current Cue Group on the RMM status bar.
- View a Group by Selection - Pops up a pick list of all groups to select one (or more) that you want to view.
Cue Group Editor
To edit a Cue Group, click Cue Groups > Edit and Manage Groups. select a Cue Group in the list, then click the Edit button. If you are creating a new group, click the Add button, select the new group, then click Edit. The Cue Group Editor (Figure 4) will open. If you make a mistake, just cancel the dialog and reopen it.
Cue Group Editor
- Group Name - The name of the group. It will be used for menu selections so keep it short but descriptive.
- Group Id - The unique id of the group.
-
Cues In Group - The Cues contained in this group are listed in the text box.
- Add - Pops up a multi-selection list of Cues to add to the group.
- Remove - Pops up a multi-selection list of Cues to remove to the group.
- Remove All - Clears the list of Cues to start over.
- Reorder - Pops up a reorder dialog to reorder the position of Cues in the group. Cues are processed in the order they are listed. If a millisecond makes a difference in your project, you can try to reposition the Cues. (see Performance above)
-
Source List - This identifies the source Cuelist the group was created from. When you set this group as the Current Cue Group, if this Id does not match the Cuelist Id, you will get a warning message and the Cues in the group will likely show as "Not Found". Despite the warning, if the group Cues are found in the current Cuelist, it will work as expected.
- Source Name - Source Cuelist Name. (for documentation)
- Source Id - Source Cuelist Id. Should match Cuelist Id that the group was created from.
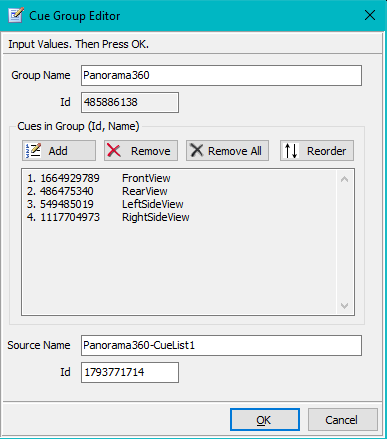
Listing 1. Cue Group DescriptionCue Group: Name: Panorama360 Id: 485886138 Source List Id, Name: 1793771714, Panorama360-CueList1 Cues in Group: Id, Name 1. 1664929789 FrontView 2. 486475340 RearView 3. 549485019 LeftSideView 4. 1117704973 RightSideView
Targeting Different Computers
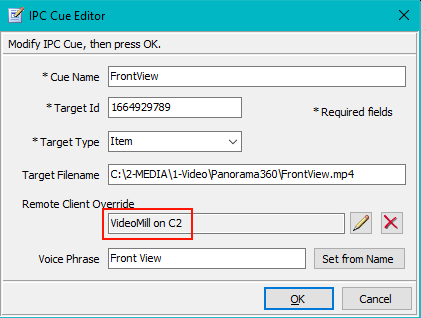
By default all Cue actions are sent to the RMM Target Remote Client selected on the Remote Tools toolbar (or in Tools > Remote Tools > Select Target Remote Client) menu item. If you want some Cue actions directed to a different client computer, set the Cue's Remote Client Override value with the Cue Editor (Figure 6)(click Edit Cuelist > Edit Selected Cue).

Cue Group Multi-Computer Example
Example Setup
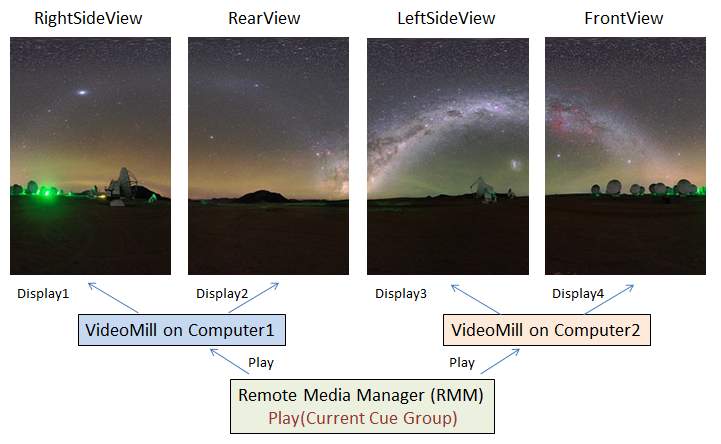
Assume you have 2 computers (C1 and C2) with Videomill on each one (Figure 7). You have 4 videos you want to play in sync. You want Videomill on C1 to play RightSideView and RearView videos. You want Videomill on C2 to play LeftSideView and FrontView videos.
- You create 2 IPC Remote Clients ('Videomill on C1' and 'Videomill on C2').
- You create the Cue Group as shown in Figure 4. It includes 4 cues (RightSideView, RearView, LeftSideView and FrontView).
- You set the RMM Target Remote Client to 'Videomill on C1'. All cues without a Remote Client Override will be sent to the Target Remote Client by default.
- Then on the Cues for LeftSideView and FrontView, you edit those 2 Cues to set Remote Client Override to 'Videomill on C2' (Figure 6).