Player
About Player
Two Player Modes
- Playlist AND User Requests - Player will operate as a standard music player playing cues sequentially as a playlist (or optionally shuffled). If a user requests a music track, it will play after the current playing track ends. If you want to prevent user requests, simply hide the Add Request button on the user interface.
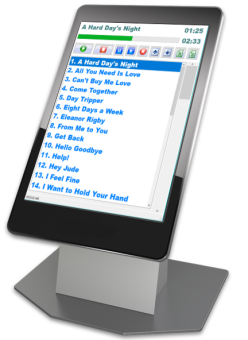
- User Requests Only (Music Jukebox) - Mimics the operation of a music jukebox machine with users requesting music tracks to play (Figure 1 kiosk user interface). When no requests are waiting to be played, the player remains idle.
Player Operation
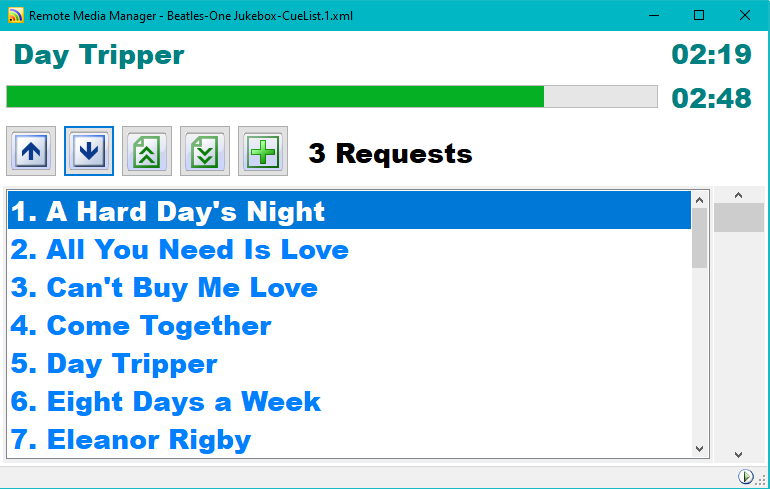
- Users add a Play Request to the Request Queue by selecting an item in the list, then clicking the Add Request button (Figure 1, green plus sign). If the item is already in the queue, a message is shown on the status bar at the bottom.
- Requests are played in the order that they are added.
- The current number of Requests in the queue is displayed to the right of the Add Request button.
- Status of the current playing item is shown at the top: Item name; current play position time; and item length (duration).
- Progress bar indicates either: 1) Current Play Position Time or 2) Time Remaining.(Figure 2) Mouse click on the play position time readout (on the right) to toggle between these two time modes.
For Music Jukebox mode
You generally want to hide the play buttons (Play, Stop, Pause, Resume and Cancel All) otherwise one user will be able to cancel the playing request of another user (Figure 1).
Player Options
Player behavior is set in the Options > Voice/Player tab.


Player Menu Items
Menu Items
-
Start - Starts the Player. While the Player is running, the Player mode icon (
 ) will appear on the app statusbar (Figure 1 bottom right) .
 - Stop - Stops the Player.
- Pause - Pauses the Player.
- Resume - Resumes the Player.
- Clear Requests - Empties the Requests Queue.
- View Requests Queue - View the items in the Requests Queue.
- Add Multiple Requests - Pops up a list of Cues available. You can do single or multi-selections to add to the Requests Queue.
- Add Selected Item to Requests - The selected Cue is added to the Requests Queue.
- View Player Status - Lists: Player options in effect; Cues in the Requests Queue; and Cues waiting in the playlist in the order they will be played.
- View Play Log - List all cues that have been played during the program session. It includes Cues played by the Player and those that were played manually as well as.
Player Operation
See Menu Items above.
Setup Steps
- Start RMM and Sound Mill. (Or Video Mill if you are playing videos.)
- Start IPC on both RMM and Sound Mill. (assumes you have already set up the IPC clients on both apps.)
- Open a Cuelist file in RMM.
- Sync RMM and Sound Mill. Click Tools > Remote System Controls > Sync Remote Source List to Cuelist. This is the same as manually opening the Soundlist file in Sound Mill.
- Add any Player Requests to the Requests Queue.
- Now start the Player from the menu.
Note: Sound Mill or Video Mill can be installed on a remote computer, or on the same computer as RMM. Setup is essentially the same.
How to
- Stop the current playing item - Click the Stop All action button (or from the menu). The next request in the Requests Queue will begin playing.
Player Configuration - User Interface
UI Features Visibility
Depending on the level of access you want to grant users, you can optionally show/hide any of the play control buttons in the Options. You can toggle show/hide of the main menu bar with the Ctrl+M keyboard shortcut. You can toggle show/hide of toolbars under the view menu. The UI can also be locked with the Admin password.
Fonts (Family and Size) and Colors
You can customize the font typeface and size and colors (foreground and background colors) of several features of the user interface (UI). These include: the items selection panel; the current playing item status information (name, times); and the number of requests text.
Wide Scrollbar for Touch Screen
Most of the UI is Touch Screen enabled by default. A wide vertical scrollbar can be made visibile to scroll the items list. (Figure 1 right side of app window)
Start Player On Program Start-Up
You may want to start the Player automatically when the program is started. To do so, you need to make sure the follow setup is performed.
Setup Steps - Soundmill Or Videomill
- Start the program (Soundmill Or Videomill). This must be done prior to starting RMM.
- Start IPC (IPC can be auto-started, see Options). This assumes you have already setup the IPC Remote Client to talk to RMM.
- Open the media file (Soundlist .SLT or Medialist .MLT) that is associated with the RMM Cuelist that you plan to use.
Setup Steps - RMM
- In the General Options > On Program Start-Up, check the checkboxes for: 1) Start IPC and 2) Start Player. This assumes you have already setup the IPC Remote Client to talk to Soundmill Or Videomill. The most recent selected Remote Client will be used.
- Decide which user interface (UI) controls you want available to Player users. Once you set the visibility of the controls, the UI will be the same when you restart the program.
- The Player will not start unless a Cuelist file is opened. So you need to start RMM so it opens an initial Cuelist file on start-up. There are a few ways to do this. See the Program Start-Up Methods page.
- After setting the above options, the Player should begin playing as soon as you start RMM.
 Page Bottom
 To Page Top