
 Net Comms : User's Guide
 Contents
 Language
 Product Home
Quick Start
 Page Bottom
This Quick Start assumes you are already familiar with SoundMill or VideoMill.
Basic Operation
NetComms works with a Cue List that is associated with a Sound List (SoundMill sound items) or Media List (VideoMill media items). Each Cue in the Cue List targets a media item or a script (playlist of media items). SoundMill and VideoMill allow you to create the NetComms CueList very quickly by selecting a set of media items and/or scripts, then export it to a file. The CueList is then Imported into NetComms.
Cue Target Types
- Item - Targets a Media Item (or Sound Item).
- Script - Targets an automation Script (ie. playlist).
NetComms uses IPC to cummunicate with SoundMill and VideoMill. This requires a one-time IPC setup to configure IP addresses and port numbers. Once IPC has been configured, you simply Start IPC, select a CueList and you are ready to go.
1. Create a Cue List
Start SoundMill or VideoMill and open a Sound List or Media List. Go to Tools > Automation > IPC > Create Cue List for Net Comms. This will open the Cue List Creator. When done creating the list, export it to a file.

2. Import the Cue List into NetComms
Open NetComms and click File > Import Cue List to import the list created in step #1.
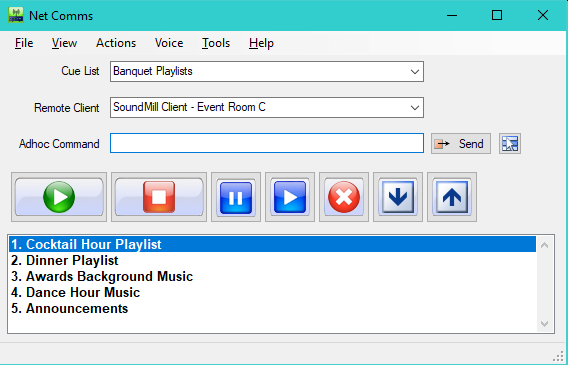
3. Select the Cue List
At program start-up, the most recently used Cue List is selected. To select another Cue List, select a Cue List with the Cue List pulldown selector (Figure 2). The Cues will fill the list box below the panel of play action buttons.
SoundMill or VideoMill should be started. Then open the Sound List or Media List that is associated with the selected Cue List. (You may have already completed this in step #1)
4. Select the Target Remote Client
In Figure 2, select a Remote Client with the Remote Client pulldown selector. This is where commands will be sent when you click the action buttons.
5. Start IPC
Assuming you have already configured the IPC Clients, this will open a network communications connection between the NetComms tool and SoundMill and/or VideoMill. IPC must also be started in SoundMill and/or VideoMill or the connection will fail.
6. Select a Cue
In Figure 2, select a cue in the Cues listbox at the bottom of the NetComms app window.
7. Click the Play button
 To Page Top
Play Actions buttons
The Actions buttons operated on the current selected Cue.
Actions
-
(Figure 2 buttons, left to right)
- Play - Plays the selected cue.
- Stop - Stops the selected cue.
- Pause - Pauses the selected cue.
- Resume - Resumes the selected cue.
- Cancel All - Stops ALL playing cues on the current selected Remote Client. If you are controlling multiple Remote Clients (ie both SoundMill and VideoMill), you can also use Tools > Halt All on All Remote Clients.
- Next - Selects the Next Cue in the Cue-List. (useful for touch screen)
- Move Selection Up - Selects the Next Cue in the Cue-List.
Actions menu items
Adhoc Commands
You can enter Adhoc Commands into the textbox (Figure 2). This operation does NOT operate on the current selected Cue.
- Send - Send the command in the command textbox to the selected Remote Client.
- Command Selector - Fills the textbox with a selected command -- useful if you don't recall the command syntax.
Securing the UI for Untrained Users or Kiosk
When you are allowing an untrained user to operate the program user interface (UI) you need to lock it down so they cannot get at the admin features. Make the following setting to lock down the UI. Some of these settings are optional depending on what you may or may not trust to expose to the user.
Using these settings, the program will start up with the Locked User Interface (Figure 3) and be ready and initialized to send commands to the remote clients.
In the General Options
- Check On Start-Up > Lock UI with Admin Password. Make sure you have set an Admin Password or the app will not lock the UI.
- Check On Start-Up > Hide Menu bar. Most menu items are disabled once the UI is locked except for the Lock/Unlock menu items. Keyboard shortcut Ctrl+M will toggle between show/hide the Menu bar.
- Check On Start-Up > Hide Window Border. Removes the title bar and the window Minimize/Maximize/Close boxes.
- Check On Start-Up > Show Play Button Tooltips. The Play buttons are generally universal symbols but you can turn on tooltips if you think users need them.
- Check On Start-Up > Open Full Screen. Decide if you want the app to be full screen which hides the Windows desktop.
- Check Behavior > Play button Always Stops any Current Playing Cue. Recommended for untrained user.
Other To Dos
- The program will load the most recent used Cue List on start up, so make sure the customer's Cue List is the last one selected.
- The program will select the most recent used Target Client on start up, so make sure the correct Target Client is the last one selected.
With these settings, if the user closes the program accidentally, when it is restarted it will still be in locked mode.
