
 Video Mill : User's Guide
 Contents
 Language
 Product Home
Script Editor
 Page Bottom
The Script summary is displayed on the right inside the Automation Steps group box (Figure 1). Set Script values using the Script Editor controls as follows.
General section
- Name - The Script name. A short, descriptive name is best.
-
Id - The Script Identifier (
 Id). Used to uniquely identify the Script
 - Description - A verbose description of what the Script does and any special instructions for the operator. Click the Edit Description button for a multi-line editor.
 To Page Top
Add Automation Steps
- Add a Step button - First pick a Step Type to Add from the Step Type list. Then click the Add a Step button (or just double click on the Step Type ). Some Step types will pop up a multi-selection list of Media Items to choose from. A Step is added for each selected Media Item. Some Steps will also popup a selection dialog for a parameter that will control the Step behavior. For example the Screen Visible will prompt for True or False (Visible=true shows a screen; or Visible=false hides a screen).
Newly added Steps are added at the end of the steps list. You reorder the Steps sequence by clicking the Edit Steps button.
List of Steps Types
See the Step Types section for a list of steps and their behavior.
Edit Automation Steps
- Edit Steps button - Allows you to edit existing Steps with the Step Editor including setting Offset Time controls; Reorder Steps sequential positions; and Delete Steps.
- Change Reference button - This allows you to change the Media Item that one or multiple steps are referencing. You will first be prompted to select a new target Media Item. Then you are prompted to select one or multiple Steps that will recieve the new target reference.
- Offset Time button - You can use the Step Editor to set Offset Time of individual steps. This button offers a productivity tool to set multiple steps at once. You will first be prompted to select whether you want to Enable or Disable the use of Offset Time for the step(s). If you are enabling the Offset Time, you will be prompted to enter an Offset Time value. Finally, you are prompted to select one or multiple Steps that will recieve the Offset Time change. If a selected step is a Delay step, the Offset Time value is applied as a new Delay time.
Special Processing
- Loop continuously - The Script will run continuously until it is stopped by pressing the Stop button or by some other stop method. When Loop is checked, Repeat is ignored.
- Repeat - Specifies how many times a Script should run when it is started (1 = run one time, 2 = run 2 times, etc.). After the last Step finishes, the Script restarts at the first Step.
- UnLoad Media Screens On Completion - When checked, all Media Screens that were loaded by the Script or referenced by the Script will be UnLoaded (closed) when the Script completes its run.
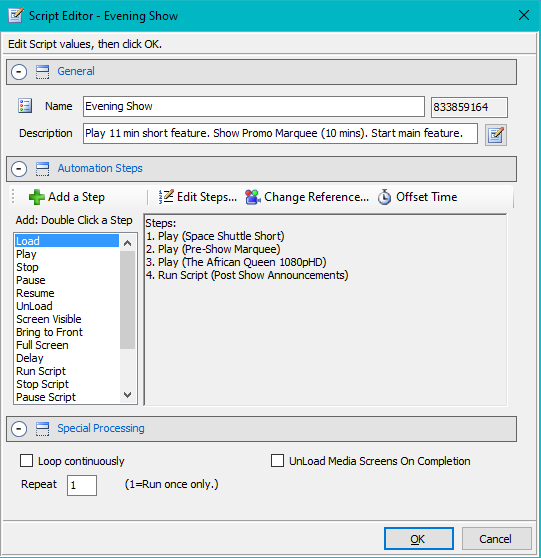
Figure 1. Script Editor