
 Sound Mill X3 : User's Guide
 Contents
 Language
 Product Home
Easy Player Basics
 Page Bottom
Overview and Uses
The Sound Mill Easy Player is designed to provide a very simple user interface (UI) that can play Sound Items and/or run Automation Scripts. It is designed for several uses:
- Operation by Wireless Remote Control Devices - Standup performers, such as magicians, story tellers, etc., may want to control Sound Mill audio from a remote control device in their pocket. The Easy Player will work with standard presentation remotes designed to run Power Point presentations or Windows Media Player; as well as programable remotes including some cell phones via a software add-in; other wireless input devices such as number keypads.
- Kiosks - You can create an audio Kiosk and allow customers or visitors to play the audio directly from any kiosk device, touch screen or laptop. Show Mode will hide all Player edit function from Kiosk users.
- Easy UI for Novice Operators - The intuitive Player user interface (UI) will allow operators who are not trained on Sound Mill to operate the sound design in show scenarios.
 To Page Top
Basic Player Operation
- Create a Sound List - Or open any existing Sound List. Then open the Easy Player window.
- Create a Playlist - Click File > New Playlist .
- Add Sound Items - You build a Playlist by adding Sound Items via Edit Playlist > Choose Sound Items for Cue Buttons .
- Rebuild Player - Rebuild the Player via Actions > Rebuild Player . A Cue Button is added to the Player Cue Button Table for every item added in the previous Step.
- Play - You can now push/click any Cue Button (via mouse click or keyboard Enter/Spacebar key) to play the associated Sound Item. The current playing Cue Button is hightlighted with a special color.
- Keyboard Navigation - You can navigate the Cue Button Table with the keyboard via the Arrow keys ( Left, Right, Up, Down arrows or Tab key). The current selected (focused) Cue Button is hightlighted.
- Playback Controls Panel - A Playback Controls Panel is provided for mouse or touch screen operation to Play, Stop, Pause, Resume and Move Focus to the Next or Previous Cue Button or use the Actions keyboard shortcuts.
- Save Playlist - Click File > Save Playlist . Playlists are saved within the Sound List file.
Player Color Theme: Change the player colors to your favorite color theme in just a few clicks.
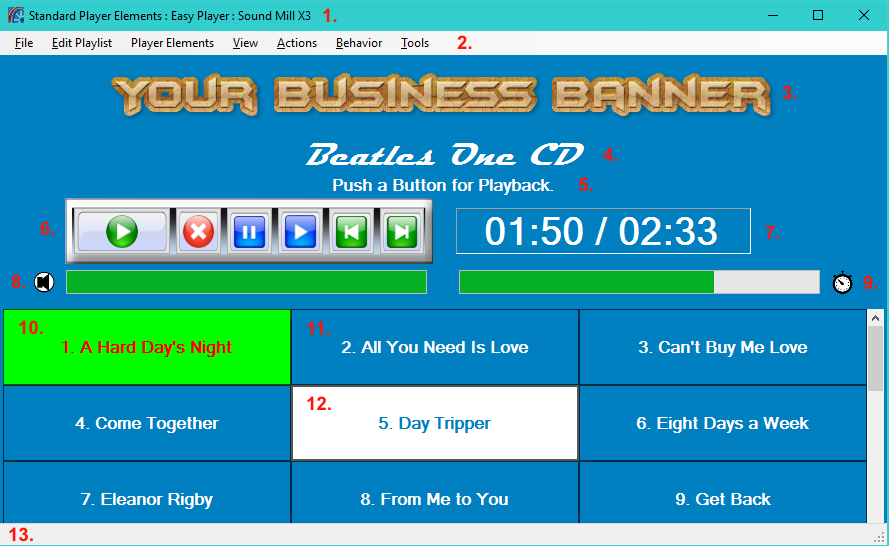
Easy Player Elements:
1. Window Title Bar;
2. Window Menu Bar;
3. Playlist Marquee Image;
4. Playlist Title;
5. Playlist Description;
6. Playback Controls Panel;
7. Playback Time Position Readout;
8. Volume Bar and Volume/Mute Indicator;
9. Playback Position Progress Bar and Playing/Paused Indicator;
10. Cue Button - Playing Cue;
11. Cue Button - Unselected;
12. Cue Button - Selected;
13. Window Status Message Bar.
Solo Performer - Easy Player Configuration
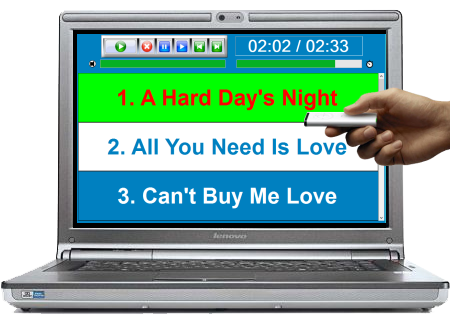
A Solo Performer using a pocket remote control device will want to be able to read the Player Cue Buttons from a distance (Figure 2). So you might want to place the laptop off stage where it is not visible to the audience. You may hide the Playlist Marquee Image, Playlist Title, Playlist Description elements to save screen realestate. Then by setting the cue button font to a large size, the cues are readable from many feet away. The playlist is configured to show only one column of buttons and three rows. With three rows showing, the Previous Cue, Current Playing Cue and Next Cue are visible. Using the remote Next and Previous buttons you can scroll through the playlist to pick the next cue to play so you can skip around. The current playing cue is highlighted (in green). The current selected cue is highlighted (in white) and it will start playing when the remote Play button is pressed. One of more ad-hoc sounds can be setup to play when a specific button on the remote is pushed (for example a laugh track, buzzer, etc.). The playback time readout tells you exactly how much time until the playing cue is finished -- pick either time played or time remaining. The volume bar shows the current volume for the cue.
Kiosks - Visual Customization of Player
The visual look/feel of the Player is completely customizable including: a Player Background Image, a Marquee Image, Title, and Description. Visual styling such as fonts, colors, size, spacing and more are available. In fact, each player Cue Button could have its own look/feel if you wanted/needed it. When the Player enters
Show Mode
, the Window Title bar, menu bar and status bar are hidden, leaving just the content of the player window showing to the user.
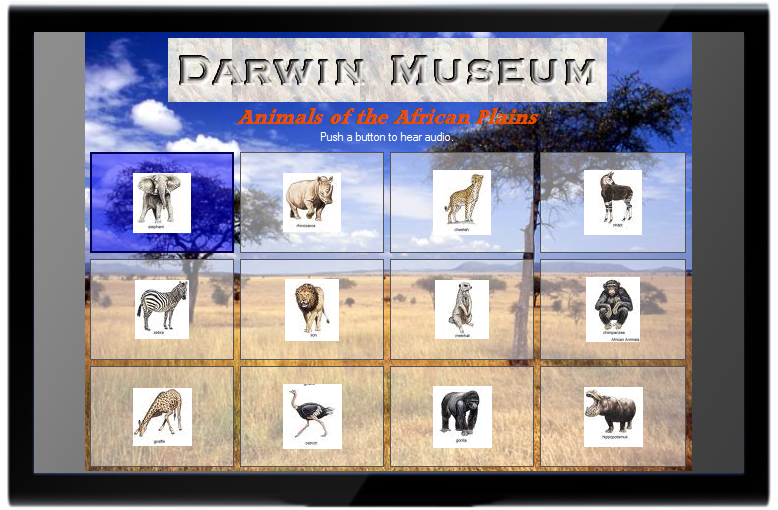
Figure 3 depicts a sample custom visual design for a touch screen museum kiosk. Each Player Cue Button has its own image and uses Opacity for a partially transparent background. There is a custom marquee image for "Darwin Museum". You can see the Elephant Cue Button is highlighted in reverse video since it is the selected Cue Button. The player has a background image of the African plains for visual impact. And the playback controls panel is hidden (as a design choice).
March 12, 2024