Video Mill : User's Guide
 Contents
 Language
 Product Home
Marquee Editor
 Page Bottom
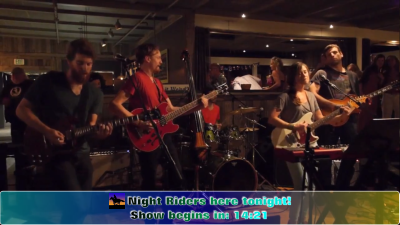
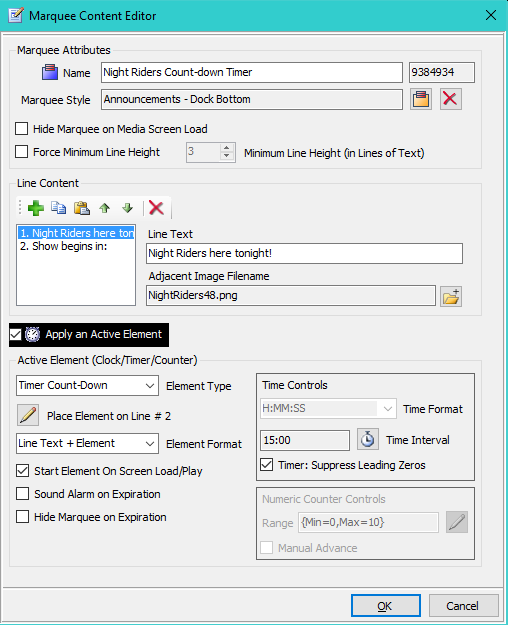
The Marquee Editor (Marquee Editor) is shown if Figure 4. It lets you define the content (text and optional image) of each line of the marquee. And you can include an active element (Clock, Count-Up/Down Timer, or a Numeric Counter). All the visual attributes (font, colors, and marquee location on the Media Screen) are acquired from a separate Marquee Style definition.
Example
Figure 3 shows a Standard Marquee with two lines of text. The first line includes a logo image (ie band logo in this case). The second line contains an active element (a count-down timer). Figure 4 shows the Marquee Editor settings for this example.
Marquee Attributes
- Name/Id - Name identifier of the Marquee. Used for menu selections. Id is the unique id number of the Marquee.
- Marquee Style - Sets the style used for this Marquee. A separate Marquee Style definition which specifies all the visual attributes (font, colors, and marquee location on the Media Screen). Pick from available styles. If you clear the style (with 'Red X' button), it will use the Default Marquee Style.
- Hide Marquee on Media Screen Load - When checked, the Marquee is hidden when the Media Screen is loaded. You need to click the Toggle Visibility button on the Marquee Runtime Tools toolbar (Figure 2) to make it visible.
- Force Minimum Line Height - When checked, the Marquee will maintain a minimum height the specified number of lines even when a message might only require one line. Use in cases where you know the longest message will require x lines and you want to maintain a consistent height of the Marquee box.
- Minimum Line Height - This is in lines of text (not pixels).

 To Page Top
Line Content
A Marquee can have as many lines a you want. The Line Content toolbar (Figure 4) lets you manage the lines of the Marquee (buttons: Add new line, Copy a line, Paste a line, Move line Up/Down, and Delete the selected line.
- Line Text - Text that appears on the selected line.
- Adjacent Image Filename - (Optional) An image that will be displayed adjacent to the line's text -- to left or right of the text. It can be any common image type (png, jpg, etc). The Marquee Style defines left or right placement.
Formatting Line Text
Auto Text Wrap - A line of text will be automatically wrapped to two lines if it is too long to fit on the Media Screen based on font size.
Line Spacing - A Line Text can be blank (no text) to create spacing between Marquee lines. However, using the Line Style Padding is the recommended approach for better control of line spacing -- it is exact to the pixel).
Indenting Text - Add as many space characters as needed at the start of the Line Text. If you change font size later, you may need to adjust the number of spaces.
Explicit Line Breaks - You can put line breaks into a Line Text by placing a <br> tag at the break point (Must be lowercase letters br, no spaces inside of brackets). No Auto Text Wrap is performed on a line that contains Line Breaks. And, you cannot use an Active Element (clock/timer/counter) on a line that contains line breaks.
Example: If Line Text is set to "Part One of a Message<br>Followed by Part Two", then it will appear on the Marquee as below.
Part One of a Message
Followed by Part Two

Active Element (Clock-Timer-Counter)
Check the Apply an Active Element checkbox (Figure 4) to include an Active Element in the Marquee. The Active Element can be a Clock, Count-Up/Down Timer, or a Numeric Counter.
Clock-Timer-Counter Edit Controls
- Apply an Active Element - When checked, an Active Element (a Clock, Timer, or Counter) will be displayed on the Marquee. When unchecked, no Active Element is used.
-
Element Type - Type of Active Element to display.
- Clock - A Clock displaying the local time of day.
- Timer Count-Down - Counts down starting from the Time Interval and stops at zero.
- Timer Count-Up - Counts up starting from zero and will stop when the Time Interval is reached. If you don't want it to stop at all, just set the Time Interval to a large amount of time (ex 24 hours).
- Play Position Time - Displays the Play Position Readout for the current selected Media Item. Only one Marquee with this type of timer will operate when the screens are loaded.
- Numeric Count-Down - Numeric counter that counts down starting from the Range High value and stops at the Range Low value.
- Numeric Count-Up - Numeric counter that counts up starting from the Range Low value and stops at the Range High value.
- Place Timer on Line # - Specifies which Marquee Line Text that the timer will be placed on.
-
Element Format - Defines how the Line Text is positioned in relation to the Active Element.
- Line Text + Element - Line Text is placed on the left of the Element. (ex Time remaining: 10:00)
- Element + Line Text - Line Text is placed on the right of the Element. (ex 10:00 Time remaining)
- Element Only - Only the Element is placed on the line. Line Text is ignored. (ex 10:00)
- Start Element On Screen Load/Play - When checked, a Element will start immediately when a Media Screen is Loaded or Played (replayed).
- Sound Alarm on Expiration - When checked, when a Timer, or Counter reaches the end of its count range, an alarm sound will play. The Alarm Audio file is specified in the Options > Screens(2) dialog.
- Hide Marquee on Expiration - When checked, when a Timer, or Counter reaches the end of its count range, the Marquee will be hidden. It can be made visible again by clicking the Toggle Marquee Visibility button on the Marquee Runtime Toolbar.
- Time Interval - The amount of time used to reset a Count timer. Important: If you specify a Count timer, the Time Interval MUST be set to a non-zero (not 0) time duration or the timer will not start! See Numeric Counter - Manual Advance below.
-
Timer: Suppress Leading Zeros - When checked, any leading zeros in the time/counter will be suppressed.
- For Timers - Examples: "00:25:59" will display as "25:59"; "00:00:59" will display as ":59".
- For Counters - Examples: "098" will display as "98"; "008" will display as "8"
- Time Format - Sets how the time is formatted when displayed. If hours or minutes are zero, a zero is displayed. This format is ignored when Suppress Leading Zeros is checked (above).
- H:MM:SS - Hours:Minutes:Seconds. Ex. 1:25:59
- H:MM - Hours:Minutes. Ex. 1:25
- M:SS - Minutes:Seconds. Ex. 25:59 (only use if Time Interval is less than one hour)
- :SS - Seconds only. Ex. :59 (only use if Time Interval is less than 60 secs)
-
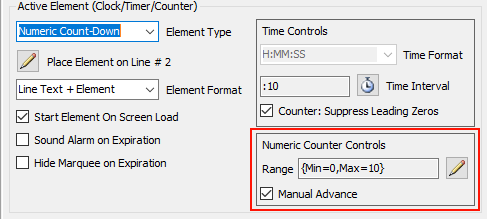
Numeric Counter attributes (Figure 5)
- Range - The counter will count through the High and Low values stopping at the end of the range.
- Manual Advance - When checked, the counter is in manual mode. Click the Marquee Start button to advance the count value. When un-checked, the counter is in automatic mode. When the Marquee Start button is clicked the counter values advance automatically. The speed of moving from value to value is determined by the Time Interval setting. Example: If Time Interval is set to 1 second, counter values will change every second.
Clock
Displays the local time of day (either AM/PM or 24 hour format). It can be displayed with or without the seconds (hh:mm or hh:mm:ss).
Figure 6 shows a 2 line Marquee with Clock on Line #2.

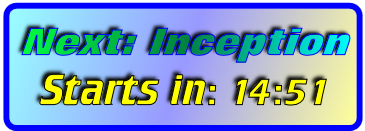
Timer
Displays a timer which updates every second (see Figure 7). Time Interval sets the total duration of the timer. It can Count-Up starting from 0:00 and ending at the time interval; Or it can Count-Down starting from the time interval down to 0:00. An optional alarm sound can be used to mark the expiration of the timer. It can be started automatically when the Media screen is loaded or started manually by clicking the Timer Start button on the Marquee Runtime toolbar .
Figure 7 shows a 2 line Marquee with Count-Down Timer on Line #2; Line Text ("Starts in:") is added to the left of the timer based on Element Format.
Numeric Counter
Displays a numeric value (Figure 8). It can Count-Up or Count-Down through the specified Numeric Range. It can be configured to count manually when you click on the Timer Start button on the Marquee Runtime toolbar (check the Manual Advance checkbox, Figure 5). Or it can count automatically based on the specified Time Interval (un-check the Manual Advance checkbox). An optional alarm sound can be used to mark the end of the counter when it reaches the end of the Range.
Figure 8 shows a Marquee with Numeric Counter (Count-Down) on Line #2; Line Text ("Items Remaining:") is added to the left of the timer based on Element Format; Numeric Range = {Low=0, High=10}.