
 Video Mill : User's Guide
 Contents
 Language
 Product Home
Media Item Options
 Page Bottom
These options control Media Item attributes and actions behavior.
Edit Settings
- Default Name for New Media Item - Name given to a New Media Item when you click the New button and there is no media file yet associated to the Media Item.
- Default Media File - Used for the Edit > Media Item > Add Default Media File to Media Item. The file can be any supported video, audio or image type.
- Create New Group for Dropped Files - If checked, when you drag and drop new Media files into Video Mill , a new Media Group is created which contains all the dropped files. And the Media Group is set as the Current Media Group.
 To Page Top
Action Behavior
- Volume Bump (Up/Down, in Percent %) - When you click the Volume Bump Up or Down menu item, volume will change by this amount (in percent).
- Fast Forward/Rewind Step Amount - When you click the Fast Forward or Rewind button on the Play Position panel, the video will advance (or rewind) by this amount of time for every click of the button. For example, setting the amount to 2 seconds advances the play position by this amount. For a frame by frame advance while paused, set the value to a fractional amount in milliseconds (1,000 milliseconds = 1 second). (Zero is not allowed. 2 seconds is the default.)
- Speed Factor Maximum - Set the maximum speed factor value for the Speed control slider. Set this to the maximum speed you will need to use. The lower the value will give you finer control over speed settings. You may want a higher value if you are scanning through a two hour movie vs a two minute video.
Text Screen Default Values
- Text Screen and Image Duration - A Duration is needed to determine how long to persist an Image or Text Screen when used as a Play Step in an automation Script; or when Fade-Out is desired. Static Image files (Jpg, Png, etc.) and Text Screens do not have an inherent time duration (time length) like video and audio. For these media types, this Default Duration time is used. If you want to apply a custom duration to an individual image Media Item, set and enable its Post-Delay time which will override the Default Duration. Changing this default value may require a Refresh All Scripts to reflect changes to a Script's Total Time Effective.
- Margins - Text Screen Theme Margins used when creating a new Text Screen Theme.
- Preview Text File - This is a sample text file (.TXT, full path) used for the Preview function in the Text Screen Theme Editor. If this is blank, a default text file is used. This allows you to use a sample text file that is close to your typical text screen (in text line width and number of lines).
- Preview App - This is a program (full path) that will be used for the Preview function in the Text Screen Theme Editor. If this is blank, the viewer program that is associated with the PNG image file type is used. The program you select must be able to accept a filename as a program start-up parameter.
Fades
These durations set the fade rate when you use any of these Behavior fade modes: Auto-Fade-In , Auto-Fade-Out or Cross Fade .
- Master Fade-In Duration - Set the duration for Fade-In of a video at the start of play.
- Master Fade-Out Duration - Set the duration for Fade-Out of a video when it reaches the end of play. Does not apply if the Stop button is clicked.
- Exclude Volume on Fades - When checked, volume is NOT faded along with video opacity (aka transparency). When unchecked, fade behavior is to fade both video opacity and volume at the same rate. Also applies to fades done with the Fader Bar.
Rate of Fade
The fade rate is determined by the Fade Duration that you set. The duration is the amount of time it will take for the fade value to change from 100% to 0%. The longer the duration, the slower the fade.
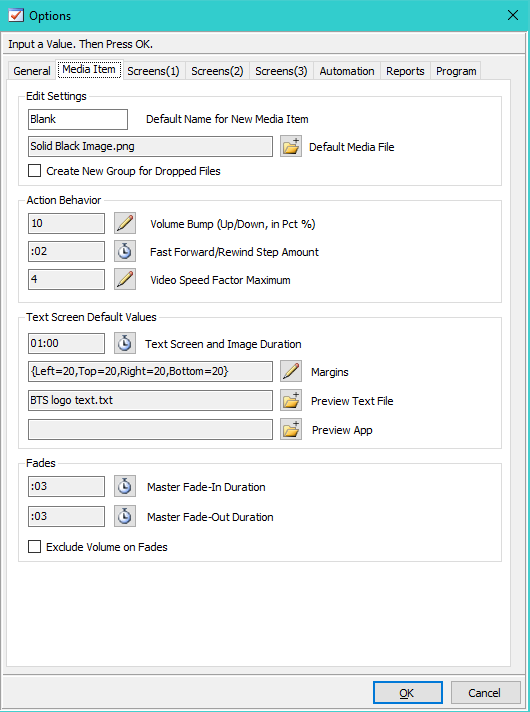
Figure 1. Media Item Options