Video Mill : User's Guide
 Contents
 Language
 Product Home
Text Screens
 Page Bottom
Overview

A Text Screen is a special type of Media Screen that displays multiple lines of text.
- The text is sourced from a standard text file (.TXT file extension, see Listing 1 example).
- The screen is formatted visually based on the settings of a Text Screen Theme. You assign the theme to a Media Item in the Screen Layout Attributes panel (Figure 2).
Text Screens provide a quick method to compose a message and present it on a visually interesting screen with minimal effort. Any Media Item with a text file for the Media File will be treated as a Text Screen. Just drap and drop a TXT file into the Media List to create a Text Screen Media Item. You can optionally select a subset of the lines in the TXT file (Figure 2). Then just load the Media Screen by clicking the Play button. The TXT file must be a local machine file -- it CANNOT be a web linked file (ex http).
A Text Screen Media Screen is treated basically the same as an image based Media Item (static image Jpg, Png, etc).
Text Screen Themes
The Text Screen Theme fonts, colors and other presentation properties are set using the Text Screen Theme Editor . You can create as many themes as you like. One theme may be applied to many Media Items. If a Text Screen Media Item does not have a theme assigned to it, then a default theme is used.
Usage scenarios
- Audience Messages - Quickly compose and display a screen of informational content to an audience.
- In-store Advertising Screens - Make them part of a playlist on an in-store kiosk.
- Lyric System - Display song lyrics for a singing group. (ex. church services, etc.)
- Musician Songs At A Glance - Display an entire song with chord tabulature on a single screen. View the song on a laptop (or secondary display) using a bold font and dark background for easy reading in a darkened venue.
- Meeting Slides - A quick alternative to creating a deck of slides when you don't have time to fuss with a presentation creation program.
Listing 1. Text File Contents Example - SunsetConcert.txtSunset Concert Series July 15 - Bikini Bottom Blues Band July 22 - Patrick's All-Stars July 29 - Krusty Krab Trio More Info: http://SunsetConcertSeries.net
 To Page Top
Creation Steps
Note: None of these steps will affect the content of the source TXT file.
Steps
-
Create a Text Screen Media Item
- Drag and drop the TXT file into the Media List.
- Or there is a menu item that will create the Media Item AND create and open a new text file for you (Edit Media Item > New Media Item > New Text Screen and Create New Text File ).
- Select a Theme - (Optional) Click the Select Theme button (Figure 2) to pick from your Favorite Themes.
- Play the Text Screen - Now click Play to display it on the Target Display.
TXT File Editing
Use your favorite text editor (ie NotePad or other text editor). The TXT file can reside in any folder. You can change the text in the TXT file at any time; Save the TXT file; then just close and reload the Media Screen to see the updates. You can use a rich-text editor (such as MS Word, WordPad, etc.) to edit the text, but you MUST Save-As a Plain Text Document. (See Listing 1 example)
Text Screen Attributes panel buttons
Text Screen Themes menu items
The Default Theme
There is always one theme designated as the Default Theme. When a Text Screen Media Item does not have a selected theme or its theme cannot be found (ie it was deleted), the Default Theme is used when you Play the Media Item.
One possible strategy for using the Default Theme, is to leave all (or most all) Media Items set to the Default Theme. Then you can change the Default Theme at any time to another one of your Favorite Themes . That one change will cause all of these Text Screens to have a new appearence when they are Played.
Menu Locator: Media List Editor > Tools > Text Screen Themes .
Menu Items
- Select Default Theme - Selects the Text Screen Theme to use as the Default Theme (via selection popup).
-
Manage Text Screen Themes - Pops up a list selector to manage your Themes.
- Edit - Opens the selected Theme in the Text Screen - Theme Editor.
- Add - Adds a new Theme to the list. You can then edit its properties with the Edit button.
- Duplicate - Makes a duplicate copy of the selected Theme.
- Remove - Removes the selected Theme from the list. If you remove a Theme that is referenced by any Media Item(s), a warning will be flagged by Media List Validation.
- Remove All - If you Remove All Themes, one Theme will be automatically created since there must be at least one template available at all times to use as a Default Theme.
- View All Themes - Pops up a list of all Text Screen Themes and their settings.
Fading Text In/Out
You can fade the text in/out using the Fader Bar. And the standard Fade-In/Fade-Out controls also apply to Text Screens. If you have set up the Theme to use a background image, the image along with the text will fade in/out. If you want to just fade the text, but leave the image visible, see the Text Screen with Background Video or Image section below.
Text Screen Time Duration
Static Image files (Jpg, Png, etc) and Text Screens do not have an inherent time duration (length) like video and audio. See Default Image / Text Screen Duration for rules on how a time duration is determined.
Formatting Tips
Formatting the Screen
Edit your text file to modify the Text Screen appearance as follows:
- Indent - Use space characters to indent a line of text. Do not use Tab characters to indent.
- Apply Margins - Use the Theme Margins settings to: precisely position the text block horizontally or vertically on the screen; and/or add padding to all four sides of the text block.
- Screen Size - See the section on How Text Screen Size is Calculated.
- Unicode Characters - Some common Unicode characters (ex ©,®,¢ etc) can be used if the Theme Text Font you select supports them (Figure 4). Fonts have very limited Unicode support. Here is a handy Unicode Table that allows you to copy any character to the Windows clipboard. Or enter a unicode character into the text file by holding the Alt key down and typing the unicode numbers. You'll need to save the TXT file in Unicode or UTF format.
- Fonts - There are additional font related tips on the Text Screen Theme Editor page.
Save Text Screen as Image File
If you want to save the Text Screen as an image file (png, jpg, etc) for other purposes, click the Screens >Screen Capture menu. For best results (ie best resolution image), set the Screen Dimensions - Size Mode to Natural Media Size.

Slide Show with Text Screens and Images
You can create an Automation Script to run a a multi-slide presentation composed of Text Screens and/or Images which will automatically move from one screen to the next in a timed sequence (similar to a Power Point presentation). You can have cross-fade transitions and accompany it with a music track if desired. See this Knowledge Base article for instructions.
Text Screen in Figure 5 uses: Background Color Gradient (3 tri-colors yellow / orange /blue); Drop Shadow (black); Text Background Mask (white).

Text Screen with Background Video or Image
You can use a Background Video with a Text Screen (Figure 6) with a couple added steps. After setting up a Text Screen as described above, follow these steps. This also works for Media Item Background Colors or Background Image. This approach will allow you to fade the text in/out using the Fader Bar while leaving the Background Video or Image visible.
Setup Steps
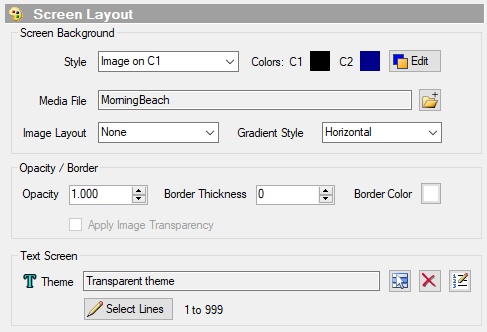
- Add a Background Video - Click the Screen Layout > Screen Background > Media File folder Browse button (Figure 2) to select a Background video (or image) for the Media Item.
- Set Screen Background Style to Video on C1. Or to Image on C1 if it is an image. (Figure 2)
- Apply a Transparent Theme - Select a Text Screen Theme that has its Backgound Style set to "Transparent".
Operation
- Sync Background Video - If you want the Background Video to begin playing immediately when the Text Screen is played, then go to Screens(2) Options > Link Background Video with Main Play Controls and check this checkbox. If you prefer to manually control the Background Video, then leave this unchecked and use the Background Video Control panel.
- Play - Click Play to open the Text Screen on the target display. The Background Video should begin playing as well.
- Background Video Controls - Use the Background Video Control panel to operate the video (pause, resume, etc).
- Fade Text In/Out - You can use the Fader Bar Fade-In/Out buttons to Fade the Text in/out manually. The Background Video play is not affected by the Fader Bar.
Limitation
A Text Screen's Background Video will NOT play when Load Template mode and/or Cross-Fade mode are active. In these modes, the Text Screen text will show in front of the Background specified by the selected Load Template.

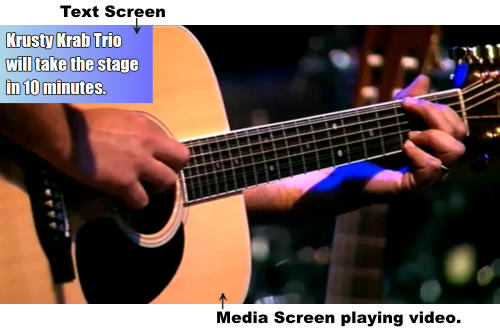
Text Screen for Adhoc Messages
A message Text Screen is an easy way to present spur of the moment audience messages (Figure 7). You would create one Text Screen Media Item dedicated to adhoc messages. Then when you have a need to present a quick message, you simple change the message text in the associated text file and save the file. After the message text is saved, just Play the Text Screen. The process literally takes just a few seconds.
Steps to Create
- Create one Text Screen Media Item. Name it something logical. (ex. Message Text Screen).
- Set its Target Display. (In the Media Screen Dimensions panel)
- Set its Size Mode to Natural Media Size.
- Set the Screen Alignment to the position where you want the Text Screen displayed.
- Create a Text Screen Theme for adhoc messages.
- The Theme Font Size and the amount of message text will determine the size of the Text Screen. Try a 36 point font size, then raise or lower the size based on how much display real estate you want it to use.
- Set other Theme settings to make it visually interesting.
- Save the Theme and assign the Theme to the Media Item in the Screen Layout Attributes panel (Figure 2).
- Set the Screens Mode to Multi-Screen. This allows you to pop-up the message Text Screen in front of any playing video Media Screen.