Full Screen Marquee
Requirement

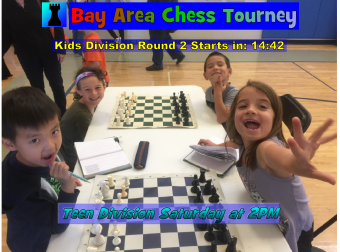
In most cases, a Marquee is docked to the top or bottom of the Media screen with all of its lines grouped close together. But you may have instances where you want the Marquee Lines to float across the full screen. Figure 1, shows a Marquee that has 3 Text Lines. Two lines are at the top of the display with the 3rd line positioned near the bottom. Line #2 has a count-down timer.
For this article, it is assumed you are already familiar with the basics of creating Marquees and Marquee Styles .
Marquee Edit
Marquee Style
The style is set to "Chess Tourney Style" created in the next section.
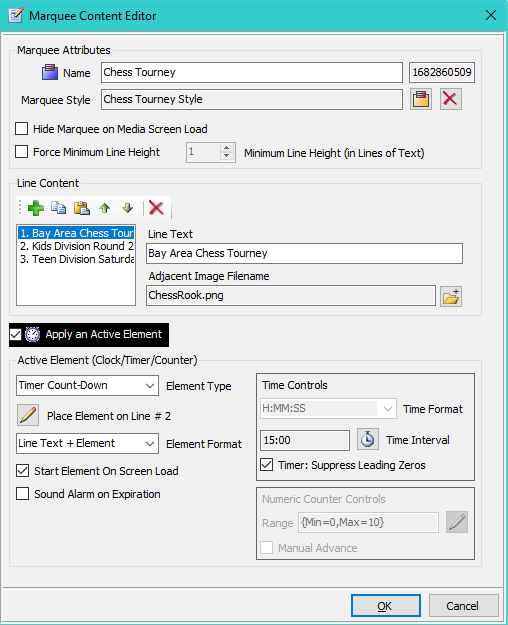
First the Marquee is edited with the Marquee Editor (Figure 2). We add 3 Lines of Text to the Line Content.
Line Text 1
- The top line.
- Text is set to "Bay Area Chess Tourney".
- It has an Adjacent Image file = ChessRook.png.
Line Text 2
- Second line from top.
- Text is set to "Kids Division Round 2 Starts in:".
- An Active Element (Count-Down Timer) placed on line #2.
Line Text 3
- The line at the bottom of the screen.
- Text is set to "Teen Division Saturday at 2PM".

Marquee Style Edit
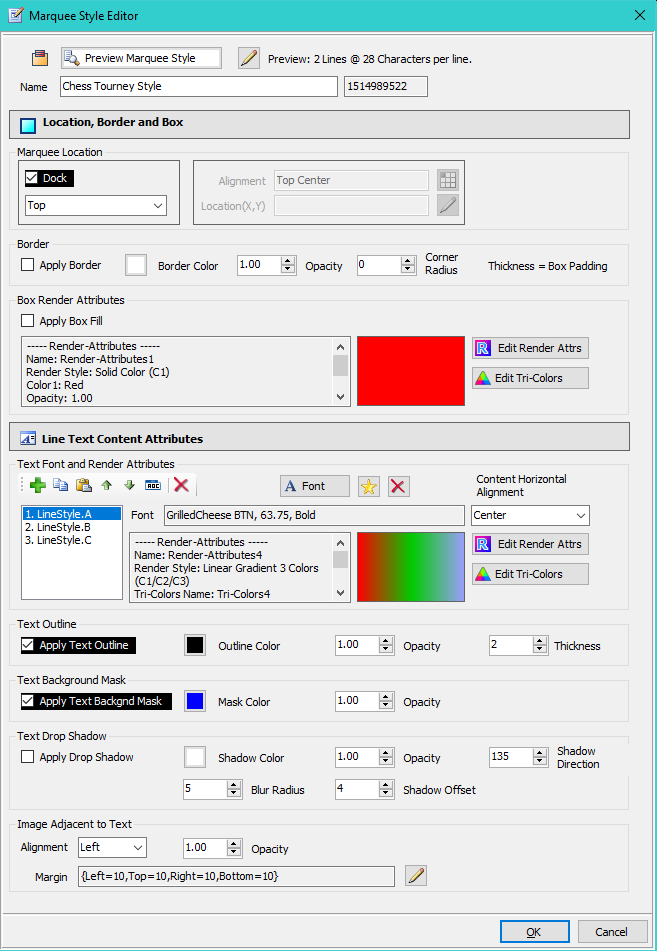
Next the Marquee Style ("Chess Tourney Style") is created with the Marquee Style Editor (Figure 3).
Marquee Location
The Marquee is docked to the top of the screen. But we could also have set it as Alignment = Top, Center.
Border and Box Fill
We do NOT Apply either a Border or Box Fill for this Marquee. Since the Marquee spans the entire display, those features would obscure the video behind the Marquee.
Line Styles
We add 3 Line Styles one for each line of Text so each line gets its own Font, Tri-Colors, and Render Attributes. Setting colors and render styles is covered in the Marquee Style Editor - Help docucment . With this type of Marquee, it is useful to use a Text Background Mask to keep the text readable as the video behind cycles between dark and light colors.
- Line Style 1 - Render Style: Linear Gradient 3 Colors (C1/C2/C3); Margin: {Left=0,Top=10,Right=0,Bottom=40} .
- Line Style 2 - Render Style: Solid Color (C1); Color1: Yellow; Margin: {Left=0,Top=0,Right=0,Bottom=650} .
- Line Style 3 - Render Style: Linear Gradient 2 Colors (C1/C2); Gradient Origin: Top Center .
Moving Line 3 to the Bottom
This is done by setting the Margin for Line Style 2, increasing its bottom margin by 650 pixels. That pushes Line# 3 down the screen to the bottom.
Adjacent Image to Text
Adding some spacing to the Adjacent Image Margin proves spacing for the Rook image to align it with the text.
Margin {Left=10,Top=10,Right=10,Bottom=10}

 Page Bottom
 To Page Top