Behavior menu
Locator: Sound List Editor > Behavior .
Behavior menu
The Behavior menu has the following functions.

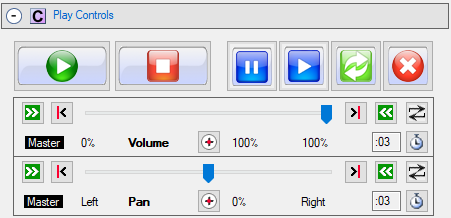
Figure 1. Play Controls panel
-
Apply Volume as Master - When checked, the volume controls settings are applied to all sounds as a master control. Any changes you make to the volume settings (ex. moving the trackbar to raise or lower volume level), will apply to all Sound Items as they are played. However, any volume changes are saved in the Sound Item attributes. When this mode is in effect, the controls are labeled as 'Master' (see Figure 1).
Automator Volume: When Apply Volume as Master is checked, the volume slider value will also apply to the any scripts currently playing in the Automator.
When UNchecked, any changes you make to the volume settings (ex. moving the trackbar to raise or lower volume level), will apply ONLY to the current selected Sound Item and will be saved as an edit to that Sound Item. When playing sounds in this mode, each time you select a new Sound Item, the settings are restored into the volume controls. Values saved in this mode are not lost when you switch to the 'master control' mode -- they will simply be ignored in that mode. - Apply Pan as Master - The Pan controls exhibit the same behavior as the volume controls described above.
- Allow concurrent sounds - When checked, it allows multiple Sound Items to be played at the same time. When unchecked, only one Sound Item will play at a time. This means any Sound Item currently playing will be stopped when the Play button is clicked.
-
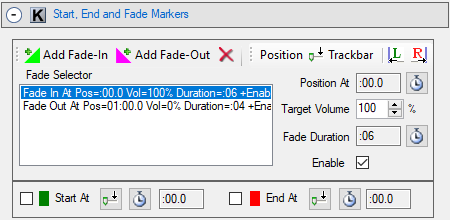
Disable Fade Markers - When checked, fade-in and fade-out effects from Fade Markers are NOT applied during play. This allows you to turn fading effects on and off globally without having to edit each Sound Item to enable / disable individual markers. A
Fades Disabled
symbol (
 ) is displayed at the right end of the marker row (on the Progress bar panel). This does not effect the current Auto-Fades settings (ie. applies only to Fade Markers).
 -
Disable Start and End Markers - When checked,
Start
and
End
markers are NOT applied during play. This allows you to turn these on and off globally without having to edit each Sound Item to enable / disable individual markers. A
Start/End Disabled
symbol (
 ) is displayed at the left end of the marker row (on the Progress bar panel).
 - Play On Double-Click - When checked, a selected Sound Item will played by pressing the Enter key, Space bar or double clicking it with the mouse. The Sound Items listbox must be the focused program control to enable this behavior. Focus the listbox by clicking it with the mouse or by the Edit Media Item > Focus List Items menu item.
- Simple Play/Pause Mode - Click this menu item to toggle the mode on/off. When checked (enabled), the Play button will operate as a Play/Pause button. When the Play button is pressed, if the selected Sound Item is not playing or is paused, it will begin/resume playing. If the selected Sound Item is playing, it will be paused. This mode eliminates the need to use the Pause and Resume buttons. It is also useful with wireless remote devices that only have a Play button (ie no Pause and Resume buttons) (See Custom Shortcuts Keys section).
- DSP Chains Mode - Changes the mode in which DSP Chains are applied. See DSP Chains Modes for details on modes.
- Program Behavior Summary - Show a list of current Program Behavior settings and Automator Behavior settings.
- View Behavior Summary - Pops up a list of most program Behavior settings. Useful as a diagnostic aid.

Figure 2. Edit panel for Start, End and Fade Markers
Behavior tool bar
- Behavior tool bar - Buttons (Figure 3, from left to right): Play On Click, Disable Fade Markers, Disable Start and End Markers, Simple Play/Pause Mode, Allow concurrent sounds, Apply Volume as master setting, Apply Pan as master setting, Apply Pause/Resume as master setting, DSP Chains Mode.

Figure 3. Behavior tool bar
 Page Bottom
 To Page Top