Sound Mill X3 : User's Guide
 Contents
 Language
 Product Home
DSP Effects and DSP Chains
 Page Bottom
DSP Effects

Effect Types: Equalize, Reverb, Volume Wave, Fuzz, Echo, and Pitch Shifter.
DSP Effects (Digital Signal Processing) alter the input audio signal to produce a defined effect. It does not alter the source input audio file. Each DSP has parameters that customize the effect. You create customized DSPs, then assign them to DSP Chains.
There is no limit on the number of DSP Effects you can create. And you can have multiple effects of the same type (ex Light Reverb and Heavy Reverb, etc).
How to use DSPs
- Create DSP Effects - Create one or more DSPs using the DSP Effects Editor (Figure 2). (See DSP Effects > Manage menu item below)
- Create DSP Chains - Create a DSP Chain that consists of one or multiple DSP Effects.
-
Assign DSP Chain for Use
- Assign a DSP Chain to a SoundItem in the Play Modifiers panel.
- Or, you can simply use the current Global DSP Chain to apply to all SoundItems.
- Set Driver - The Sound Item MUST be set to use the Windows Audio driver in the Play Modifiers panel. If not, DSP is ignored for the Sound Item.
- Set DSP Chain Mode Behavior - Select the DSP Chain mode which defines the DSP selection behavior for applying DSPs.
Tuning Latency for DSP
Also see the Latency setting which can be adjusted to produce a richer DSP effect. In general, raising the Latency will increase the quality of DSP effects, but there is a crossover point where DSP can begin to breakup and degrade. Since it is dependent on system hardware speeds and performance, you may need to test a few settings to find the optimum value for your system. The Default value is probably fine for most systems.
 To Page Top
DSP Chains

DSP Chains allows you to chain together multiple DSP Effects so that they will be applied in combination when a Sound Item is played. The output of one effect will be the input to the next effect in the chain.
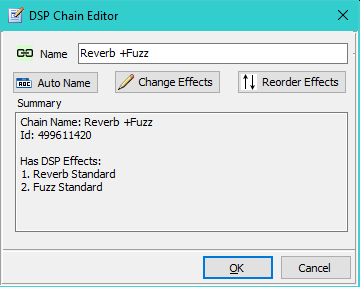
Example Chain: Reverb + Fuzz
- A Chain can contain one DSP Effect or multiple DSP Effects.
- The DSP Chain Editor (Figure 1) allows you to modify an existing chain.
- You can also assign one DSP Chain as the Global DSP Chain which can be used for playing all Sound Items.
- The Play Modifiers panel has DSP Chain buttons to select a chain for individual Sound Items.
The order of the effects in the chain can make a subtle difference or a more obvious difference in the resulting sound. It depends on the effects used and their parameters. If you are not satisfied with the sound of a chain, try changing the order of the effects.
DSP Effects and Chains menu items
Locator: Sound List Editor > Tools > DSP Effects and Chains .
DSP Effects menu items
DSP Chains menu items
Global DSP Chain
The Global DSP Chain allows you to apply a Chain to all Sound Items without having to manually assign the Chain to each SoundItem in its Play Modifiers. It works based on the current Behavior > DSP Chain Mode (see below). You assign the Global DSP Chain with the Select Global DSP Chain menu item (above). You can change the Global DSP Chain at any time. If you delete a DSP Chain that is assigned as the Global DSP Chain, then the Global DSP Chain will become undefined until you assign another valid Chain.
DSP Chain Modes
Locator: Sound List Editor > Behavior > DSP Chain Mode .
You can change the method that DSP Chains are applied to Sound Items when they are played. Change the mode by clicking the DSP Chains Mode menu item or the related button on the Behavior toolbar. It will popup a list selector dialog.
Modes
- DSP Not Active - No DSP Chains are applied to playback. Turns off DSP processing.
- Use Global DSP Only - The current Global DSP Chain is applied to ALL played Sound Items. If a Sound Item has a DSP Chain assigned in its Play Modifiers, that DSP Chain is ignored in this mode. This may be useful when you want to run a Script playlist and have all the playlist Sound Items use the same DSP Chain (ex. apply reverb to all Sound Items.)
- Use SoundItem DSP Only - Only Sound Items that have an assigned DSP Chain in their Play Modifiers will have DSP applied. The Global DSP Chain is ignored in this mode.
- Use SoundItem or Global DSP - All Sound Items will have a DSP applied when played. If a Sound Item has an assigned DSP Chain, it will be used. For Sound Items that do not have an assigned DSP Chain, the Global DSP Chain is used.
DSP Chain Editor
Editor controls
- Name - Sets the Name of the Chain. Name is used for menu selection lists.
- Auto-Name - Creates a name based on the type effects in the chain.
- Change Effects - Pops up an Effects selection dialog. This does a complete replacement of the effects in the chain.
- Reorder Effects - Lets you move the order of effects in the chain.
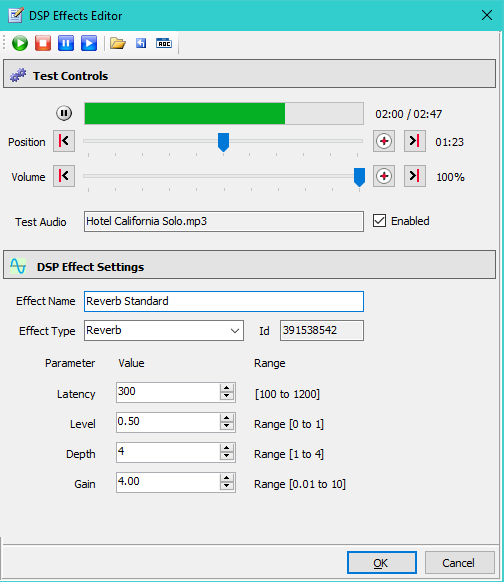
DSP Effects Editor
Volume Setting Tip
If you are just experimenting with the Effects Editor, you can set the Volume slider so that playback does not bother other people in the proximity. But if you are creating a final effect to use with SoundMill, set the test Volume slider to 100%. This will produce an effect that will be tuned (volume-wise) to how a SoundItems will sound when played by SoundMill. Then as you change parameter values, use the Enabled checkbox to turn the effect on/off. You will be able to hear the difference in volume. Adjust the effect's Gain parameter until the audio's unprocessed volume matches the DSP processed volume.
Test controls
Test control values are NOT saved as part of the DSP settings. They are simply for Effect test purposes.
- Position scrubber bar - You can drag the Position to a time location prior to playback then play will begin at that time when the Play button is clicked. This scrubber bar can also be dragged during playback or when paused. The Test Audio File length is not known until the first time it is played by the editor.
- Volume - See the volume tip above.
- Enabled - During test playback you can turn the effect on/off by checking/unchecking this control. This will help you hear how the effect changes the audio. Some effects take a second or so to turn off as processing buffers are emptied.
- Test Audio File - A simple, one or two instrument music file is often a good choice to hear the difference between the unprocessed playback and the DSP processed playback.
- Pick Test Audio File toolbar button lets you browse for a new test file.
- Play, Stop, Pause, Resume toolbar buttons will control playback.
DSP Effect Settings
The parameter changes in this section define the customization of the DSP Effect and are saved when you click the editor's OK button.
- Effect Name - Give the effect a logical name. It will be used for selection lists so keep it relatively short.
- Auto-Name toolbar button renames the effect based on the Effect Type.
- Effect Type - Select the type of effect you want to create. The parameter fields will change based on the Effect Type and are set to the Effect Type default values.
- Id - The unique id of the custom effect.
- Reset to Defaults toolbar button resets the effect paramters values to the defaults for the Effect Type.
- Parameters - Each Effect Type has its own paramters and default values. (See DSP Effect Types section below)
You can change most parameters during test playback and the effect processing will change immediatley. A few parameters require that you stop and replay the audio to hear the change -- a status mesage will indicate when replay is required.
If you type a number into a parameter value spin box, the new value will not be recognised until you move the mouse cursor out of the box (by clicking on another field control, for example click the Name textbox with the mouse pointer.). Using the numeric Up/Down arrows on the spin box does not require this extra mouse click.
DSP Effect Types
Effect Types are Reverb, Volume Wave, Fuzz, Echo, and Pitch Shifter. Below are explanations of how parameters affect the overall sound. As you move further away from an effect's default values, some effects may begin to break-up or distort.
Latency parameter
All the DSP effects have a Latency parameter. The DSP effects Default Latency Value is 300 milliseconds (300 ms). For most effects, the default value will be fine. Generally DSP playback needs a higher Latency than non-DSP playback. Latency controls how much audio buffering the program will use to produce the DSP sound. Increasing Latency by +100 or +200 above the default value can sometimes improve the quality (richness) of an effect. But there is a point where too high a Latency can cause jagged, choppy results with sound ghosting, then you may need to lower it a bit. The Pitch Shifter effect definitely needs a higher Latency (see below). You can read more about Latency here.
Equalize
See separate Equalizer section for details on Equalize(EQ) DSP Effect Type.
Reverb
Creates a sound reflection effect of playing sound in a big room.
Parameters
- Level - The amount of reflection signal mixed with the original sound signal.
- Depth - More Depth equals more sound reflections. Think of this as the number of walls that the sound reflects off of.
- Gain - Volume gain.
Fuzz
Creates a fuzzy sound moving into distortion at higher Level values.
Parameters
- Gain - Volume gain.
- Level - The amount of fuzz signal mixed with the original sound signal. Fuzz is produced generally at Level=0.4 to 0.6. Distortion is produced at Level=0.7 to 1.0.
Echo
Creates a sound reflection effect of playing sound in a large hall up to a stadium size venue depending on Reflection Time value.
Parameters
- Level, Depth, Reflection Time, Gain
- Level - The amount of reflection signal mixed with the original sound signal. Level above 0.7 may cause chop in the effect.
- Depth - More Depth equals more sound reflections. Think of this as the number of walls that the sound reflects off of.
- Gain - Volume gain.
- Reflection Time - Number of seconds it takes for the furthest reflection to return to the sound source.
Pitch Shifter
This can shift the frequency of the sound up or down. This effect can be CPU intensive. Check your system CPU utilization (with Windows Task Manager) to see how it performs on your system.
Parameters
-
Pitch Factor
- Equal to 1.0 - No Pitch shift (original signal).
- Greater than 1.0 - Raising a voice recording to produce a high pitched chipmunk sounding voice.
- Less than 1.0 - Produces a low and rough (raspy) sounding voice.
- Gain - Volume gain.
- Latency - This effect requires higher Latency than the other effects (try Latency=800 as a starting point).
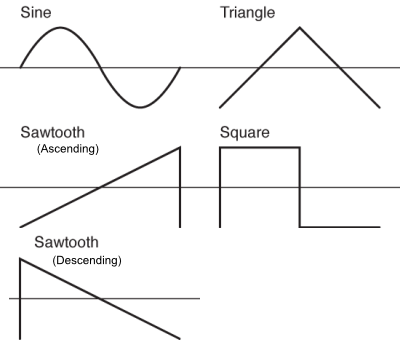
Volume Wave
Playback Volume rises and falls over time following a wave form specified by Wave Form Type. For volume amplitude (Wave High/Low), a value of 1.0 (100%) equals 100% of the current Windows Speaker Volume which is set by clicking the Speakers icon on the Windows Taskbar.
Parameters
- Wave Form Type - Sine, Square, Sawtooth Ascend, Sawtooth Descend, Triangle. (Figure 3)
- Wave Length - The length of one full wave period. (in Seconds)
- Wave High - The highest volume used by the wave. Set this below 1.0 if you don't want the volume to rise all the way to full volume (100%) during each wave. (Value is percent of full volume. 0= 0% volume, 0.5= 50% volume, 1.0= 100% volume)
- Wave Low - The lowest volume used by the wave. Set this above zero if you don't want the volume to drain all the way to silence during each wave. (Value is percent of full volume. See Wave High value samples above.)