
 Sound Mill X3 : User's Guide
 Contents
 Language
 Product Home
Schedule Editing
 Page Bottom
Locator: Automator > Edit Script > Edit Script > Schedule Edit .
Schedule Editor
The Schedule Editor allows you to create a highly flexible schedule. The editor is composed of expandable sections of attributes. Click a section header to expand or collapse the section. You can test the schedule's date criteria to verify what dates it will run on by clicking the Test Schedule button. See the Test Schedule Dates menu items for details. See the Scheduler Behavior section for how the Scheduler applies Date and Time settings.
 To Page Top
12AM, Noon, Midnight Defined
Internal Time Values
- Internal format HH:MM:SS
- 12AM - 00:00:00, The start of a new day. (effectively midnight)
- Noon - 12:00:00, 12 hours into a day. 12PM in 12 hour time format.
- Midnight - 23:59:59, The end of a day; one millisecond before 12AM.
12-Hour Clock(AM/PM) Vs 24-Hour Clock
Times will be displayed in you country's official national time format.
Start and End Times
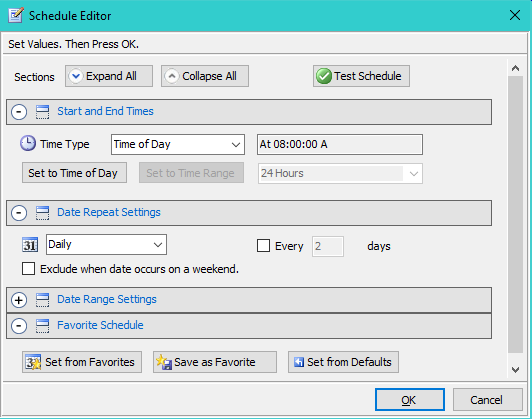
See Figure 1 for the Start and End Times controls. Use the Time Type selector to pick one of the following Schedule Time methods.
Time Type
- Time of Day - Sets the schedule Start Time to a Time of Day. This opens the Time Period Editor discussed below. When you start the Scheduler BEFORE this time, the item will be scheduled to execute at the set time. If you start the Scheduler AFTER this time, it is considered a missed schedule and the item will not be added to the daily schedule plan and will NOT execute.
- Time Range - Sets the schedule Start Time to a Time Range. A Time Range is a span of time with a start and end time. A pop-up dialog (similar to Figure 6) will allow you to set the Time Range. The scheduled object will start to execute if the Scheduler is started (or is running) at any time during the Time Range.
- Time Period - Sets the schedule Start Time to a preconfigured Time Period. The scheduled object will start to execute if the Scheduler is started (or is running) at any time during the Time Period. Select a Period from the Time Period pulldown menu. There is more detail about Time Periods and the Time Period Editor below.
How Schedule Time Works
When the Scheduler is started, any Script that has a Schedule enabled and a Schedule Time that is later than or equal to the current time, will be scheduled to run. See Time Types above for setting the time a schedule should run. The Script must also pass the Schedule Date check. Schedules marked Daily will run every day.
Scheduled Steps are not scheduled until the containing Script starts running. They are scheduled in the manner described above.
At the time the Scheduler is started, any scheduled Script or Step with a Schedule Time that is earlier than the current time will be marked Time Miss in the Scheduled Plan (ie. its execution time has passed). And thus, it will not be scheduled to execute.
Schedule Time Format
A schedule set for a specific Time of Day will appear as "At 8:00:00 A". A schedule set to a time range will appear as Start Time to End Time (ex "8:00:00 A to 10:00:00 A"). You can select a Time Display Format as either Local time (12 hour AM/PM) or 24 Hour Time in the Automation options.
Date Repeat Settings
See Figure 1 for the Date Repeat Settings controls.
- Date Repeat Frequency - Sets the repeat frequency (daily, weekly, or monthly by date).
- Every - You can change the repeat interval by checking the Every checkbox and setting the interval ( for example, every 2 days, every 3 days, etc). The interval is tested based on the Start Date of the Date Range. The interval units change based on the repeat frequency used (ie. days, weeks or months).
- Exclude when date occurs on a weekend - When checked, occurrences that fall on a weekend will be excluded.
Note that the Every (repeat interval) and Exclude when date occurs on a weekend settings will override settings made for the Weekly and Monthly settings. So for example, if you are excluding weekends and you selected first day of the month, the schedule will not fire if the first day of the month falls on a weekend day.
Date Range
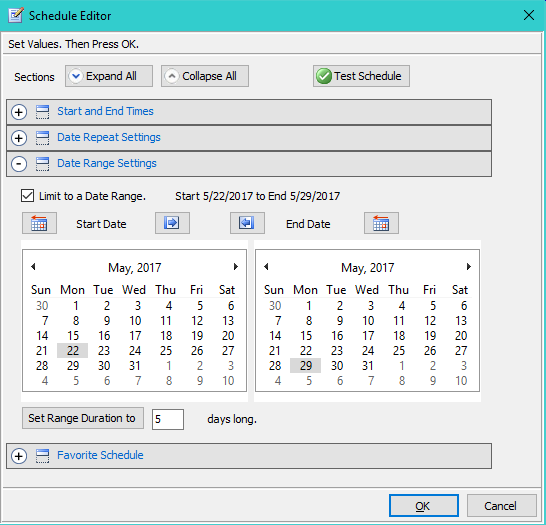
See Figure 2 for the Date Range Settings controls.
- Limit to a Date Range - When checked, schedule will apply a Date Range (a Start Date and End Date). When applied, a date must fall inside the Date Range to pass the schedule test.
- Date Picker - Use the Date Picker controls to set a Start and End date of the range. If no Date Range is applied, a date must be equal to or later than the Start date pass the schedule test.
- Set Date to Today - This button will set a date to Today's date. There is a Today button above both the Start and End Date Pickers.
- Set Start date from End date - Sets the Start date to the same value as the End date.
- Set End date from Start date - Sets the End date to the same value as the Start date.
- Set Range Duration to - Set the range to a duration of a number of days (starting from the Start date).
Weekly Settings
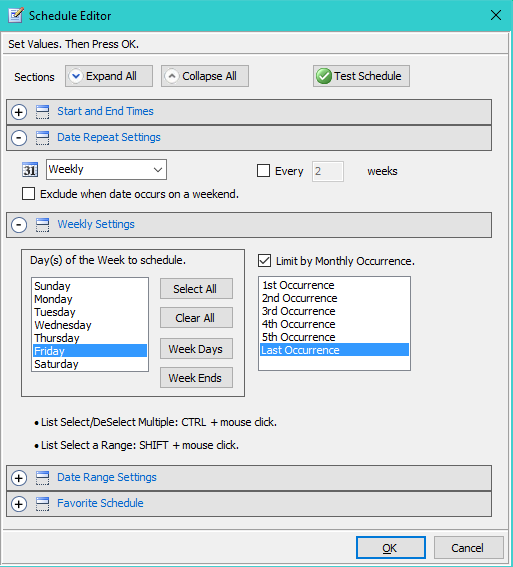
See Figure 3 for the Weekly Settings controls.
- Days Of The Week selector - Select one or more Days Of The Week. There are quick set buttons to Select All , Clear All , select Week Days only, and select Weekend Days only.
- Limit by Monthly Occurrence - Check this if you want to limit the schedule to a specific monthly occurrence (for example, the first or last Monday of the month). Then Select one or more of the Occurrence values in the list below the checkbox.
 Tip - If you want every day of the week scheduled, set the repeat frequency to Daily rather than using Weekly settings. It is more efficient when processing schedules.
Multi-Select Note: You can select multiple items in the listboxes as follows. To select a range of items, click the first item in the range, then hold the Shift key and select the last item. To select or de-select multiple non-contiguous items, hold the Ctrl key and mouse click each item.
Monthly Settings
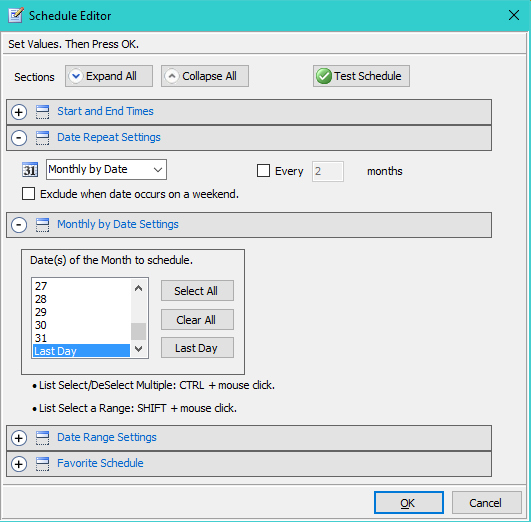
See Figure 4 for the Monthly Settings controls.
- Dates Of The Month selector - Select the Dates Of The Month you want the item scheduled. There are quick set buttons to Select All , Clear All , and select Last Day of the month.
Tip - If you want every day of the month scheduled, set the repeat frequency to Daily rather than using Monthly settings. It is more efficient when processing schedules.
Also, see the Multi-Select Note in the Weekly Settings section.
Favorite Schedule
Favorite Schedules allows you to save any schedule for reuse as a Favorite.
- Set from Favorites - Set the current schedule from your Favorites. You are prompted to select the favorite.
- Save as Favorites - Save the current schedule as a Favorite.
- Set from Defaults - Set the schedule from the program Defaults schedule.

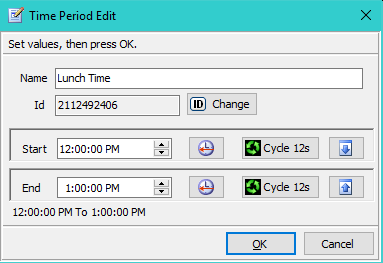
Time Period Editor
Time Period Editor (Figure 6), allows you to create or modify a Time Period.
- Name - Give the Period a descriptive name. Used in selection menus.
- Id - Used by the program to find the Period at runtime. It is recommended that you don't change the generated Id unless necessary. See the Time Periods section below for more details on Ids.
Setting Start and End Times
There are four controls for setting both Start and End Times. The End time must always be later than the Start time (an error indicator is displayed when End is earlier than Start).
- Time Picker - Allows you to set hour, minutes and seconds plus AM/PM indicator.
- Set to Now - The Set to Now button (clock with red arrow) sets the time to the current time.
- Cycle 12s - With each click, this button cycles the time setting between: 12AM, Noon and Midnight. See time definitions of 12AM, Noon, Midnight at top of this page. (a quick set productivity button)
- Set to Same - Quick set buttons to set the End time equal to the Start time (blue down arrow). Or set the Start time equal to the End time (blue up arrow).
Time Periods
A Time Period is a configured time range from a Start Time to an End Time. The End Time MUST be later than the Start Time for Periods to work properly. The power of Time Periods is that when you change the values of an existing Time Period, any schedule that references that Time Period will use the new values. These are five Program Default Time Periods created when you click Tools > Automation > Time Periods > Reset . And you can create your own custom Time Periods. For details on how the Scheduler uses Time Periods see the Scheduler Behavior section.
Default Time Periods
- 24 Hours, 12:00 AM to Midnight (full day)
- Early AM, 12:00 AM to 6:00 AM
- Morning, 6:00 AM to Noon (12PM)
- Afternoon, Noon (12PM) to 6:00 PM
- Evening, 6:00 PM to Midnight
Period Ids
The Time Period Id is used to find the Period at runtime. You should not change the Id unless you are trying to correct a problem with the Sound List. If you change an Id (or delete Time Period), schedules that already reference that Time Period Id will become invalid because the program will not be able to find the time period. In this case, simply change the Id to the referenced Id. Also, you should not have duplicate Ids (two time periods with the same Id). A Settings Validation Check will find duplicates if any. Reserved Ids: Ids 1 to 20 are reserved for the Default Time Periods Do not use these Id numbers.