Sound Mill X3 : User's Guide
 Contents
 Language
 Product Home
Step Editor
 Page Bottom
Menu Locator: Automator - Edit Script > Edit Script > Edit Steps .
Set Step values using the Step Editor controls as follows:.
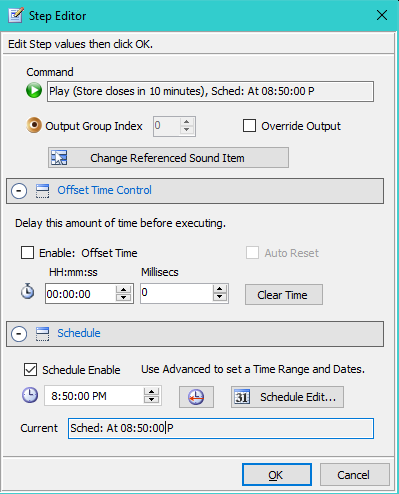
Command and Parameters
- Name - The name is a derived field from the Step command type, the target Sound Item or Script, and the time control used if any.
- Override Output Group Index - Overrides the Output Group specified in the Sound Item > Play Modifiers. Set the value to any valid ouput. Ignored if Output Override is not checked. This allows you to create one Sound Item and direct the sound to different Output Groups.
- Output Override - When checked, enables the override of Output Group specified in the Sound Item with this Step Output Group Index.
- Change Referenced Item > - This button will allow you to change the Command's referenced item. The item type depends on the type of Step (ie Play Sound Item, Run Script, or Start External Program).
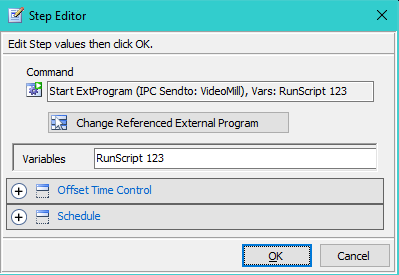
- Text Variable > - Some Step types allow a text Variable(s). This is only exposed when the step type allows for a variable. (ex. Start External Program, see Figure 2)
-
Run Script - Spawns New Thread - This is only exposed for Run Script Steps. In most cases, it is best to leave this box unchecked. See the section on Script Threads for more details.
- When checked, a Run Script Step will spawn a Script in a new, separate thread. The new thread begins executing immediately and concurrent with the parent script. If you use this mode, be sure to also set the Automator > Tools > Allow Concurrent Scripts to Run menu item.
- When unchecked, the target Script will be started inside the parent Script's thread. It's steps will begin to execute sequentially, suspending the parent script until its steps have finished executing.
Output Group
- (for Play Sound Item steps only)
Notes
- Not all of the controls above are available for every type of Step command.
- When no time control is enabled, the Step is treated as a simple sequential Step.
- A Sound Item already has an Output Group so the Override provides a way to override that value in a Script. So a given Sound Item can be played on multiple devices without having to make multiple copies of the Sound Item.
 To Page Top
Offset Time Control
- Enable: Offset Time - Enables use of the Offset Time for this Step.
- Offset Time - Sets the Offset Time amount. Once the containing Script starts to run, the Step will fire after the Offset time expires. (1000 milliseconds = 1 second, ex 500ms = 0.5 second)
- Clear Time - Button clears the Offset Time to 00:00:00.000. (productivity aid)
- Auto Reset - Enables Auto Reset of the Offset Time. Step is automatically reset to fire again each time the Offset time expires. A Script with 'Auto Reset' steps will continue to run until it is stopped (either manually or by a Stop-Script step). In general, Scripts that contain 'Auto Reset' steps should not be set to Repeat. See caution below about Scripts that Repeat.
A Caution about a Repeating Script with Offset Timed Steps
If you Repeat or Loop a Script that only contains ONLY Offset Timed Steps, then make sure you enable Repeat after Offset Time and set the Repeat Offset to an amount of time to allow all steps to execute before repeating the script.
If you Loop such a Script WITHOUT Repeat after Offset Time, it will probably create a Runaway condition which the Automator should detect and abort.
Schedule Time Control
Schedule a Step when it must fire at a specific time of day. For example, schedule a message at 9:50PM to announce "Store is closing in 10 minutes".
Schedule Controls
- Schedule Enable - Enables the scheduling of a Step to Run at the specified Time of Day. This must be checked for the Step to be added to the Schedule Plan.
- Schedule Time picker sets the Time of Day to run the Step. This sets a point in time. If you want to set a time range, use the schedule Schedule Edit button.
- Set to Now button - Set the Schedule Time to current time (a point in time).
- Schedule Edit button - Allows for setting the Schedule time range and/or date criteria using the Schedule Editor .
- Current - This is the Step's Current effective Schedule.
Rules
- Scheduled Steps are NOT added to the Schedule Plan until the Script that contains the Steps is run by the Scheduler.
- When a Schedule Step is added to the Schedule Plan, if its Schedule Time is earlier than the current system time, the Step will not execute and will be marked as Time Miss in the Schedule Plan.
Step to Send IPC Command
You can use IPC to send IPC Commands to another instance of Sound Mill or Video Mill by creating a step as follows (see Figure 3):
- Add a Start External Program Step.
- Select an IPC Send External Program. There should be an IPC Send for each IPC Remote Client.
- In the Variables field, enter any valid IPC Command. (see Variable Format below).
- You may set an Offset Time for the Step if desired.
- When the Step executes it will send the command to the Remote program.
IPC RunScript Command Variable Format
- Syntax - RunScript Script-Id. Example: RunScript 123
-
Multiple commands - You can send multiple commands at one time. Each command is separated by a semi-colon (;). This is more efficient (runs faster) than creating multiple Steps.
Example: RunScript 123 ; RunScript 456 ; RunScript 789 - Case-Insensitive - The command is case-insensitive; So RunScript, runscript, RUNSCRIPT are all acceptable.
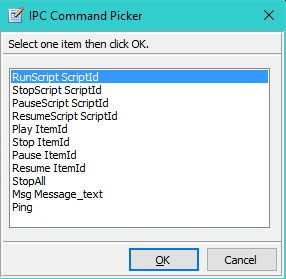
IPC Commands
Figure 3 shows the possible IPC Commands you can use for the variable(s).