
 Sound Mill X3 : User's Guide
 Contents
 Language
 Product Home
Script Editor
 Page Bottom
Locator: Automator > Edit Script > Edit Script .
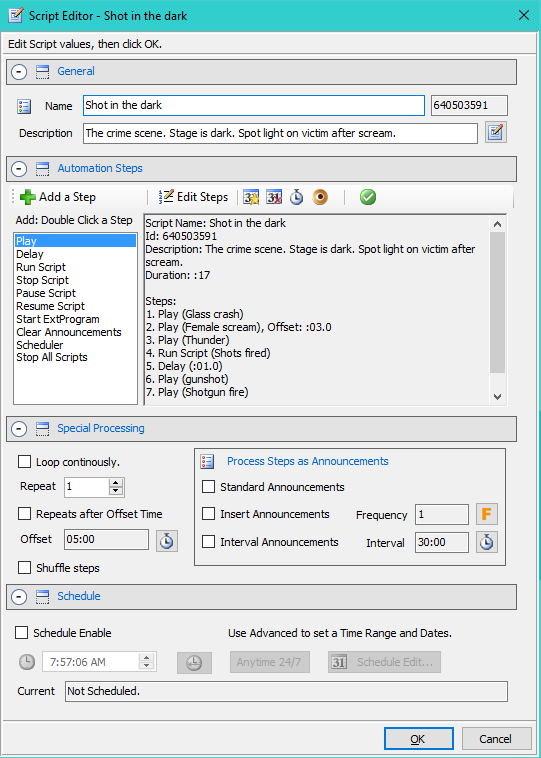
The Script summary is displayed on the right inside the Automation Steps group box. Set Script values using the Script Editor controls as follows:.
General section
- Name - The Script name. A short, descriptive name is best.
-
Id - The Script numeric Identifier (
 Id). Used to uniquely identify the Script
 - Description - A verbose description of what the Script does and any special instructions for the sound person. Click the Edit Description button for a multi-line editor.
 To Page Top
Automation Steps - Add or Edit
In addition to editing individual Steps with the Step Editor, there are productivity buttons to change certian Step properties on multiple Steps at a time with just a few clicks.
- Add Selected Step button - First select a Step Type to Add from the Step Type list (below the button, Figure 3). Then click the Add a Step button. Some Step types will pop up a multi-selection list of items to choose from. Steps are added to the end of the Script. You can re-order Steps with the Edit Steps button. 'Play, 'Run Script' and 'Start Ext-Program' Steps will pop up a multi-selection list for the reference target item(s) (Sound Items, Scripts or External Programs) that you want the step to act on.
- Edit Steps button - Pops up a list of existing Steps. You can select and Edit a step with the Step Editor. Also Reorder Step positions, and Delete Steps.
- Schedule Steps from Favorite button - Sets the Schedule of one or multiple Steps from the Favorite Schedule. You are prompted to select the Steps to apply the change to.
- Delete Schedules - Deletes the Schedule of one or multiple Steps. You are prompted to select the Steps to apply the change to.
- Set Steps Offset Times button - Sets the Offset Times of one or multiple Steps to an Offset Time. You are prompted for: Enable/Disable of the Offset Time; Time amount of the Offset Times ; and a selection the Steps to apply the change to.
- Steps Output Group Override button - Sets the Output Group Override of one or multiple Steps. You are prompted for: Enable/Disable of the Override; Index of the Override Output Group; and a selection the Steps to apply the change to.
- Validate Script - Will validate the Script control logic. If any errors/warnings are detected, it will display the messages in a popup window.
Edit Steps Tools

Automation Step Types
Automation Steps can be any of the following types:
- Play - Plays a Sound Item.
- Delay - Adds a time delay time between two sequential Steps.
- Run Script - Runs another Script. The script can run inside the parent scripts thread or it can spawn a new, separate thread. (See Run Script - Spawns New Thread for details.)
- Stop Script - Stops a Script that is currently running. Mostly useful if you want to time/schedule the end of audio programming at a time of day, or set an offset-time to stop audio after a time period has expired (ex after 1 hour). If you stop a parent script that has started child scripts using Run-Script steps, the child scripts will also be stopped. See a detailed explanation in the Script Threads section below.
- Pause Script - Pauses a Script that is currently running. If a Script pauses itself with a Pause Script Step, it can only Resume itself with a timed Resume Script step. See section on How to Pause/Resume a Script below.
- Resume Script - Resumes a Script that is currently Paused. See section on How to Pause/Resume a Script below.
- Start External Program - Starts an External Program and passes any variables (parameters) specified in the Step. When the Start External Program Step executes in automation, the Automator does not wait for the external program to complete its operation. It starts the External Program then goes on to execute the next automation Step immediately.
- Clear Announcements - Removes announcements currently executing and optionally announcements already scheduled for a later time. See the Clear Announcements section for more details.
- Scheduler - Start, Stop, Pause or Resume the Scheduler. When the Scheduler is paused, all scripts running under the Scheduler are paused. See section on How to Pause/Resume a Script below for the method to resume the Scheduler when paused.
- Stop All Scripts - All Scripts currently running are stopped. This also may or may not stop the Scheduler and its running Scripts, depending on the option chosen in the Automation Options ('Stop All button includes Scheduler').
Affect of Pause on Delay Times
If you click Pause while a Delay Step is in effect, the delay time will suspend (stop draining) until Resume is clicked. So for example, consider a 20 second Delay. If you click Pause after 5 seconds of the delay has expired, there will be 15 seconds of delay remaining once you click Resume.
Special Processing
Iteration Controls
- Loop continously - The Script will run continously until it is stopped by pressing the Stop button or by some other stop method. Loop behaves just like Repeat except there is no end to the repeating. Repeat after Offset Time also works with this setting.
- Repeat - Specifies how many times a Script should run when it is started (1 = run one time only, 2 = run 2 times, etc.). After the last Step finishes, the Script restarts at the first Step.
- Repeat after Offset Time - When checked, the Script runs will repeat after the Offset Time has expired. For example, if Offset Time is 5 minutes, the Script will run every 5 minutes for the specified number of Repeats. The first run occurs immediately when the Script run is started. Useful when you want to time the repeat of a Script.
- Shuffle Steps - When checked, the Steps are randomly shuffled when the Script is run. Useful for music playlists. After all Steps have played, the Steps are reshuffled. You can view the order of shuffled steps by Automator Tools > View Recent Shuffled Script menu.
Process Steps as Announcements - These checkboxes designate that the Script is an Announcement Script and all its Play Steps are treated as Announcements. See the separate page on Announcements with Music Programming.

Date/Time Scheduling a Script
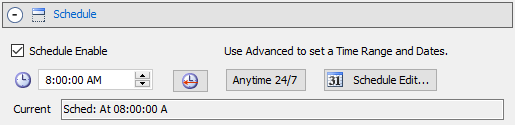
See Figure 2. Only Scripts that have their Schedule Enabled will be added to the Schedule Plan when the Scheduler is started.
- Schedule Enable - Enables the scheduling of a Script to Run at the specified Current Schedule. This must be checked for the Script to be added to the Schedule Plan.
- Schedule Time picker sets the Time of Day to run the Script. This sets a point in time. If you want to set a time range, use the schedule Schedule Edit button.
- Set to Now button - Set the Schedule Time to current time (a point in time).
- Schedule Edit button - Allows for setting advanced Schedule time range and/or date criteria using the Schedule Editor.
- Anytime 24/7 - Set the Script's Schedule to start the Script Anytime you start the Scheduler (regardless of Time Of Day). This is a quick set button and sets the Schedule to Time Period = 24-Hours.
- Current - This is the Script's Current effective Schedule.
Script Threads
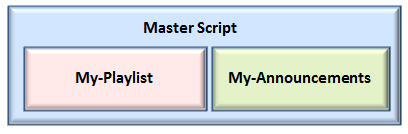
When you run a script by clicking the Automator Run button, a thread is created for script execution. If the script has Run Script steps (as in Listing 1), the child scripts will run inside the parent script's thread. In this case, the master script thread can control both of the spawned scripts and coordinate the announcements with the music playlist.
Listing 1. Master ScriptScript Name: Pre-show Music Master Steps: 1. Run Script (My-Announcements) 2. Run Script (My-Playlist)
Stopping a Script(s)
In the case of Listing 1 above, you have a parent script ('Master Script') that starts two child scripts.
- If you stop the 'Master Script' (the parent), both of the child scripts it has started will be stopped (Listing 2).
- If you want to stop only one child script, you can do it as shown in Listing 3.
Listing 2. Stopping the Parent Script and Its ChildenScript Name: Stop Master Script Steps: 1. Stop Script (Pre-show Music Master)
Listing 3 - Using the Scheduler to stop music programming at 5:00:00 PM.
Listing 3. Stopping One Child ScriptScript Name: Stop Music Playlist Sched: At 5:00:00 PM Steps: 1. Stop Script (My-Playlist)
Run Two Scripts Concurrently
If you want to run two scripts concurrently (at the same time) using Run Script steps, you apply a Timed Offset of zero (:00, see step#1 in Listing 4). However, if both scripts contain Play steps, that can interfere with how steps advance. To prevent interference between the two Scripts, apply the Spawns New Thread attribute to one of the Run Script steps in the Step Editor.
Listing 4. Run Two Scripts ConcurrentlyScript Name: Run Two Scripts Concurrently Steps: 1. Run Script (Zone-1 Music Playlist), Offset: :00, Spawns New Thread 2. Run Script (Zone-2 Music Playlist)
Stop/Pause/Resume of Child Scripts
What is a Child Script
When you select a script in the Automator (ex. Parent-Script, Listing 5) and click the Run button, then Parent-Script runs as a Parent script. If Parent-Script has a RunScript step to start My_Playlist, then My_Playlist starts as a child of Parent-Script.
Listing 5. Parent/Child ScriptsScript Name: Parent-Script Steps: 1. Run Script (My_Playlist)
Listing 6. Pause a Child ScriptScript Name: Pause-My_Playlist Steps: 1. Pause Script (My_Playlist)
Required Option - A new Option was introduced in v.r 3.38 (Apply Stop/Pause/Resume To Child Scripts) to expand the scope for Stop-Script/Pause-Script/Resume-Script step commands. This includes scripts running under the Scheduler. This provides better functionality for scripts and is the recommended option. The legacy behavior did not allow for Stop/Pause/Resume of child scripts. This new option will provide these actions for operating on child scripts. So for example, Pause-My_Playlist (Listing 6) can now find and pause My_Playlist which is running as a child of Parent-Script.
How to Pause/Resume a Script
When performed programmatically in a script, Pause/Resume is a special case. The Resume-Script step MUST be a timed step (either Offset Timed or Scheduled for a time-of-day). The reason is that when you Pause a script, it stops executing sequential steps until the script is resumed. Also, the 'Apply Stop/Pause/Resume To Child Scripts' must be enabled (checked) in the Automation Options for the following examples to work.
Required Option - A new Option was introduced in v.r 3.38 (Apply Stop/Pause/Resume To Child Scripts) must be enabled (checked) in the Automation Options for the following examples to work.
Pause/Resume by Offset Time
Listing 7 shows an example of Pause/Resume for the Scheduler. The Scheduler paused 30 minutes after the script starts. When the scheduler is paused, the My_Playlist Script is paused. Then at the 1 hour mark the Scheduler is resumed. In this way a Script or the Scheduler can be Paused/Resumed multiple times.
Listing 7. Pause/Resume Scheduler by Offset TimeScript Name: Pause/Resume Scheduler Sched: Period: 24 Hours Steps: 1. Scheduler (Pause), Offset: 30:00 2. Scheduler (Resume), Offset: 1:00:00 3. Run Script (My_Playlist)
Listing 8 shows an example of Pause/Resume for a Script. It has the same timed behavior as Listing 7 above.
Listing 8. Pause/Resume a Script by Offset TimeScript Name: Pause/Resume Script My_Playlist Steps: 1. Pause Script (My_Playlist), Offset: 30:00 2. Resume Script (My_Playlist), Offset: 1:00:00 3. Run Script (My_Playlist)
Pause/Resume by Scheduled Time of Day
Listing 9 shows an example of Pause/Resume for the Scheduler. The Scheduler is paused at noon time (12:00:00 PM). When the Scheduler is paused, the My_Playlist Script is paused. Then at 1PM the Scheduler is resumed. Finally at 5PM, the Scheduler is stopped which ends My_Playlist playback. In this way a Script or the Scheduler can be Paused/Resumed multiple times.
Listing 9. Pause/Resume Scheduler by Scheduled TimeScript Name: Pause/Resume Scheduler Sched: Period: 24 Hours Steps: 1. Scheduler (Pause),Sched: At 12:00:00 PM 2. Scheduler (Resume), Sched: At 1:00:00 PM 3. Scheduler (Stop), Sched: At 5:00:00 PM 4. Run Script (My_Playlist)
Listing 10 shows an example of Pause/Resume for a Script. It has the same timed behavior as Listing 9 above.
Listing 10. Pause/Resume a Script by Scheduled TimeScript Name: Pause/Resume a Script Steps: 1. Pause Script (My_Playlist), Sched: At 12:00:00 PM 2. Resume Script (My_Playlist), Sched: At 1:00:00 PM 3. Stop Script (My_Playlist), Sched: At 5:00:00 PM 4. Run Script (My_Playlist)
Cautions
 1) If you delete a Sound Item from the Sound List and an automation Step references to that Sound Item, the automation Step will not execute. It will also be flagged as an error when you Validate the Script.
2) A Run Script Step cannot run the Script it is contained in. This will be flagged as a 'self reference' error. For example, Script A cannot contain a Step to Run Script A. This would create an infinite loop condition.
3) It is possible to create an infinite loop if you are not careful with Run Script Steps. For example, if Script A contains a Step to Run Script B; and Script B contains a Step to Run Script A. In this case, A and B will run each other infinitely and if not stopped with the Stop button will eventually cause the program to run out of memory.