Video Mill : User's Guide
 Contents
 Language
 Product Home
Displays Management
 Page Bottom
Displays Overview
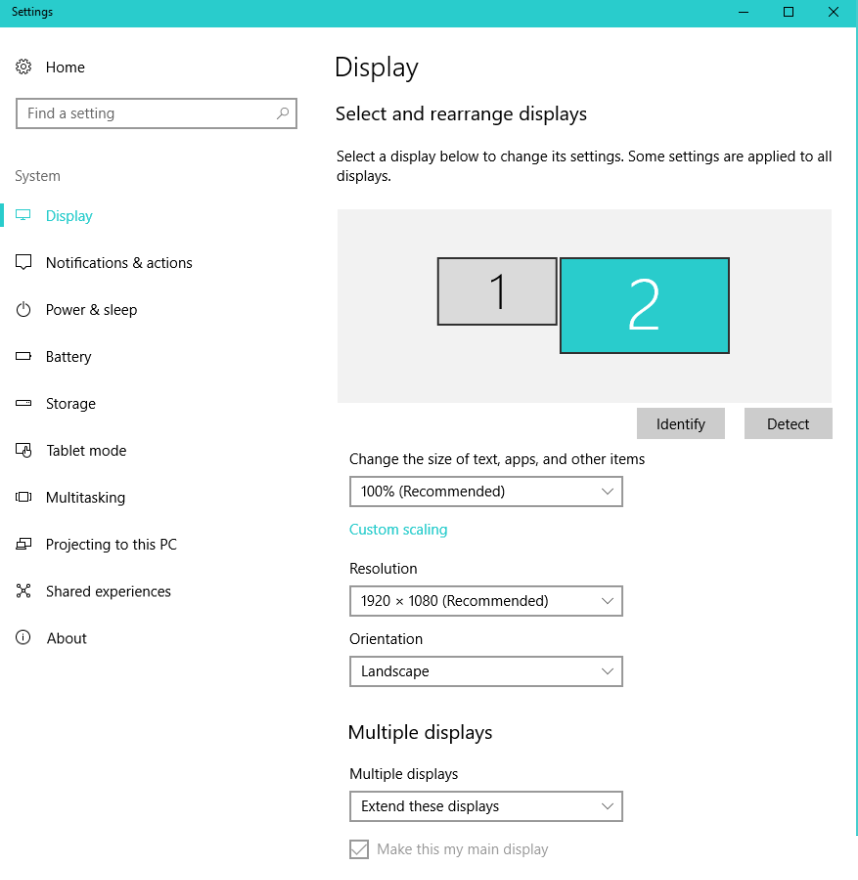
Video Mill will maintain a list Display definitions for all known, installed displays (monitors) on your computer. A display will be acquired by Video Mill when it is extended via the Windows Control Panel(WCP) > Display applet (Figure 4).
Primary (Main) Display
The Primary (Main) display is a virtual display that may be changed in WCP > Display (Figure 4) by selecting a display, then checking the "Make this my main display" checkbox. In most cases, the Primary display will be your laptop display, or for a desktop computer with separate connected display, it will be the display that you use to run application windows on.
Windows 10 and 4K High DPI Displays
In Windows 10 Anniversary Update (June 2016), each connected display could have its own different Scale Factor. More High DPI improvements with scaling were been added in Windows 10 Creators Update (April 2017). If you have high DPI display(s) and are using display Scale Factor, it is recommended that you run on the latest Update of Windows 10 if possible. There is a section below with more considerations for using display Scale Factor.
 To Page Top
Display - Menu items
Menu Locator: Media List Editor > Tools > Displays .
Menu items
- View Extended Displays Details - Pops up a listing of all known displays and their size (extended displays and non-extended displays).
-
Manage Physical Displays - Pops up a list selection of known Display definitions.
- Delete - If you delete one or more displays, Video Mill will re-acquire any deleted displays on exiting the dialog (essentially performing a reset of the deleted displays). If you have removed a physical display from your inventory, you may as well delete the Video Mill Display definition for it.
- Edit - Clicking the Edit button will popup the Display Editor (Figure 2 below).
- Extended Displays Diagram - Creates a block diagram mapping the relative position of all extended displays on the Windows Desktop. This will open the diagram in whatever program you have associated with the PNG image filetype. The image is also saved to a file in your VideoMill documents folder for future use. The display numbers shown in the diagram will not necessarily match the numbers in the WCP > Display applet.
- Windows CP Extend Displays - Shortcut to open the WCP > Display applet (Figure 4) to Extend Displays on the Windows Desktop.
- Virtual Displays - See Virtual Displays page for menu item details.
-
Identify Displays
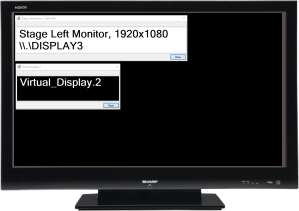
- Show Identifiers - Opens an Identifier popup on each display that you select (Figure 1). This will help you map VideoMill display identifiers to physical displays. You are prompted to select displays to identify. Any display you select that is not currently extended on the windows desktop is simply ignored.
- Close Identifiers - Closes all Identifier popups.
Display Editor
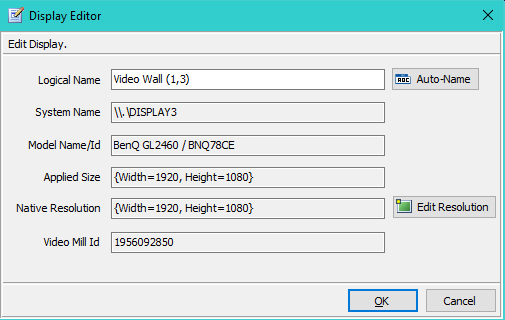
The Display Editor allows you to edit a Display definition. Changes here have no effect on Windows Device Manager definitions.
Editor functions
- Logical Name - You should set this value to a short name that logically identifies the display. It will be used in list selection dialogs so keep it relatively short. The Auto-Name button will set the Logical Name to System Name + Size.
- System Name - The name that Windows OS assigns to the display. The System Name is not a mapping to the display numbers that are shown in the WCP > Display applet (Figure 4). For example, a display with System Name = "\\.\DISPLAY3" may be represented as Display "2" in WCP > Display.
- Model Name/Id - Manufacturer's Display model name and id. (* see note)
- Size - Size (Width, Height in pixels). It may not match the Display's Native Resolution if a scale factor is applied or the user changes the Resolution in the WCP > Display applet.
- Native Resolution - This is the physical width, height of the display (in Pixels). It will be detected automatically in most cases. You can set it manually with the Edit Resolution button. There are several features that require an accurate resolution to work correctly. (* see note)
- Video Mill Id - Video Mill identifier for the display.
* Some display data is not always detectable due to missing EDID data.
How Displays are Identified
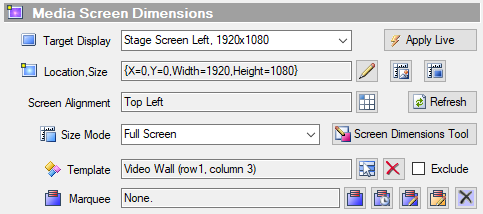
VideoMill determines where to create a video's Media Screen by the selected Target Display (Figure 3). Internally, VideoMill uses the display's Id number (Figure 2) to identify the Target Display. A Display is uniquely identified by a combination of these two items:
- The Video-Out Port that the display is connected to on the graphics adapter card.
- The display's Size that appear in the Display Editor (Figure 2).
That has some important implications that the Video Configuration Tech should be aware of. And if for some reason you need to be changing any of the settings listed below, you likely will end up with two or more Target Display Ids for the same physical display.
- Video-Out Port Connection - If you plug a display into different Video-Out Port, it will have a different Id.
- Changing Display Resolution - If you change the Display Resolution in the WCP Display applet (Figure 4), its reported Size (Figure 2) will change. Thus it will have a different Id.
- Changing Display Scale Factor - If you change the Display Scale Factor in the WCP Display applet (Figure 4), its reported Size (Figure 2) will change. Thus it will have a different Id.
- Replacing a Display - If you replace a physical display in your matrix with another display of the same resolution and connected to the same Video-Out Port, it will have the same Id. If the replacement display has a different resolution than the original display, it will have a different Id.
- Changing Display Logical Name - Has NO effect on the displays Id. You can change it any time without affecting your design.
Example: Same physical display set to two different resolutions results in different Ids.
- \\.\DISPLAY3, 1920x1080, Id=1956092850.
- \\.\DISPLAY3, 1097x617, Scale Factor 175%, Id=1991944153.
Recommendation
Unless you have a reason to do so, leave the display's Scale Factor at 100% and Resolution at the value that matches its physical resolution in WCP Display applet (Figure 4). It can make Target Display settings a little easier to determine.
Display Scale Factor
Scale Factor - Bottom Line: You are always best off to leave display scale at 100% (native resolution) unless you have a specific need to change it.
Display Scale Factor is set in the WCP Display applet (Figure 4), by the "Change Size Of Text, Apps And Other Items" pulldown control. You can set scale factor to 125%, 150%, etc. This increases the size of program's buttons, textboxes and other user interface controls. It is often used for High DPI (dots per inch) 4K displays to make program user interfaces usable.
When using Display Scale Factor (other than 100%) with VideoMill, the Size shown in Figure 2, will be an applied display Size which is different than the physical display native resolution. You don't need to remember how Windows calculates the applied size (explained in the next paragraph), but just know that despite the reported Size difference, your videos will be shown at full video resolution includig 4K video.
Here's how Windows calculates the applied display Size. If you scale a display, Windows reports its applied Size based on the Scale Factor. This will make the Size (in Figure 2) look a little strange. For example, if you have a 4K display with a physical resolution of {Width=3840,Height=2160}, and set the display Scale Factor to 150% (1.5X), Windows will report its applied size as {Width=2560,Height=1440}. That's because (2560 * 1.5 = 3840) and (1440 * 1.5 = 2160).
Resetting Target Display on Multiple Media Items
Productivity Tip. If you end up having to reset the Target Display on multiple Media Items, it can be done quickly without having to edit each Media Item individually. Follow these steps:
- Select any Media Item and set its Target Display to the new value (Figure 3).
- In the Media List Editor, go to Edit Media Item > Copy Attributes from Media Item.
- Go to Edit Media Item > Paste Attributes Selection into Media Items Selection > Media Screen Dimensions.
- Select Target Display from the attributes selection dialog.
- Select all the Media Items that should get the new Target Display value.
Windows Extended Desktop and Video Walls
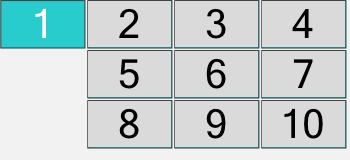
If you are constructing a video wall, for example a wall of 9 displays in 3 rows and 3 columns , extend the displays in a 3x3 matrix (Figure 5). That way you can use Media Screen stretching to stretch a video across two or more displays. The key is to have the video wall displays in a matrix (square or rectangular) if you plan to stretch videos across displays. So if you have 8 displays, you could organize them as: a) one row of 8 displays, b) two rows of 4 displays, c) four rows of 2 displays.
Display #1 (Figure 5) is the Primary display used to run Windows programs and Video Mill. It will not be part of your Video Wall. It should not matter where you position the Primary display.
Extended Desktop Tips for Video Wall
- Extend in Rows and Columns - This orientation will allow you to stretch videos across displays.
- Align Rows and Columns - Keep the rows and columns X,Y coordinates aligned (ie Align tops of rows and Lefts of columns).
- No Space Between Displays - Don't leave space between rows and columns.
- Keep Displays at Native Resolution - Don't change the display Resolution or use a scale factor in WCP > Display applet unless required for some other purpose.
- Keep Displays Plugged into Same Video-Out Ports - Moving displays connection plugs between various graphics card ports will affect the Video Mill design. Pick one connection setup and stick with it.
- Stretch ALWAYS goes Left to Right - Pick origin displays accordingly for your design.
- Equivalent Sized Displays Work Best - If you have one or two odd sized displays, position them to the far right column or on the bottom row of your display matrix.

Scale Media Items Dimensions (PPI Adjustment)
Menu Locator: Media List Editor - Edit Media Item > Scale Dimensions of Media Items Selection .
Term: PPI/DPI (Pixels/Dots Per Inch) is the pixel density or resolution of the display device.
If you develop a video design using a display with one PPI, then connect to another display with a different PPI on the performance system, the locations and sizes will appear different (in physical dimensions, inches or centimeters). In this case, you may want to scale the Dimensions of your Media Items with the Scale Dimensions of Media Items Selection tool.
Scaling applies only to the Media Item's Dimensions. It has no effect on Size Modes for Full Screen or Natural Media Size.
About Display PPI/DPI
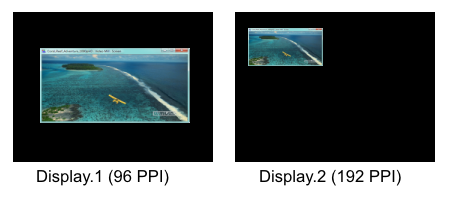
Video Mill does not do any Location or Size calculations based on display device PPI. For example, if your design time display is 96 PPI and you size a Media Screen to 96,96 pixels (width,height), the screen will appear as a square, 1 inch by 1 inch. Then if your performance system is a 192 PPI display and load the same Media Screen, it will appear as a square, 0.5 inch by 0.5 inch. PPI has the same effect on Location (X,Y). When working at new venues with display systems you are not familiar with, ask the system administrator for display size and PPI.
Calculating Scale Factor by Display PPI
To calculate Scale Factor based on display PPI, use:
Scale Factor = (Performance display PPI) divided by (Design display PPI)
Example:
You develop your design on a display with 96 PPI.
Your performance display is 192 PPI. (twice the pixel density)
Scale Factor = 192 / 96 = 2.0
Figure 7 illustrates the PPI issue visually. The same Media Screen (with same location and size values) is diplayed on two displays of the same physical size but with different PPIs. Note how X,Y Location is affected as well as the Size.