Sound Mill X3 : User's Guide
 Contents
 Language
 Product Home
Automator - Visual Styling
 Page Bottom
Automator Control Panes
Control Bars
- Window Title Bar (top)
- Menu Bar (top)
- Toolbars (top)
- Message Status Bar (bottom)
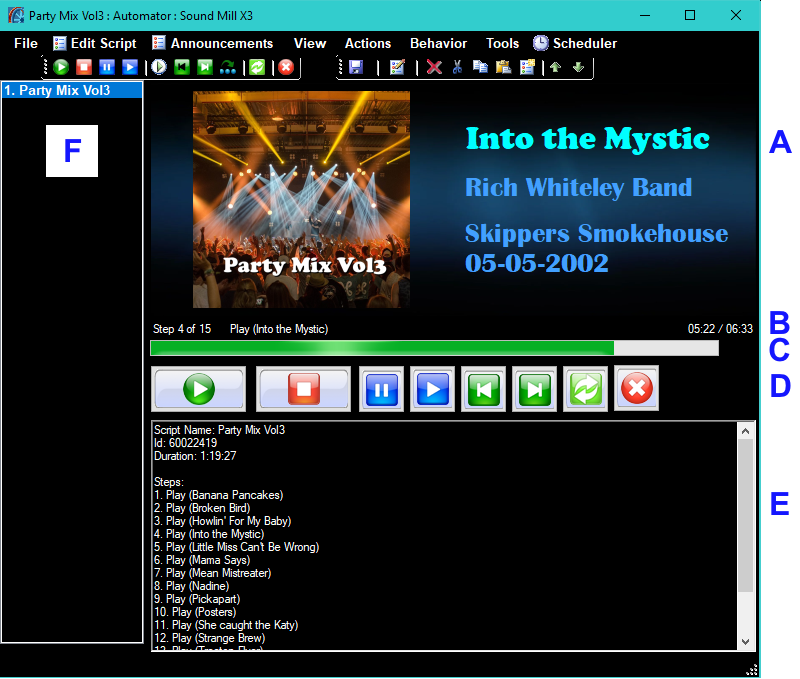
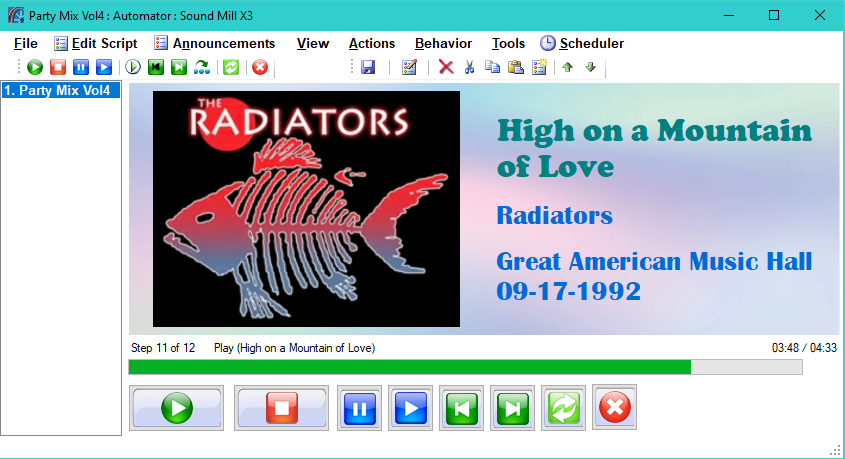
Control Panes (see Figure 1)
- A. Now Playing Screen - Displays Song Title, Artist, Album Name, and Album Artwork. (from media file Mp3 tags)
- B. Run Status - Current playing song playback time readout.
- C. Progress Bar - Current playing song playback time progress.
- D. Play Control Buttons - Buttons to control script operation.
- E. Script Contents - Steps and controls included in Script.
- F. Scripts List - List of all available Scripts.
 To Page Top
Automator - Visual Settings
The Automator is designed so that you can expose different controls when editing soundlists and when playing audio in performance mode. It can be used in Full Screen mode and projected onto a display screen for crowd viewing.
After making visual settings changes in the Automation Options, you need to refresh the Automator by clicking View > Automator User Interface Refresh.
Automator Theme Colors
Theme Colors define the foreground (text) and background colors of the Automator. Figure 3 shows a dark Theme ( White text on Black background). Figure 4 shows a light Theme ( Black text on White background). (set in the Automation Options)
Progress Bar Height
This is the height (thickness in pixels) of the Progress Bar (control C in Figure 1). A value of 20 is usually about right (maybe higher on a 4K display). If you want it to appear more prominent for audience viewing in Full Screen, set the number higher. (set in the Automation Options)
Show/Hide Control Panes
Click View > Show Automator Control Panes > Pick Panes to Show to select Panes that you want to make visible (Figure 2). The current panel configuration can be saved as a Favorite for later use. For example, you could save the preferred Full Screen look as a favorite. If you are not using the Now Playing Screen, you can hide the pane and save on CPU cycles that are used to draw the screen.
When hiding the Scripts List you can select a Script to run by clicking Actions > Select Script To Run.
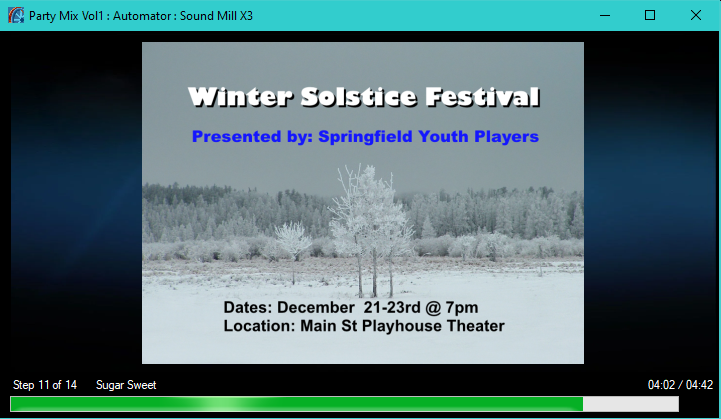
Figure 2 selections will result in showing 3 Panes: Now Playing Screen, Run Status, and Progress Bar. Other Panes are hidden (result screen in Figure 3).
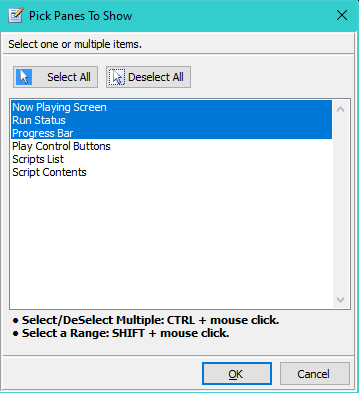
Figure 3 - Automator Theme Colors: White foreground (text) on Black background. Using App Default Background Image.
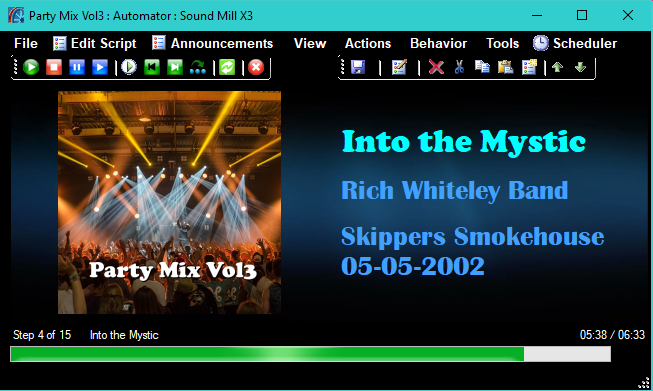
Figure 4 - Automator Theme Colors: Black foreground (text) on White background. Using Background Custom Image (rainbow blur).
Full Screen Mode
Full Screen Mode is designed so that you can project the Automator onto a large display for crowd viewing. The features below make it easier to control the look when you jump to Full Screen.
Entering Full Screen Mode
Click View > Full Screen Toggle (or keyboard Ctrl-F11) to swap between normal window size and Full Screen mode. ESC keyboard key (Escape) will exit Full Screen mode as well as Ctrl-F11. Any Automator Control Panes that you want to hide should be hidden before jumping to Full Screen (see 'Show/Hide Control Panes' above).
How to Project Onto a Large Display
If you want to show the Now Playing Screen on a large display for audience viewing, follow these steps.
- Connect the display to the computer (via HDMI cable or other connector).
- Extend the displays on the Windows Desktop.
- Hide the Automator Control Panes as desired. (explained above)
- Drag the Automator window to the target display.
- Enter Full Screen Mode.
Text Fonts Scaling
 Tip - When you jump to Full Screen mode, the font size for text elements (song title, etc.) is scaled up proportional to the current window size. So for the best approximation, before you jump to Full Screen mode, follow these steps.
- Hide any Control Panes that you don't want to see in full screen mode.
- Resize the Automator window so that the Now Playing Screen looks the way you want to see it in full screen (given current font sizes).
- Click View > Size Automator to Display Aspect Ratio. With the Automator window set to the same aspect ratio as the display device, you will see how long lines of text will wrap onto multiple lines. Test it with the song that has the longest song title.
In Full Screen Hide These
In Full Screen, the Window Title Bar is hidden. Also the Menu Bar, Toolbars, and Message Status Bar can be set to Auto-Hide when jumping to Full Screen. Click View >In Full Screen Hide These to pick which control bars to hide (any or all). Hidden controls are restored on return to normal window size.
When you auto-hide the Menu Bar, you can still use keyboard shortcuts to operate the Automator. You can print out the shortcuts for reference (Tools > Shortcut Key Summary). If needed you can always restore the Menu Bar in Full Screen with the Menu Bar toggle shortcut (Ctrl+Alt+M).
Using the Window Maximize/Restore button
 This button has the same effect as clicking View > Full Screen Toggle (or keyboard Ctrl-F11). However, the Window Title Bar will not be hidden.
Now Playing Screen

The Now Playing Screen panel is designed for audience viewing if you want to project the screen on a large display. It provides a level of control over fonts, colors, sizing and artwork. Visual settings are set in the Automation Options .
Tag text values are sourced from Mp3 tags (aka ID3 tags) stored inside each media file. If any text elements are not showing on the Now Playing Screen, it is likely that the associcated Mp3 tags in the media file is blank. The Now Playing Screen panel displays the following content (Figure 5).
Mp3 Tag Elements Settings
- - The following settings are available for Now Playing Screen elements.
- Song Title - Font family, size and color. Source: Title tag or media filename.
- Album Artist - Font family, size and color. Source: AlbumArtist tag or Artist tag.
- Album Name - Font family, size and color (shares visual settings with Artist). Source: AlbumTitle tag.
- Album Artwork - Width of the Artwork image (as a percent of screen) and Border Style. See image sourcing below.
- Track Number - Source: TrackNumber tag. (not displayed on this screen)
Mp3 Tags Edit
You can change the values of Mp3 Tags with an Mp3 Tag editor. See the Editing Mp3 Tags section below for full details.
Text Tag Elements Width Layout
Text items will occupy the right side of the Now Playing Screen. Based on the specified Width for Album Artwork, Text Elements will take the remaining width of the screen. For example, if you set Album Artwork Width to 40%, then the text elements will occupy 60% of the screen width. If you only want to show the Text Elements (ie no Album Artwork), set the Album Artwork Width to 0%.
Text Tag Elements Fonts
You can use any font family and font size available on you computer.
A good approach is to pick a font size about 24Pt (or whatever size looks good based on your typical Automator window size). Font size is scaled up proportionally when jumping to full screen.
Tip - When picking new font for tag text, test the font with a media file that has the most text in its tags (usually the longest song title). Text will wrap when it can't fit on one line, so that expands the vertical space text will use.
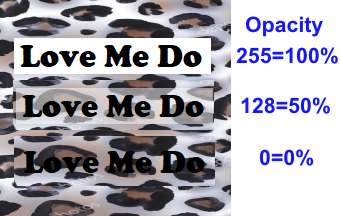
Text Background Color Opacity
Opacity is the opposite of transparency. Text Elements have a foreground and background color. Figure 6 shows text with a black foreground and a white background, in front of a leopard skin image. The Color Group Editor allows you can set an Opacity level (0-255) on the background color to allow the image behind the text to filter through. Opacity=0 makes the color fully transparent. Opacity=128 makes the color 50% transparent. Opacity=255 makes the color solid (no transparency). Figure 7 shows an example Screen with a white background (opacity=33).
Show/Hide Tags
Any of the Elements (above) on the Now Playing Screen panel can be shown/hidden via the Show Info checkboxes in the Automation Options.
Now Playing Screen Limitations
- The screen is designed for running one Script at a time. Running multiple Scripts concurrently could produce unpredictable visual results.
- The screen always reflects the status of the current selected Script in the Scripts List panel.
- You cannot edit media file Mp3 tags while the files are in use by Sound Mill . Close Sound Mill and restart after you are done editing.
Now Playing Screen - Background Image
The Now Playing Screen Background Type is specified in the Automation Options.
Now Playing Screen Background Choices
- Solid Color - The Automator Theme Colors background color is used. Figure 10 shows a solid color background.
- Custom Image - It can be any size and most of the common image formats will work. The image will be stretched to fit the current size of the Now Playing Screen. If the image cannot be loaded, Solid Color will be used.
- App Default Image - Shown in Figure 5.
Text Flicker with Background Images
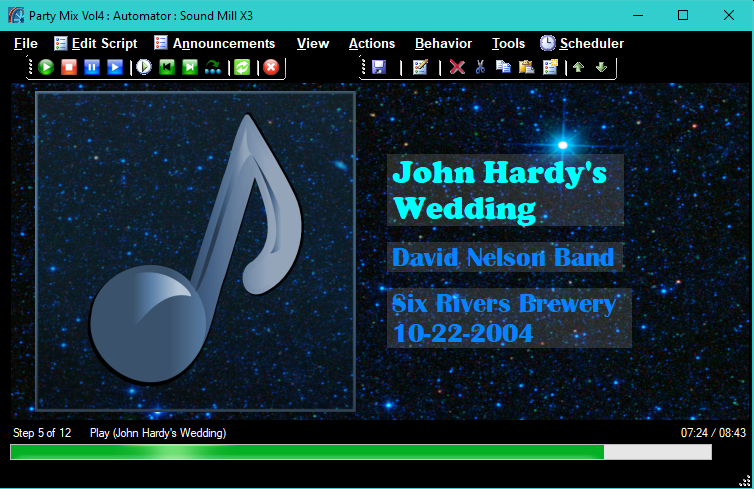
When using a background image, there is a quick flicker when the text elements (song title, etc) change. The degree of flicker can be minimized by making the Automator Theme Colors background color similiar to the predominent color of the background image. For example, in Figure 7, the background image (star field) is predominently black, so the Automator Theme Colors are set to white foreground on black background. When using Solid Color for background (ie no background image), there is no text flicker.
Now Playing Screen - Album Artwork
Artwork Width
Artwork image will occupy the left side of the Now Playing Screen. You can set the Width of the Artwork image (in percent of the width of the Now Playing Screen). The Artwork image is scaled to fit the space while maintaining the image aspect ratio (no stretch distortion). If you want to show only the Album Artwork (ie no Text Elements), set the Album Artwork Width to 100%. Figure 8 shows the Artwork Width set to 50%.
Artwork Border
You can apply a border to the Artwork in the Automation Options (None, Single, or 3D). Figure 10 shows a border example.
Artwork Sourcing
You can control what artwork is displayed for songs based on the Artwork Search Precedence below. Album Artwork can be sourced from one of several locations. Each location is checked in sequence. The first found Artwork source will be used.
Artwork Search Precedence
- Artwork Image Default overrides all other sources when Always Use Artwork Image Default is checked in the Automation Options. This is useful if you have set the Image Default to a special event image and always want to have that image displayed.
- Image embedded in the media file itself. Use an Mp3 tag editor if you want to embed an image into a media file. If multiple images are embedded, image type 'FrontCover' is picked first. Use image embedding if you want each media file to have its own unique image. When you want all media files in a folder to use the same image, it is more efficient (and less work) to place a Folder Image file into the folder (next option).
- Custom Folder Image file (user provided) placed in the same folder as the media files. The file must be named 'FolderArtworkBTS' and can be any of the popular image formats (png, jpg, bmp, gif, etc, Example: FolderArtworkBTS.png). Use this if you want all media files in a folder to share the same artwork. Different folders can have different custom images (ex album cover, band logo, your event signage, etc).
- Windows Folder Image file (named Folder.jpg) found in the same folder as the media files. Windows Media Player (WMP) sometimes places this file in the folder when a user uses WMP to play the files. (usually a hidden system file)
- Artwork Image Default when no other image source is found (specify this in the Automation Options). When none is specified the Sound Mill Artwork Image Default is used. (below)
Sound Mill Artwork Image Default
 The
Sound Mill
Default Album Artwork Image is a music eight note. It has a background opacity of 30% so a background image will show through it (Figure 7).
The
Sound Mill
Default Album Artwork Image is a music eight note. It has a background opacity of 30% so a background image will show through it (Figure 7).
Making Folder Artwork Changes
Sound Mill keeps a cache of Folder Artwork for reuse and efficiency. If you make changes to Folder Artwork while Sound Mill is running, you may need to clear the cache so new changes will be found. This includes adding, deleting or replacing Folder Artwork image files. Note that while Artwork is cached, Windows keeps a file lock on the files on disk, so you can't make changes like deleting or renaming the files until you clear the cache.
Click View > Clear Album Artwork Cache.
Artwork Custom Default Image
A Custom Image can be used if you plan to display the Automator on a large screen for crowd viewing. It can be literally any image you want (company/organization logo, event signage, branding image etc). A custom image is best when created with image size (width, height in pixels) close to the size that it will be displayed. If the image is created too small it will have a fuzzy look when scaled up on the screen. Most industry produced Album Artwork is square but you can make your custom image any aspect ratio you want based on how you want to display it. Transparent background works (tested with png format, Figure 8). Animations do not work (ex. animated gifs only show the first frame).
Figure 8 shows Album Artwork occupying half of the screen (Album Artwork Width set to 50% in the Options). Artwork Image Default is set to a custom image.
Figure 9 shows Album Artwork occupying the full width of the screen (Album Artwork Width set to 100% in the Options). Assuming there is no artwork embedded in the media files, put a Custom Folder Image file (ex. FolderArtworkBTS.png) into the folder with the media files. The Artwork Image can be a wider aspect ratio (width to height) when displaying in this format.
Music with Announcements Artwork
Announcement audio files can have Mp3 tags and artwork, just the same as music files. So you can place your Announcement audio files in a separate folder and all the Artwork image sourcing guidance above will apply to the Announcements. And you can use the Mp3 tags that get displayed on the screen (AlbumName, AlbumArtist) for information related to your business, organization or event (info such as business name, Website link, phone number, etc).
Example
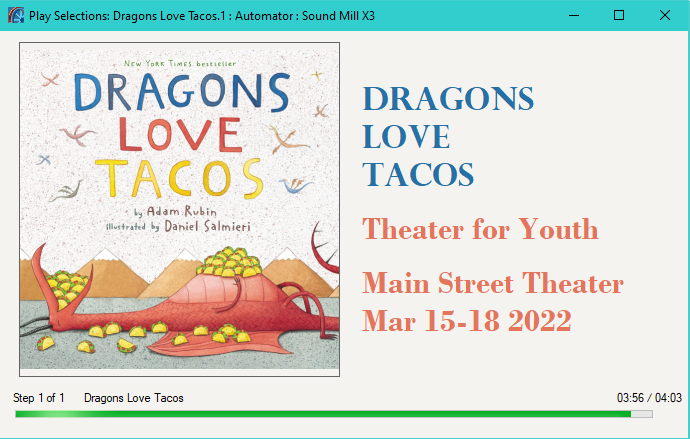
Figure 10 shows the resulting screen for an announcement Mp3 file set with the following values for Mp3 tags.
- Song Title: Dragons<br>Love<br>Tacos
- Album Artist: Theater for Youth
- Album: Main Street Theater<br>Mar 15-18 2022.
- Artwork: Embedded in the Mp3 file. Artwork Border = Single (set in the Automation Options)
Note the break tags (<br>) to produce line breaks in Song Title and Album.
Editing Mp3 Tags
Get an Mp3 Tag Editor
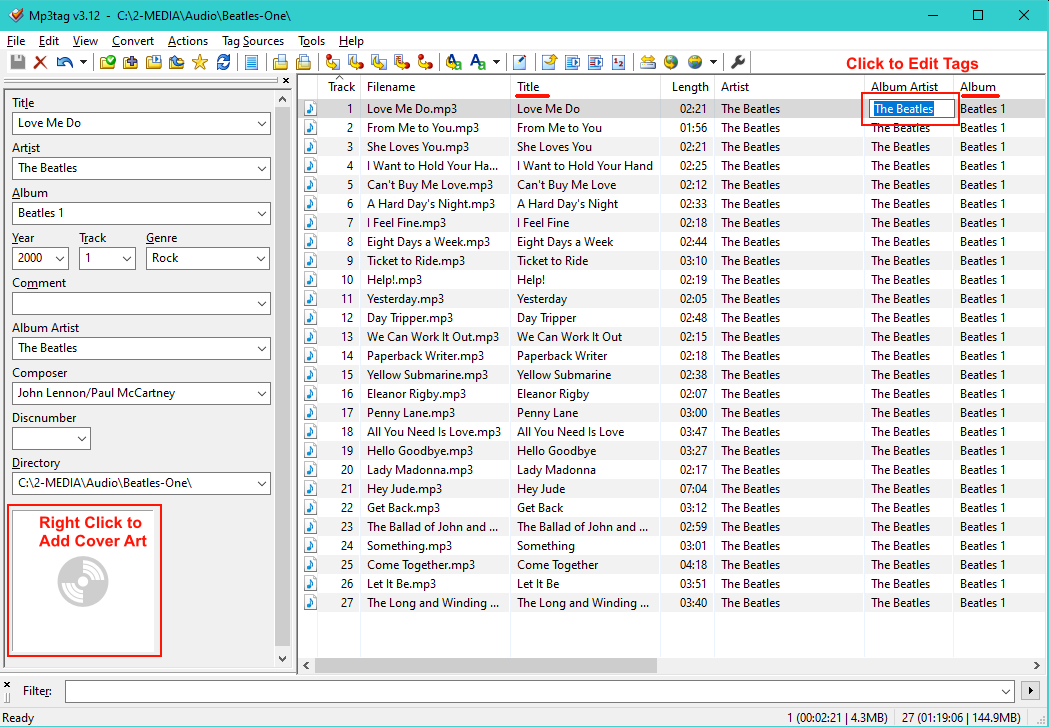
Mp3 Tags (aka ID3 tags) are meta information about a media file and are stored inside the file itself. Many media file formats allow for Mp3 Tags (mp3, wav, aac, flac, wmv, many more. Full list here. ) Editing Mp3 Tags is fairly simple. We recommend the excellent (and free) Mp3TAG Editor (Figure 11). There are other tag editors and they all achieve the same goal.
Acquiring Mp3 Tags into Sound Mill
Mp3 Tags are acquired for a new Sounditem when you create it in Sound Mill . After making any tag changes to your music files, you need to reacquire the changes into your existing Soundlist. Click, Edit Sound Item > Media File Information > Reacquire Info. You cannot edit/save changes to Mp3 Tags while Sound Mill is using the media file. You need to close Sound Mill while you edit Mp3 Tags.
Inserting Line Breaks into Mp3 Tags
You can put new line breaks into any of the text tags by placing a <br> tag at the break point (Must be lowercase letters br, no spaces inside of angle brackets. This is an html line break symbol). This is a non-standard marker (only Sound Mill will process it as a line break). See Figure 10 (above) for an example of using line breaks. If your Mp3 Tag Editor allows entry of hexidecimal characters, 0x0D 0x0A (carriage return, new line) should work as well.
Tweaking Mp3 Tags
After acquiring Mp3 Tags into Sound Items, you can tweak the values if needed. In the Sound List Editor, click Edit Sound Item > Update Attributes > MP3 Tags: Song Title, Artist, or Album. (More info)
Mp3TAG Editor Basics
- Drag/Drop a folder of Mp3 files into Mp3TAG. (result will look like Figure 11)
- To Edit A Tag: Mouse click on the tag and type or paste the new text value. (Figure 11 upper right)
- To add album art: Select the Mp3 file in the list. Then right-mouse click on the disk icon (Figure 11 lower left).
Power Editing: Mp3TAG has lots of features to make power editing much easier. You can set a given tag on a selection of multiple files using the Actions menu. There are many tutorials for this editor. Just do a web search for "Mp3Tag Tutorial".