Video Mill : Knowledge Base
 Contents
 Language
 Product Home
Multiple Media Screens on Multiple Displays
 Page Bottom
Requirement
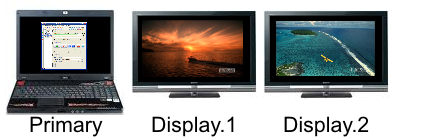
You need to display multiple videos simultaneously or sequentially as a playlist, at full screen size and each video on its own display device (see Figure 1). These instructions are for the 2 video arrangement shown in Figure 1, but can be adapted for any number of displays.
 To Page Top
Media Screen Set-up Steps
Extend Displays on the Windows Desktop
This gives VideoMill visibility to your connected displays. See the Display Management in Windows article for details if you are not familiar with the procedure to Extend Displays.
Set Multi-Screen mode
Set the program to Multi-Screen mode. Go to Behavior > Screens Mode. Clicking this menu item will toggle the mode between Single-Screen and Multi-Screen mode.
Create Media Items
For these instructions, we will assume you have created two Media Items (one for each video). To do this, simply drag/drop the videos from Windows Explorer (or any file manager) into the Video Mill Media List Editor. Or you can import the media files using an Import menu item in the File menu.
Set Screens Dimensions
-
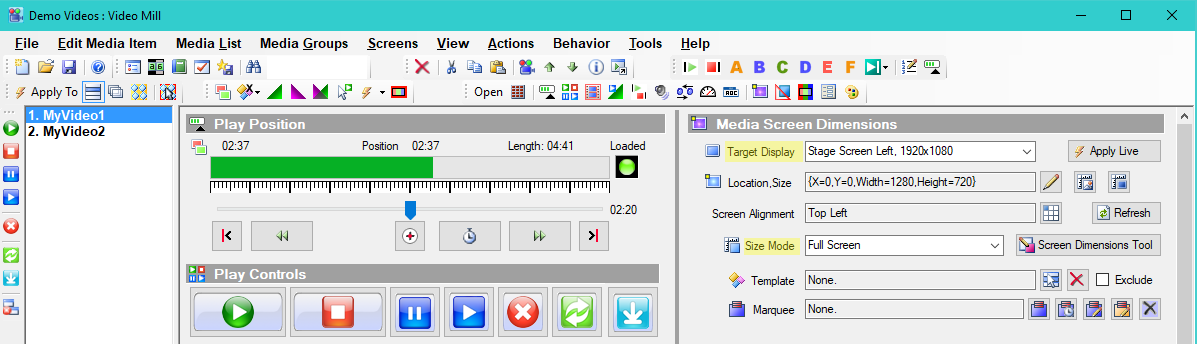
Now select each Media Item and perform these steps using the controls in the Media Screens Dimensions panel (Figure 2).
- Set Target display to desired display.
- Set Size Mode to "Full Screen".
Location,Size and Screen Alignment attributes are IGNORED when using "Full Screen" size mode.
 For More Information:
See the Media Screen Dimensions Help page.
For More Information:
See the Media Screen Dimensions Help page.
If the set-up is correct, the two Media Screens should play on the two displays as shown in Figure 1 when you select each video (left column) and click the Play button.
Playing the Videos Sequentially (Simple Playlist)
To play the videos as a simple playlist (one after another), we use the Automator.
Make a Playlist
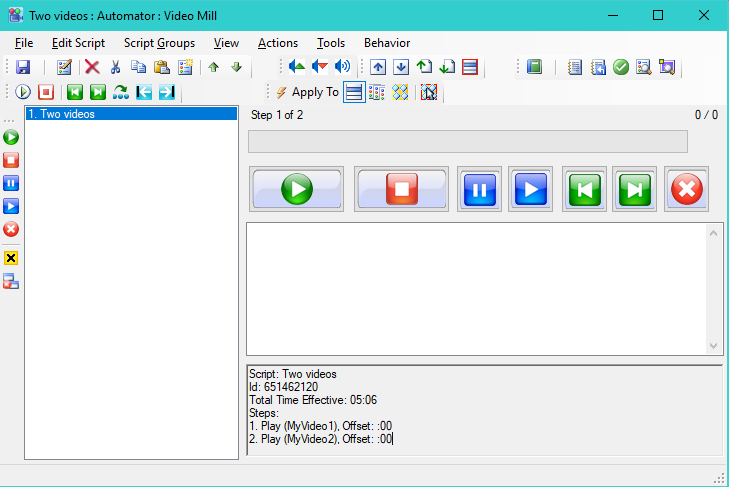
- Open the Automator via Actions > Automator menu. (Figure 3)
- In the Automator, create a new Script via Edit Script > New Script menu.
- Now edit the new Script. With the new Script selected (left column), click Edit Script > Edit Script menu. The Script Editor (Figure 5) will open.
- Add 2 Play Steps to the Script (as shown in Figure 5). They will play sequentially like a playlist.
- In the Script Editor, select the "Play" step type (left column).
- Click the Add A Step button. A Media Item selection menu will popup. Select the videos you want to play, then click OK.
- If you want the script to repeat, open the Special Processing section at the bottom of the Script Editor by clicking on the section bar. You can make the script repeat forever by checking the Loop continuously checkbox. Or set a specific number of times that it should Repeat.
- You can Reorder the script steps by clicking the Edit Steps button. In the resulting popup use the green Up/Down arrows to reposition a video in the list.
For More Information
- Automator (Figure 3).
- Script Editor (Figure 5).
Playing the Videos Simultanously
Once you have set the Target Display, there are two methods you can use to start the videos to play simultanously: 1) Use a Media Group, or 2) Use an Automation Script. (described below)
Method 1 - Starting Videos with a Media Group
A Media Group is simply a defined set of two or more Media Items (Listing 1). Once you have set up a Media Group, you can use the Media List Editor play controls (Figure 2) to perform actions on all Media Items in the group with one button click (ie Start all, Stop all, etc). Make sure the Apply-To mode is set to "Apply To Media Group" (see Apply-To toolbar in Figure 2).
Media Group Instructions
- See this link for setup and usage instructions for Media Groups.
- There is also a Media Group instruction video in the Online Demo Videos section.
Listing 1. Media Group_________________ Media Group Name: Two videos Media Items in Group: 1. MyVideo1 2. MyVideo2
Method 2 - Starting Videos with an Automation Script
You can use an Automation Script to start videos simultanously. You create a script (Listing 2). All Play Steps need to have an Offset Time set and enabled. Offset Time zero (0:00) starts the Step as soon as the Script is started. If you do not set an Offset Time, then the Steps will execute sequentially one after another, each waiting for the previous video to end (like a simple playlist).
Setting Step Offset Time
- In the Script Editor, click the Edit Steps button. This pops up a list of Steps.
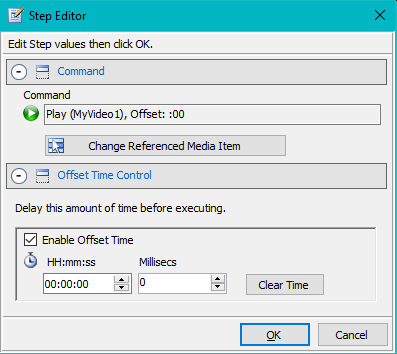
- Select a Step to edit, then click the Edit button. The Step Editor pops up (Figure 6).
- In the Offset Time Control section, check the Enable Offset Time checkbox.
- Leave the Offset time value at zero (0:00). Click OK to save the setting.
You can optionally set the Offset Time for all (or multiple) steps at once if they will all get the same time value (as in this case). In the Script Editor, click the Offset Time button and fill in the popup menus.
For More Information
- Automator (Figure 3).
- Script Editor (Figure 5).
- Step Editor (Figure 6).
Listing 2. Automation ScriptScript: Two videos Steps: 1. Play (MyVideo1), Offset: :00 2. Play (MyVideo2), Offset: :00
Synchronize Multiple Videos in a Loop
There are a couple ways to Synchronize Multiple Videos in a continous loop. This includes playing all videos to their end point, then restarting them at the exact same time.
Method 1 - Use a MediaGroup
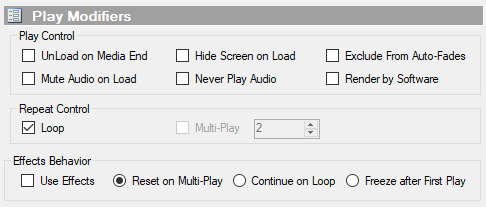
MediaGroups is the simplest way to sync videos. See the section "Starting Videos with a Media Group" above. To make the videos repeat in a loop, for each video MediaItem, set the Play Modifiers panel, check the "Loop" checkbox (Figure 4).
Method 2 - Use an Automation Script
There are cases where MediaGroup method fails to keep the videos synced (ex long videos, different length videos, different video formats, long running loops, or other reason). In this case, a better approach is to sync play using a Script. See the section "Starting Videos with an Automation Script" above to setup the videos so they start simultaneously (using the Offset Time zero (0:00)).
Loop/Repeat
To do the Loop processing, you should check the "Loop continously" checkbox in the Script Editor > Special Processing panel (Figure 5). Once all videos have finished playing, this restarts the Script.
For this method, DO NOT set the Play Modifiers panel "Loop" checkbox (Figure 4) as this will interfere with the Script Loop processing.