
 Video Mill : User's Guide
 Contents
 Language
 Product Home
Media Screen Dimensions
 Page Bottom
Screen Dimensions Controls
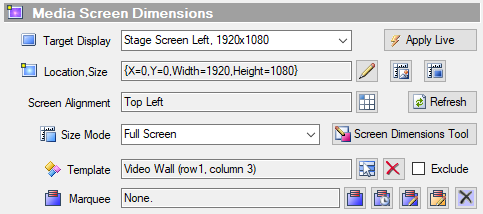
Screen Dimensions consist of: Media Screen Location (X,Y - Horizontal,Vertical position); Size (Width, Height) (all values in pixels).
Methods to Set Dimensions
- Screen Dimensions Tool - Click the Screen Dimensions Tool button (Figure 1) to open the Screen Dimensions Tool dialog window.
- Edit Dimensions Dialog - Click the Edit Dimensions button (Figure 1, pencil icon button), to manually change the Screen Dimensions.
- Drag Media Screen window - Load a media screen and turn on (show) the window Title Bar. Then you can drag the window with the mouse to a display location and/or grab the corner of the window and drag it to resize. Once completed, click the Save Screen Dimensions to Media Item tool bar button to save the dimensions.
Apply Live button
Dimensions Settings
- Target Display - Sets the physical display or Virtual Display that the Media Screen will be loaded to. If the Target Display is not present (ie a secondary display that has not been extended on the desktop), the Primary display will be substituted (unless you check the Option > Media Screen Load > Abort Load if Target Display is not found).
-
Location,Size - A Display Location (X,Y - Horizontal,Vertical in pixels) and Size (Width, Height in pixels). For changes to location and size to have an effect on a Loaded Screen (via Apply Live), the Media Item Size Mode must be set to "Media Item Dimensions Size". Use the following set buttons:
-
Edit -
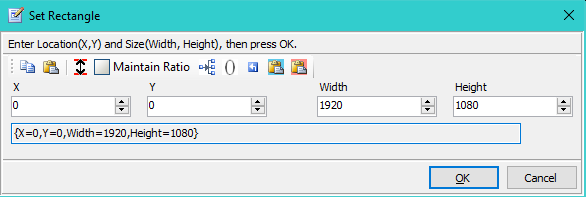
 Set via the Location,Size Dialog (Figure 2). Location is ignored unless Screen Alignment is set to use Location X,Y.
 -
Set to Natural Media Size -
 Set the Size to the media's natural recorded size. Location is reset to {X=0,Y=0}.
 -
Set to Target Display Size -
 Set the Size to the Media Item's Target Display size. Location is reset to {X=0,Y=0}.
-
Edit -
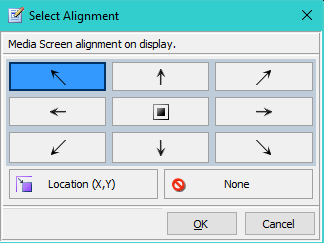
- Screen Alignment - Sets the alignment mode that determines how the Media Screen is located (positioned) when loaded to a display. Click the Set Alignment button (Figure 1) to open the Alignment Selection Dialog (Figure 3) to set alignment mode. See Alignment Selection Dialog section below.
-
Size Mode - Media Screen size when loaded to a display. Click the
Size Mode
button (Figure 1) to set the mode.
- Full Screen - The Media Screen will be displayed Full Screen. In this mode, Location,Size and Screen Alignment are ignored.
- Natural Media Size - The Media Screen will be displayed at the Natural Video Size (original recorded video size in pixels). In this mode, any custom Size setting is ignored.
- Media Item Dimensions Size - The Media Screen will be displayed at the Screen Dimensions Size. In this mode, Location,Size and Screen Alignment settings are used.
- Refresh - When also using video cropping, you may need to refresh a loaded Media Screen after resizing the Screen. This forces the cropping area to be recalculated based on the new screen size.
-
Load Template - A Media Item can reference a Load Template to use when it is loaded/played. The current Load Template Source Mode determines whether or not this template is used.
- Template Selector - Picks a template to use for the Media Item.
- Delete - Remove the template reference from the Media Item. (but the template remains in the template list).
- Exclude - When checked, it will exclude the Media Item from using any template when loaded/played. You do not have to delete the template reference to exclude it.
-
Marquee - These buttons apply on the Marquee used by the selected Media Item. These functions are also available from edit buttons on the Marquee Edit Toolbar.
- Set a Standard Marquee - Sets the selected Media Item's Marquee to a standard Marquee (via pick list popup).
- Set a Timed Messages - Sets the selected Media Item's Marquee to Timed Messages (via pick list popup).
- Edit Marquee - Edit the selected Media Item's Marquee.
- Edit Marquee Style - Edits the Marquee Style used by the Marquee of the selected Media Item.
- Remove Marquee - Removes the Marquee from selected Media Item. The Marquee remains available for later use.
 To Page Top
Location, Size Dialog
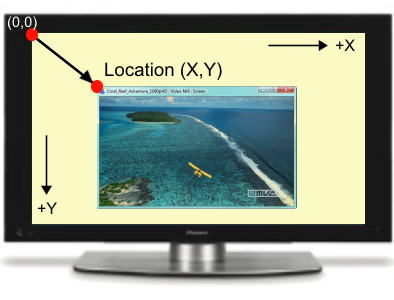
Sets a Location (X,Y) and Size (Width,Height). When the Maintain Aspect Ratio checkbox is checked, width and height will maintain the original Aspect Ratio (Width/Height). Location (X,Y) values are oriented as shown in Figure 4.
Copy and Paste are provided to easily transfer values from one dialog to another.
- Copy - Copies all four values to the clipboard.
- Paste - Pastes all four values from the clipboard. Assumes a Location,Size has been previously copied to the clipboard.
- Show Valid Ranges - Show the valid value range for each value.
- Maintain Aspect Ratio - When the Maintain Aspect Ratio checkbox is checked, Width and Height will maintain the original Aspect Ratio (Width/Height) as size values are changed.
- Set All To Same Value - You are prompted to enter a value.
- Set All To 0 or Minimum - All values are set to the minimum allowed value (most often 0).
- Reset - Resets all values to their original values (when the dialog was opened).
- Paste Only X,Y - The X,Y values from the clipboard are pasted.
- Paste Only Width,Height - The Width,Height values from the clipboard are pasted.
Productivity Tip
Any dialog that lists a Location and/or Size in the standard format below, can be copied to the Windows clipboard and pasted into this dialog.
Standard Location, Size format example: {X=100,Y=200,Width=300,Height=400}
Alignment Selection Dialog
Location Alignment Modes
-
Relative Alignment - The element is aligned at a relative location inside its container.
Alignment values: Top Left, Top Center, Top Right, Middle Left, Middle Center, Middle Right, Bottom Left, Bottom Center, Bottom Right.
Examples: A Media Screen contained on a display; A Marquee contained on a Media Screen; etc. - Location (X,Y) - An X,Y Location from the Media Screen Dimensions is used to position the screen on the Target Display.
- None - No alignment adjustment is made. The element is located at the default position in its container. Default is generally the X,Y origin (0,0 - upper left corner of the display).
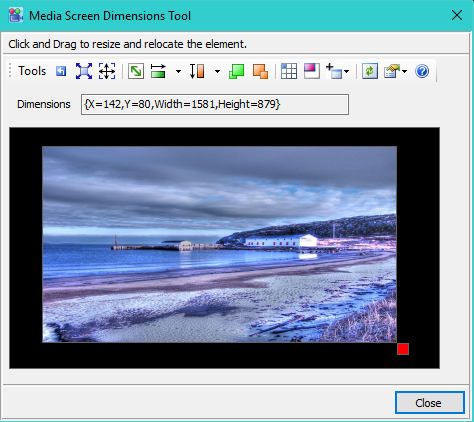
Media Screen Dimensions Tool
The Media Screen Dimensions Tool (Figure 5) let's you change the size and and location of the Media Screen.
Open the tool, by clicking the Media Screen Dimensions Tool button (Figure 1). Click on the screen box and drag it to relocate its position. To resize it, click on the resize handle (red square at the bottom, right corner of the shape) and drag it. There is a wide variety of sizing and locating functions available on the tool bar.
Tool bar functions
For details on what the tool bar functions do, see the Resize/Relocate Tool section.
Resize/Relocation Tools
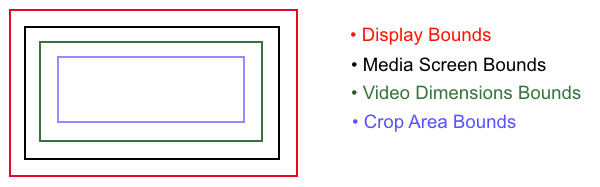
Typical desktop organization when making adjustments to Crop Area size/location; Video size/location; and Media Screen size/location.
Tools in Figure 6 (left to right): Crop Area Tool, Video Dimensions Tool, Media Screen Dimensions Tool.

About Display PPI/DPI
If your Performance display PPI/DPI (pixels/dots per inch) and your Design time display PPI are different, you may need to scale your design to the performance system. See Tools > Scale All Media Items Dimensions. Read the cautions before applying this function.