
 Sound Mill X3 : User's Guide
 Contents
 Language
 Product Home
Solo Performer Playlist Cookbook
 Page Bottom
For this cookbook, we'll assume you have read the Sound Mill Quick Start page. It explains how to drag/drop your audio files into the Sound List Editor to create your Sound List. And it explains some of the terminology used in our documentation.
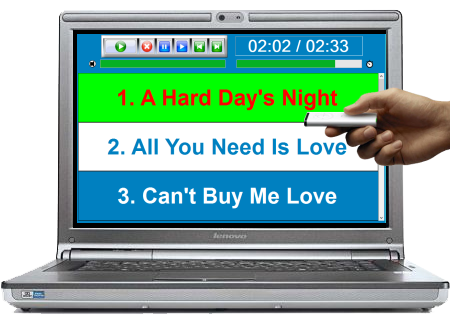
After completing the setup steps below, you should have a working Player looking similar to Figure 1.
Download the Playlist Template
A Sample Playlist configured from these cookbook instructions is available for download (Figure 1). Once downloaded, you can import it into any Sound List. It has some dummy cues to illustrate the look/behavior of the cue buttons table. You can simply delete the dummy cues and add cues from your own Sound List.
Download Instructions
- Simply Download the Playlist to any folder on your computer. If you put it in your "Documents/Sound Mill X3" folder it will be easy to find when you are ready to import it.
Download link: Solo Performer Playlist Template
(v1.0, 9Kb)
Solo Performer Playlist Template
(v1.0, 9Kb)
- In the Sound Mill - Easy Player, go to File > Playlist Port > Import.
- Go to File > Open Playlist and pick the imported Playlist.
- Then rebuild the Player (Actions > Rebuild Player).
Pick a Color Theme
Picking a Color Theme, will set the Player colors for: Player background, Play Position Time Readout, Cue Buttons, and some other visible elements. The Playlist in Figure 1 has a "White on Blue" theme (white foreground (text color), blue background).
- Go to Edit Player Elements > Player Color Theme. The Color Group Editor opens to pick your Color Theme.
- Rebuild Player action (in Action menu) to view the results.
Help page: Edit Player Elements menu.
 To Page Top
Hide Unneeded Player Elements
Hide visibe Player and/or Playlist features that you don't need to free up display real estate.
- Go to the View menu to UNCHECK the following items: Playlist Marquee Image; Playlist Title; and Playlist Description.
Help page: View menu.
Add the Cue Buttons
Assuming you have already created a Sound List of Sound Items (from audio files), you can now add Cues to the EZPlayer.
- If you using the "Solo Performer Playlist Template" (from above), you will want to delete the sample cues that came with the template. Go to Edit Playlist > Edit, Delete or Re-order Cue Buttons, and click the Remove All button.
- In the EZPlayer, go to Edit Playlist > Choose Sound Items for Cue Buttons. You can create Cue Buttons from all SoundItems with one click or pick a selection of SoundItems to use.
Help page: Edit Playlist menu.
Configure Cue Button Table Rows and Columns
Now we want to setup the Playlist so that only 3 Cue Buttons are visible at any given time (as in Figure 1).
- If you using the "Solo Performer Playlist Template" (from above), these steps have already been done but you can follow the instructions to see where the settings were made.
- Go to Edit Playlist > Edit Playlist Attributes. (the Playlist Attributes Editor will popup)
In the Playlist Attributes Editor
- See the Help page link below for screen shots of the editor tabs and settings explanations.
- Set Selected Button Highlight = Reverse_Video. Or you can pick a color group if desired.
- Uncheck Show Button Background Images .
- Set Number of Columns = 1.
- Set Number of Visible Rows = 3.
The rest of the default settings should be fine.
Help page: Playlist Attributes Editor.
Pick Cue Buttons Font
Now we'll pick a font that will fill the Cue Buttons for best reading at a distance. Resize the EZPlayer window to full screen. We'll assume full screen is how you will use it during a performance.
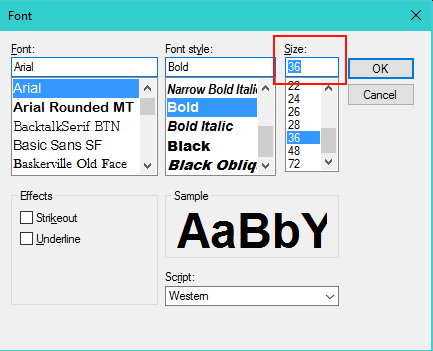
- Go to Edit Playlist > Cue Button Font > Select a Font. Picking the size is important because you want a large font to read from a distance. Pick Size=72 to start with. You don't need to settle on the standard sizes offered in the Font dialog (Figure 2) -- you can type in a custom font size number into the textbox at the top of the Size picker. If Size 72 is not large enough, type in a higher number.
- Rebuild Player to see how the text fills out the Cues Buttons. It may take a few tries to find the optimal size.
Help page: Edit Playlist menu.
Resize the Play Position Time Readout
If you want to know the progress of the audio, you may want to enlarge the Play Position Readout (#7 in Figure 3) so it is readable from a distance.
- Go to Player Elements > Set Play Position Readout Attributes, then in the resulting dialog, pick a larger font size.
- Rebuild Player to see how the Readout looks.
Help page: Player Elements .
Playing Cue Button Highlight Color
If you don't like the color assigned for the Current Playing Cue Button Highlight (#10 in Figure 3), you can change it in the Player Options (accessed from the Sound List Editor).
Help page: Easy Player Options.
Player Behaviors
Here are some common Behaviors used for remote control operation found in the Player Behavior menu .
- Always Keep Next Cue Button Visible: Check this option if you want to always see what is the next cue in the list.
- Input Device Type: Pick Remote Controller if you are using a remote, otherwise pick Keyboard, Mouse and Touch Screen.
- Simple Play/Pause Mode: Pick this if your remote does not have Pause/Resume buttons. The Play button will act as a Play/Pause/Resume button.
In addition, there are behaviors that will automatically move the cue selection and more (depending on your needs and buttons offered on the remote).
Help page: Player Behavior menu .
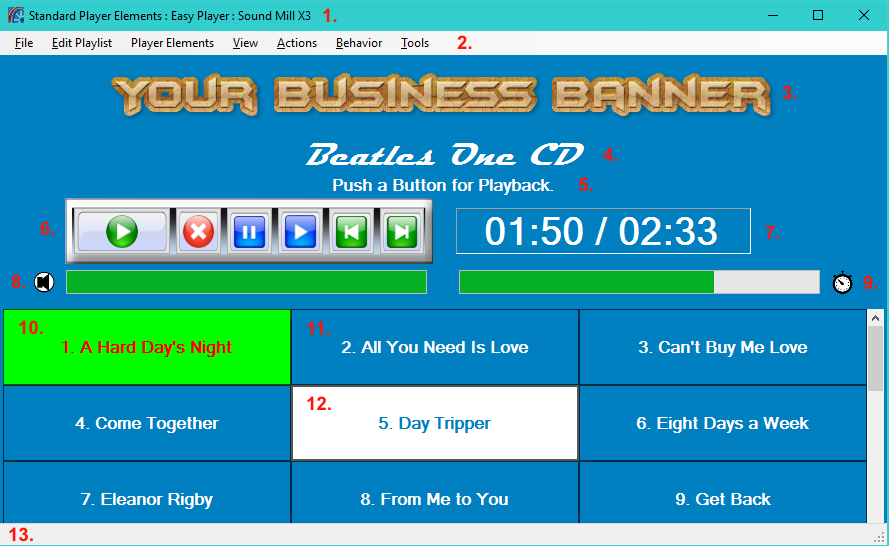
Easy Player Elements:
1. Window Title Bar;
2. Window Menu Bar;
3. Playlist Marquee Image;
4. Playlist Title;
5. Playlist Description;
6. Playback Controls Panel;
7. Playback Time Position Readout;
8. Volume Bar and Volume/Mute Indicator;
9. Playback Position Progress Bar and Playing/Paused Indicator;
10. Cue Button - Playing Cue;
11. Cue Button - Unselected;
12. Cue Button - Selected;
13. Window Status Message Bar.