Video Mill : User's Guide
 Contents
 Language
 Product Home
Load Templates
 Page Bottom
Overview
What is a Load Template?
Think of a Load Template as a viewport through which a Media Item is loaded and played. Load Templates provides a method to Load any Media Item using one custom layout template. For example, you can create a template which includes themed signage to wrap around your videos for a specific event (see Figure 1 example). You can get as creative as you like, however, some features will not work with templates (ex Video Filter).
How Templates work
When a Media Item is loaded via a template, the attributes of the template are what controls which display the Media Screen is loaded to, its size, display location, layout, and other properties. Essentially, all the attributes Media Item are ignored except the media file name. Only one Media Screen is created for the template and it is reused for subsequent requests to play other media items.
Template Efficiency
Templates can be more efficient (faster loads) than loading each video into its own Media Screen. It takes the Windows second or so to build each new Media Screen as a separate window. When you use a Load Template, each subsequent video play is inserted into the existing Template Media Screen. The Media Screen is reused. This is more efficient than creating a Media Screen to play one video. Then destroying the Media Screen and creating a new one to play the next video.
Operating Like a Standard Media Player
If you want to operate the program like a standard media player (ex Windows Media Player) which plays one video at a time, on one display, then using a Basic Template (see below) is the best approach for performance reasons.

How it works
- You create a Media Item which includes all the attributes that you want in your template: a background image, cropping, video sizing and placement, etc.
- Save the Media Item as a Load Template.
- Turn on Load Templates.
- Select the template you want to use as the current Load Template.
- Now any video you play will be rendered using the attributes of the current Load Template.
Load Template Basics and Rules
- Single Screen mode is ignored when using Load Templates.
- When you play a Media Item using a template, a Media Screen is created based on the template attributes. Subsequent requests to play another Media Item with the same template, will reuse the existing Media Screen (rather than creating a new Media Screen).
- Load Templates are saved with the program settings and are available for use with any Media List.
- You can create and save as many Load Templates as you want.
- It is recommended that you do NOT enable the Apply Live button in either the Media Screen Dimensions panel or the Video Geometry panel. Doing so will cause settings from these sections to propagate to the Media Screen and affect the template. If this happens accidentally, to restore the template, simply Unload the current playing video and play it again.
- The video size and position within the template is fully configurable using the Video Dimensions - Video Geometry controls.
Automation Script Dos and Don'ts with Templates
- Don't use a Load+Play structure (ie Don't => Load(video1); Play(video1) ). Do not include a Load step. It's inefficient and may cause a timing issue.
- Don't use a UnLoad step until the last video finishes playing (ie Don't => Play(video1); UnLoad(video1); Play(video2) ). Since each video will share the same template Media Screen, it's inefficient to destroy the Media Screen after each Play step.
Tips
- Since Media Items can be simple images, as well as videos, with automation, you can create a live bill board of information by rotating images on a timed cycle.
- If you want to display only the template background image with no video showing, create a Media Item with an image file which is a single transparent pixel.(There is such an image in the Images folder where the program was installed (filename = "ClearDot.png").
 To Page Top
Load Template - Quick Start
When you play a video, VideoMill has to open a new window (Media Screen). That takes a half second or so which is a noticeable delay. The solution is to use a Load Template which allows multiple videos to play through the same Media Screen (reusing of the Media Screen).
Follow these steps to quickly create a Load Template and put it to use.
Steps
- Create a Load Template - Click Tools > Load Templates > Create Basic Templates > Standard Basic Templates > [pick target display] > Full Screen.
- Set Load Template Mode - Click Behavior > Load Templates Source > Global Only.
- Pick The Global Template - Click Tools > Load Templates > Select Global Template.
So now the program is in Global Template mode and any video you play will play through the Global Template on the Target display specified in the Template. Note that when you are using a Load Template all settings in the Media Screen Dimensions panel are ignored -- because the Load Template defines those settings.
For Multiple Displays Setups
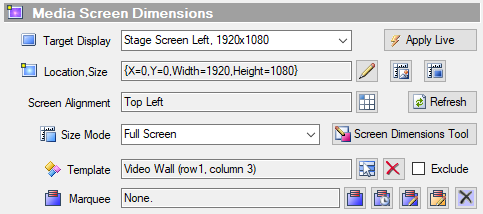
If you are using multiple secondary displays, you would create a Load Template for each display. Then assign the desired Load Template to each Media Item in the Media Screen Dimensions panel (Figure 2).
Cross-Fade
Cross-Fade produces an overlapping fade effect when one video ends and another video begins. Or you can use the Auto-Fade-In and/or Auto-Fade-Out features if you don't want overlapping during fades.
- Set Cross-Fade Mode - Click Behavior > Cross-Fade Mode. When active, the menu item icon will appear highlighted.
- Fade Duration - The fade duration can be changed in the Tools > Options > Media Item tab. It's the Master Fade Durations at the bottom of the dialog.
To avoid a black screen blink (a momentary black screen between videos) you will need to use Cross-Fade Mode. For a quick cut (rather than a pronounced cross-fade) between videos, set the Master Fade Durations to a very short time (try 200 millisecs).
Template Source Mode: Global vs Media Item
Global Template is a designated template that can be used by all Media Items. You can select a new Global Template at any time from the list of templates (see menu items below). There is only one Global Template at any given time. The current Template Source Mode determines how the Global Template is used.
Media Item Template is a template designated by an individual Media Item in its Media Screen Dimensions panel (Figure 2). This allows you to play Media Item's using different templates. The current Template Source Mode determines how the Media Item Template is used. (See more detail on the Media Screen Dimensions panel)
For both template types, changing the designated template will not affect Media Screens that are already loaded/playing.
Load Template Source Mode: When a Media Item is loaded/played, the template used is selected based on the current Template Source Mode. These modes facilitate many Media List design approaches. Select the Load Templates Source Mode from the Behavior menu or Behavior toolbar.
Source Modes
-
Not Active
 - Load Templates mode is Off/In-Active. No templates will be used. Each Media Item will be loaded as normal using its own attributes.
 -
Global Only
 - ALL Media Items are played only with the current Global Template.
 -
Media Item or Global
 - If a Media Item has a template specified, it will be used. If not, the Global Template is used by default.
-
Media Item Only
 - If the Media Item has a template specified, it will be used. If not, no template is used.
When the Exclude checkbox is checked in the Media Item's Media Screen Dimensions panel (Figure 2), no template will ever be used on that Media Item.
Load Templates Menu Items
Menu Locator: Media List Editor > Tools > Load Templates .
- Select Global Template - Selects the Load Template to use as the Global Load Template (via selection popup).
- Show Global Template - Shows the Global Load Template name on the status bar.
-
Manage Load Templates - Pops up a list selector to manage your templates.
- Edit - Opens the selected template in the Load Template Basic Settings Editor.
- Add - Adds a new Basic Template to the list. You can then edit its properties with the Edit button. For more detail on Basic Templates, see the Load Templates page.
- Remove - Removes the selected template from the list. If you Remove All templates, one Basic template will be created since there must be at least one template available at all times to use as a Global template. If you remove a template that is referenced by any Media Items, a warning will be flagged during Media List Validation.
-
Create Basic Templates
- Standard Basic Templates - Quickly creates some standard common templates for a target display; Halves or quarters of the display screen. See the separate section on Creating Basic Templates for details.
- Custom Templates by Rows and Columns - Quickly creates a set of uniform templates based on a matrix of rows and columns. See the separate section on Creating Custom Templates by Rows and Columns for details.
- Audio File Template - Creates a template specifically configured for playing audio files. Using this template for audio will provide some efficiencies over not using a template.
- View All Templates - Pops up a list of all Load Templates and their basic settings.
- Save Media Item As Load Template - Saves the selected Media Item attributes as a Load Template. You are prompted to Name the template. This is the primary method for making complex load templates that contain attributes beyond the template basic settings. Once you have a Media Item displaying with the desired layout properties, use this menu item to save it as a template. You can continue making further edits to the Media Item without affecting the saved template. Deleting the Media Item will not delete the template once it is saved.
- Paste Load Template into Media Item - The attributes of a Load Template are pasted into the selected Media Item. You are prompted to select a template to use. This replaces all attributes of the Media Item except the target Media File. This may be useful if you have an existing template that you want to make further edits on.
- Templates Import - Imports Templates that you have saved to a file (.loadtmpl file extension). If they were created on another computer system you may have to edit the imports to change the Target Display. Import/Export is useful if you are managing a large array of templates or want to add them to another computer since the exported file can simply be copied to a flash drive.
- Templates Export - Exports a selection of Templates to a file. You are prompted to make the selection.
Load Template Basic Settings Editor
Basic Template
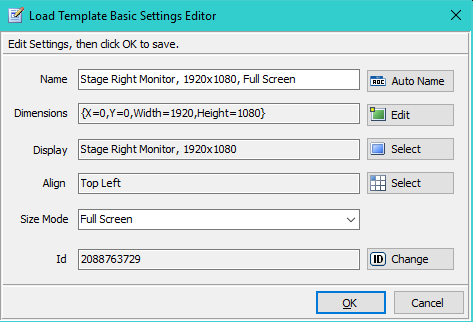
You can edit some basic settings of any template with the Load Template Basic Settings Editor, including the Basic Templates discussed in the section above.
Template Settings
- Name - Give the template a logic name that identifies its function. Auto Name button sets the Name field to the current Target Display, Size Mode. Or you can enter a name via the keyboard.
- Target Display - Select the physical display or Virtual Display where template Media Screen will be loaded.
- Size Mode - Select the Size Mode for Media Screens. If you pick Full Screen, then the Align and Dimensions settings are ignored.
- Align - Set the Media Screens Alignment on the display device. If you want to display at a specific X,Y (horizontal,vertical) location on the display, set Alignment to Location X,Y.
- Dimensions - Set the Size/Location on the display device for Media Screens.
-
Id - Each Template has a unique Id. Duplicate Ids (two templates with the same Id) are not allowed. The Id is used to find the Load Template. Typically you don't need to change the Id.
If you have lots of Media Items that reference a template-A, and you want to make them reference a new template-B, you can do it in a few steps by changing template ids. Set template-B's Id to the value of template-A's Id. Then give template-A some arbitrary Id value.
There is more detailed information on the editor controls at the Screen Dimensions Controls Help page.
Creating Standard Basic Templates
A Basic Template is a bare bones template that simply designates: 1) a target display; 2) A location and size on the display that a Media Screen should occupy. It essentially sets the settings values shown in Figure 3. All other possible template attributes are set to the default values (ie no special video geometry, no video filter, etc).
To create a Basic Template, go to Tools > Load Templates > Create Basic Templates.
Padding
First, do this BEFORE creating any new templates. Decide how much padding space you want between Media Screens if you are using multiple templates on the same display device. You can create padding (aka gutters) between adjacent template cells by setting the Screens(1) Options > Horizontal and Vertical Padding. Changes to the padding values, will not be reflected in existing templates. The padding values are only used for calculations during the template creation process. This is ignored for "Full Screen" templates. See Padding example in Figure 6.
Target Display
You are prompted to select the Target Display for the template. A display will not appear in the selection list dialog unless it is connected to the computer and Extended on the Windows Desktop.
Basic Template Styles
Then you are prompted to select one (or multiple) of the Basic Styles: "Full Screen", "Top Half", "Bottom Half", "Left Half", "Right Half", "Top Left Quadrant", "Top Right Quadrant", "Bottom Left Quadrant", "Bottom Right Quadrant". The Template Dimensions (location, size) will be calculated based on the selected Target Display size.
After creating a Basic Template, it is added to the Template list and you can edit it with the Load Template Basic Settings Editor just like any other template to tweak its properties.
In Figure 4a,4b and Figure 5, the blue area represents the total surface of the display. So depending on the style template you create, the Media Screen will occupy one of the rectangles within the display.
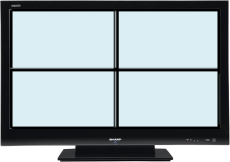
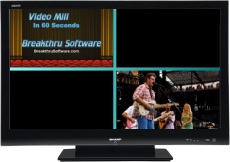
Figure 6 shows a display with two Media Screens playing using two templates ("Top Left Quadrant" and "Bottom Right Quadrant"). Note the Padding between the templates (blue areas between the Quadrants). For this screen shot, we Loaded a Media Screen behind the template screens. The Media Item was a simple clear dot image (1 transparent pixel) and the background color was set to a blue gradient.
Creating Custom Templates by Rows and Columns
The Standard Basic Templates are limited to halves or quarters of the display area. If you need a different uniform matrix of templates, this will generate templates by a number of Rows and Columns that you specify (see Figure 7).
When you click Tools > Load Templates > Create Basic Templates > Custom Templates by Rows and Columns, you will be prompted for the following inputs via pop-up dialogs.
- Set the Padding first since it is used in creating the template sizes. See Padding detail in the Creating Standard Basic Templates section above.
- Pick the Target Display.
- Specify how many Rows And Columns Of Templates to generate.
- Select which Templates To Generate. You can select one, a few or all templates.
After you generate the templates you can use them like any other Load Templates.
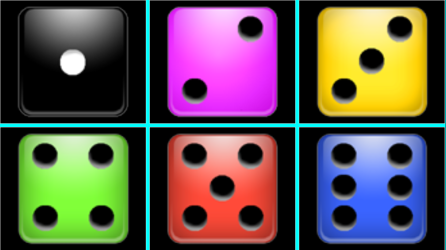
Figure 7 shows 6 Media Screens (loaded with dice images). Each Media Screen is loaded with a different template. Templates were generated for 2 rows by 3 columns. For example, the number 5 die image (red die) is loaded via the "Row 2, Column 2" template. Note the 10 pixel Padding between the templates (light blue gutters).
Themed Background with Load Template - Example
Here is a step by step process for creating the themed Load Template shown in Figure 9.
Create a Background Screen
- Go to Edit Media Item > New Background Screen.
- In the Background Screen Media Item Screen Layout controls:
- Set the Background Style to Image.
- Set the Background Image File to the desired image file (Figure 8).
- Set the Image Layout to Stretch.
Create the Load Template for Videos
Next we'll create the Load Template that will position videos in the correct location when played on top of the Background Screen. You will need to calculate the video Size (Width, Height) based on the size of the Target Display and the space taken by text in your background image.
Template Creation Steps
- Go to Tools > Load Templates > Create Basic Templates > Custom Templates by Rows and Columns. For rows and column values use 1 row, 1 column. (see section above for steps to create this template.)
- Now edit the template. Go to Tools > Load Templates > Manage Load Templates. Select the template and click Edit. The Load Template Basic Settings Editor will open (Figure 3).
- Edit the Dimensions to set the video Size (Width, Height).
- Set Target Display to the correct display.
- Set Align to "Middle Center". Or if you need fine control on video placement, set this to "Location (X,Y)"; then set the specific Location in the Dimensions (above).
- Other settings should not need any adjustments. You can Rename the template if desired. The Size Mode should be set to "Media Item Dimensions".
- Close the editor.
Assign the Template to Video Media Items
- Go to Tools > Load Templates > Multiple Item Edit.
- Pick the template you created.
- Select all the Media Items that will use the template.
Test The Setup
- Select the Background Screen Media Item created above and click Play.
- Select a Video Media Item and click Play. It should appear in the center of the display as shown in Figure 9.
- If the video size and position looks good, you can create an Automator Playlist Script to play all videos in sequence.