
 Video Mill : User's Guide
 Contents
 Language
 Product Home
Script Groups
 Page Bottom
Script Groups Overview
A Script Group (Script Group) is simply a collection of Scripts that you perform operations on as a group. Script Groups provides a way to operate on multiple Scripts with a single button click (examples: Run, Stop, Pause, Resume, etc., see Figure 1). You create Script Groups with the Script Groups Editor (Figure 3). Use the Apply-To toolbar to select "Apply-To Group" execution mode. All of the highlighted action buttons (Figure 1, other toolbars also apply) can now be applied to all scripts in the current Group with one click . Script Groups are saved with the Media List for future use.

 To Page Top
Script Groups menu
The Script Groups menu (Script Groups menu) has the following functions.
- Edit and Manage Groups - This pops up the Script Group List dialog (Figure 2.) which contains all the defined groups for the Media List. Select any Group in the list to Remove or Move its position in the list. Click the Add button to add a new empty group. Click the Duplicate button to create a duplicate of the selected group. Click the Edit button to popup the Script Group Editor . (Figure 3)
- Create New Group from All Running Scripts - As a productivity aid, you can quickly create a new Group consisting of All of the currently All Running Scripts. Once created it is automatically set as the Current Group.
- Select Current Group - The Current Group is used whenever the Apply-To mode is set to "Apply-To Group". Select the Current Script Group from the selection list.
- View Current Group - This pops up a viewer dialog showing the Current Script Group and its associated Scripts.
Script Group Editor
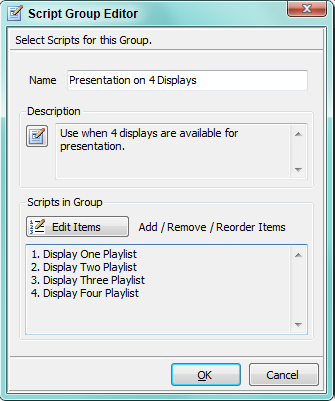
The Script Group Editor (Script Group Editor) allows you to make changes to a Group. When you perform an action with a Group, Scripts are acted on in the order that Scripts are listed in the group.
- Name - Give the group a logical Name that describes its use. Used for list selection. Keep it short.
- Edit Description - Click the Edit Desc button to edit the Group description (optional). Useful if the Name is not sufficient to describe its purpose.
- Edit Items - Add, remove or reorder the Scripts that are contained in the group.

Script Group Example
Scenario
 Here's an example of how you might use Script Groups.
Consider a presentation that has video clips and/or images as a backdrop. The venue where you are presenting has four stage displays available. You want to show four different "slides" at once (a slide can be video with sound muted, or an image). And with each click of the Next button on your remote controller, all four displays will advance to a new slide.
Here's an example of how you might use Script Groups.
Consider a presentation that has video clips and/or images as a backdrop. The venue where you are presenting has four stage displays available. You want to show four different "slides" at once (a slide can be video with sound muted, or an image). And with each click of the Next button on your remote controller, all four displays will advance to a new slide.
Note: The above is only one scenario. Other examples could include: 1) Backdrop videos for a live concert; 2) Retail or showroom promotional feed; 3) Museum multi-media room; etc.
Solution Steps
- You create four Scripts (playlists), one for each display. Each Script will have Play Steps for all the videos/images you want to show on that display. Name the scripts: Display One Playlist; Display Two Playlist; Display Three Playlist; Display Four Playlist.
- All the Media Item's played by Display One Playlist Script should have their Target Display set to one secondary display. The Media Item's played by Display Two Playlist Script should have another Target Display. And so on. This is not a requirement but helps avoid logic errors (like a collision of two videos or images playing on the same display at the same time -- one would display in front of over the other).
- Create a Script Group for that contains all 4 Scripts that you created in the previous step. You could name the Group: Presentation on 4 Displays.
- At presentation time, you select the Presentation on 4 Displays Group as the Current Group.
- Then set the Apply-To mode to Apply-To Group.
- Now when you click the Automator Run Script button, each of the four Scripts playlists will start simultaneously and display the first video or image of its Play Steps. Click the Next button and all 4 playlists advance to the next Play Step.
- All actions available to Apply-To Group can now be applied for all script playlists with one click (Pause, Resume, Next, Previous, etc., ( toolbar actions, Figure 1).
- Rather than using the Next button, you could just let the playlists advance on their own pace, advancing to each subsequent video as each video reaches its end. Images and photos have a default time duration associated with them (Default Image Duration Time). Or you can set a specific time duration for individual images by setting the Post-Delay on its Media Item.
- You can run the Automator with a wireless remote control device that you hold in you hand or a touch screen tablet that rests on a podium.
- You can make the video/images fade-in and fade-out for a smooth transition if desired. Simply enable Auto-Fade-In and Auto-Fade-Out in the Media List Editor.
If you take this presentation on the road, and each venue may have a different number of displays, you can create Script playlists based on the number of available screens. Or maybe you have a short and long version of your presentation. You could make Scripts based on the length of the pitch.