Stretch Across Displays
Menu Locator: Media List Editor > Edit Media Item > Stretch Across Displays .
Overview
You can stretch a video across multiple displays (two or more) if desired in a few easy steps. If you change your Extend Displays configuration (by add or remove a display from the Windows Extended Desktop), you may need to do this setup again so that sizes are recalculated. In the end, there is no perfect way to fit a video with a 4:3 aspect ratio onto two displays that effectively become one display with an 8:3 ratio. But it can offer some interesting visual effects.
Term: Aspect Ratio is the video Width to Height ratio.
Steps
- Extend the Windows Desktop - First Extend Displays. This will give the program access to the displays desktop location coordinates.
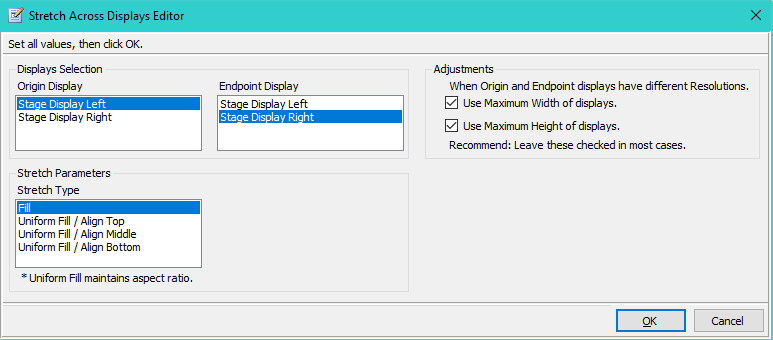
- Perform Stretch - Select a Media Item, then click Edit Media Item > Stretch Across Displays. This will open the Stretch Across Displays Editor (Figure 3).
- Test it - Play the Media Item to see how it renders across the Target displays.
Limitations
The Stretch calculations will not work well when one or more displays are Scaled in size via the Windows Control Panel > Display applet. If you are scaling displays, you'll need to adjust the Media Screen Dimensions (Size) manually after running this stretch tool. You are always best off to leave display scale at 100% (native resolution) unless you have a specific need to change it.
Stretch Across Displays Editor
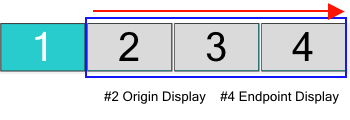
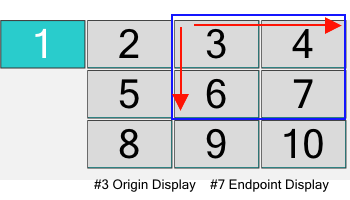
IMPORTANT: Stretch is always performed from left to right and from top to bottom (as shown in Figure 1 and Figure 2). The Stretch Editor will show an error message when you pick an Endpoint Display that is in the wrong position.
In the Figure 1 below, the video is stretched from Origin Display #2 to Endpoint Display #4. Note that Display #3 is included in the stretch. The red arrow indicates the direction of the stretch.

In the Figure 2 below, the video is stretched from Origin Display #3 to Endpoint Display #7. Note that Display #6 and #4 are included in the stretch. Once the stretch values are calculated, you could set the Media Item's target display to another display and it will stretch across any 4 displays as shown in Figure 2.

Stretch Across Displays Editor
- Origin Display - This will be the display where the left side of the video is anchored. (see Considerations for Extend Displays below)
- Endpoint Display - This is the displays you want to stretch to.
-
Stretch Type - Determines the calculations for sizing and placement of the video to fill the target displays. See Stretch Type Examples images below.
- Fill - Effectively stretches the video to twice its natural width but video height remains the same. The entire video is visible on the Target displays but it does NOT maintain the video aspect ratio (ie people will look heavy and objects wider than normal).
- Uniform Fill / Align Top - Resizes the video to fit the width of the two display while maintaining the video natural aspect ratio. To maintain the aspect ratio, the video's height will now be higher than the display height. With the video aligned to the Top of the displays, a bottom portion will be cut off from view.
- Uniform Fill / Align Middle - Same as Uniform Fill / Align Top except the video is aligned to the middle of the displays. Thus a portion of the video on the top and bottom will be cut off from view.
- Uniform Fill / Align Bottom - Same as Uniform Fill / Align Top except the video is aligned to the bottom of the displays. Thus a portion of the video on the top will be cut off from view.
- Use Maximum Width of displays. - When checked, the maximum width of Origin and Endpoint displays is used in Stretch calculations.
- Use Maximum Height of displays. - When checked, the maximum height of Origin and Endpoint displays is used in Stretch calculations.
Adjustments
- When the Origin and Endpoint displays have different Resolution sizes, the Stretch calculations may not completely fill all stretched displays. Checking these two checkboxes will ensure the stretch completely fills all displays. There may be unique conditions when you want the empty band to occur, so these are left as options.

Required setting
For Stretch Across Displays to work properly you must leave the Size Mode set to Media Item Dimensions Size in the Media Screen Dimensions controls. You can tweak most other Media Item settings to fine tune the resulting video view.
Create a Load Template for Stretch Across Displays
 Tip: Once you have one Media Item working for Display Stretch, you can save it as a Load Template if desired.
Then when you want to Stretch other Media Items, all you have to do is set the program into Load Template mode and select the Display Stretch Template as the current Load Template. Click Tools > Load Templates > Save Media Item As Load Template .
Stretch Type Examples
These figures below demonstrate how each of the Stretch Types would appear across two displays. Results will vary to some degree based on the video's natural aspect ratio and the aspect ratio of the target displays. The stretch type you choose will depend on the content of the video and how it's subjects are centered (or not).
Sample Video with No Stretch
Figure 4 is a sample video played on one display. Carefully, compare this image to the other examples below that show this video stretched across 2 displays.

Fill
In Figure 5, Fill, the entire video content is visible on both displays, but note how everyone just gained weight -- Stretch distortion caused because the aspect ratio of the video is not maintained for this stretch type.

Uniform Fill / Align Top
In Figure 6, the top-most part of the video is in view (a lower portion is cut off). But with Uniform Fill, there is no distortion stretching of the video content because video aspect ratio is maintained.

Uniform Fill / Align Middle
In Figure 7, the middle-part of the video is in view (an upper and lower portion are cut off).

Uniform Fill / Align Bottom
In Figure 8, the bottom-most part of the video is in view (an upper portion is cut off). It is a good choice if you want to watch people's shoes.

Considerations for Extend Displays
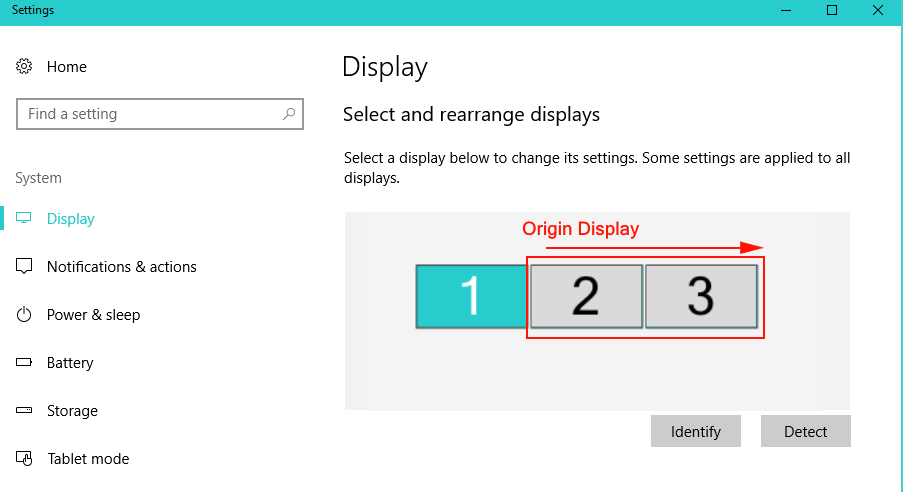
When you Extend your Displays via Windows Control Panel > Display applet, Windows will arrange the detected displays adjacent to each other (Figure 9). Note that you can reposition a display by drag and drop to move a display's position. You can extend across as many displays as desired.
If you change the orientation of your displays in this applet, you will need to re-do the Stretch operation, since Stretch calculations are done based on the display positions on the desktop.
- Display1 - Primary Display.
- Display2 - Origin Display for Stretch.
- Display3 - Endpoint Display included in the Stretch.

 Page Bottom
 To Page Top