
 Video Mill : User's Guide
 Contents
 Language
 Product Home
PowerKeys
 Page Bottom
About PowerKeys
 PowerKeys sends key shortcuts to a
Video Mill
window just as if you had typed the keys on your keyboard. Thus PowerKeys can execute any menu item that has a shortcut key assigned to it. A PowerKey is added to a Script as a Step. This allows you to change program behaviors on the fly from a script by activating or turning off a behavior. Or you can programatically select a Media Item or Script then perform actions on that item.
PowerKeys sends key shortcuts to a
Video Mill
window just as if you had typed the keys on your keyboard. Thus PowerKeys can execute any menu item that has a shortcut key assigned to it. A PowerKey is added to a Script as a Step. This allows you to change program behaviors on the fly from a script by activating or turning off a behavior. Or you can programatically select a Media Item or Script then perform actions on that item.
Target Users - PowerKeys requires a solid understanding of Video Mill automation and scripting. This feature is intended for advanced users.
 Notice - When a PowerKey executes, it will force the Target Window (Automator or Media List Editor) to become the focused (active) window (required for this feature to work). So it will make it a challenge to use another app when scripts are running depending how often a PowerKey gets executed.
Overview
- Many program menu items have an associated shortcut key (ex. Ctrl+1) so you can execute it via keyboard key presses.
- PowerKeys offers a method to programmatically execute a menu item function using its shortcut key.
- Once you create a PowerKey, you can execute it as a Script Step.
- A PowerKey specifies:
- A Name indicating what the key does.
- A shortcut key (ex. Ctrl+1).
- Target Window where the shortcut key is sent. (Automator or Media List Editor)
- Some Reserved PowerKeys use a Paramter value. These are created for you via the 'Add Reserved PowerKeys' menu item.
- Any PowerKeys you create are available for all your Media Lists.
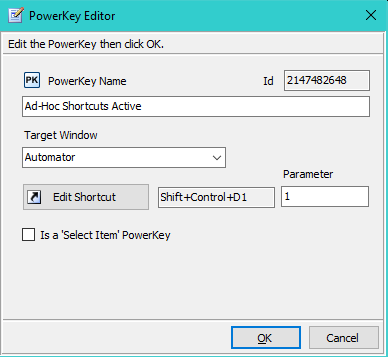
The examples below are for a Reserved PowerKey which uses a Paramter value. They send shortcut Control+Shift+D1 to the Automator window. The first one includes Parameter=(1) which is the 'Active' value. This toggles the Automator > Behavior > Ad Hoc Shortcuts menuitem to 'Active' mode. The second PowerKey has Parameter=(0) which turns Off the Ad Hoc Shortcuts mode.
Examples (PowerKey Steps as they would appear in a Script):
PowerKey: Adhoc Shortcuts Active(1)
PowerKey: Adhoc Shortcuts Off(0)
 To Page Top
Basic Steps
Basic Steps
These are the basic steps to using PowerKeys.
- Find Menu Item Shortcut Keys - In the Video Mill menus, you will see the Shortcut Keys associated with the Menu Item you want to execute. There are also Reserved PowerKeys that you can use.
- Create a PowerKey - See the Manage PowerKeys menu item description (section below). For PowerKey Shortcut, use Shortcut of the Menu Item you want to execute.
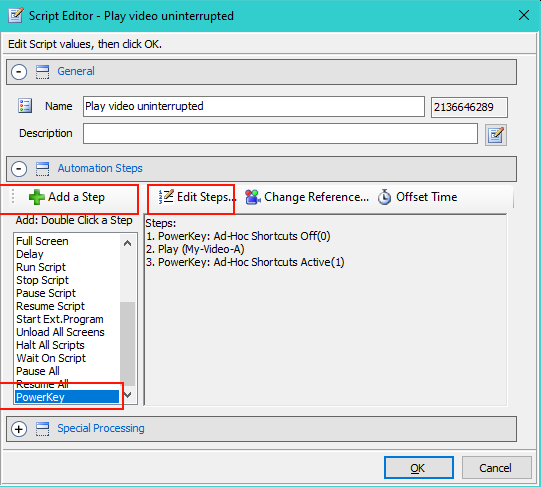
- Add a PowerKey Step to the Script - In the Script Editor (Figure 1), select Script Step Type 'PowerKey', then click Add A Step button. A selection dialog pops up to select the PowerKey(s) to add.
- Reposition the Step(s) - Steps get added to the bottom of the Script. To reposition the steps, click the Edit Steps button (Figure 1). Use the Move Position Up/Down buttons (green arrows) to reposition the steps.
- Save the Changes - Click OK, to save the changes and exit the Script Editor. Now test the Script.
PowerKey - menu items
Menu Locator: Automator > Tools > PowerKeys .
Menu items
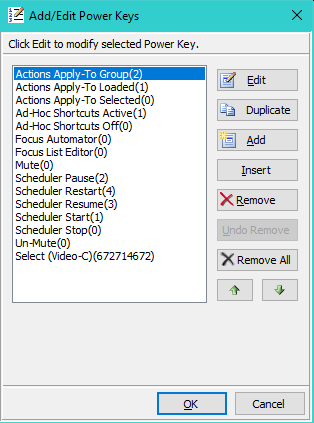
- Manage PowerKeys - Allows you to Add, Remove, Duplicate, and Edit PowerKeys (Figure 2). Click Add to add a new PowerKey. With the new PowerKey selected, click the Edit button to open the PowerKey Editor (Figure 3) to set its values.
- View PowerKeys - Pops up a view dialog listing all current defined PowerKeys.(Listing 1)
- Sort PowerKeys - Sorts the PowerKeys based on a sort order that you select (By Name, By Target Window). Can make PowerKeys easier to find in selection dialogs if you have a lot of them.
- Add Reserved PowerKeys - You are prompted to select the PowerKeys you want to add. This will create the Reserved PowerKeys listed below. No need to edit these keys and do not change the shortcut or parameter (except as detailed in the Special Notes below). If you accidentally delete one, just run this create tool again. You only need to Add Reserved PowerKeys for the ones you want to use in scripts.
- Execute a PowerKey - (Diagnostic aid) You are prompted to select a PowerKey to execute. This is a simple way to test any PowerKey to see if it is working as expected. If a script is not working you can quickly test the individual PowerKeys.
Special Notes
- Set Volume - Once this PowerKey is created you will need to go to Manage PowerKeys to Edit the Parameter to set the desired volume. See the Reserved PowerKeys section for valid values. If you need more than one PowerKey for different volume values, you can simply use the Manage PowerKeys Duplicate button, then change the Parameter value of the duplicate.
- Set Play Position - Same edit considerations as the Set Volume PowerKey.
- Select Item - This PowerKey is created by the PowerKey Editor. All you need to do is select the Target Window and the Item (a Media Item or a Script).
Listing 1 shows a sampling of PowerKeys, including some Reserved PowerKeys and some user created keys.
Listing 1. View PowerKeys============= PowerKeys ============= Total PowerKeys: 18 _________________________________________________________ PowerKeys(Parm) / Shortcut Keys -> Target Window / Id 1. Actions Apply-To Group(2), Control+Shift+A -> List Editor, Id=2147482659 2. Actions Apply-To Loaded(1), Control+Shift+A -> List Editor, Id=2147482658 3. Actions Apply-To Selected(0), Control+Shift+A -> List Editor, Id=2147482657 4. Ad-Hoc Shortcuts Active(1), Control+Shift+D1 -> Automator, Id=2147482648 5. Ad-Hoc Shortcuts Off(0), Control+Shift+D1 -> Automator, Id=2147482647 6. Focus Automator(0), None -> Automator, Id=2147482778 7. Focus List Editor(0), None -> List Editor, Id=2147482777 8. Mute(0), Control+F7 -> List Editor, Id=583808016 9. Scheduler Pause(2), Control+Shift+S -> List Editor, Id=2147482729 10. Scheduler Restart(4), Control+Shift+S -> List Editor, Id=2147482731 11. Scheduler Resume(3), Control+Shift+S -> List Editor, Id=2147482730 12. Scheduler Start(1), Control+Shift+S -> List Editor, Id=2147482728 13. Scheduler Stop(0), Control+Shift+S -> List Editor, Id=2147482727 14. Select (Video-A)(505523001), Control+Shift+Z -> List Editor, Id=1996957365 15. Select (Video-C)(672714672), Control+Shift+Z -> List Editor, Id=1733226170 16. Set Volume (100), Control+Shift+F9 -> List Editor, Id=1875486036 17. Set Volume (50), Control+Shift+F9 -> List Editor, Id=750616833 18. Un-Mute(0), Control+F6 -> List Editor, Id=1284097272
PowerKey Editor
Editor controls
- PowerKey Name - Enter a few words that describe what the key does. Keeping it short is best.
- Id - PowerKey Identifier (used internally) .
- Target Window - This is the app window where the target menuitem resides (Media List Editor, or Automator). The PowerKey will be sent to this app window when executed.
- Edit Shortcut - Set the PowerKey Shortcut to the Shortcut of the target menuitem that you want to execute.
- Parameter - Reserved PowerKeys take a Parameter (Figure 3) that determines the operation performed, such as enabling or disabling a behavior. For 'Select Item' PowerKey, the Item's Id is filled in. All other PowerKeys you create will ignore the Parameter.
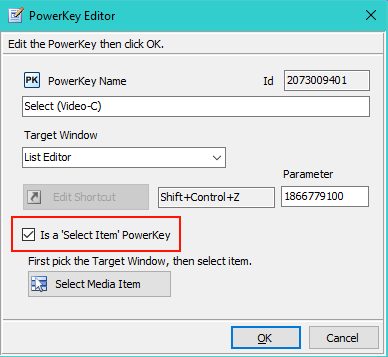
- Is a 'Select Item' PowerKey - When checked, this PowerKey is treated as a special case (a 'Select Item' PowerKey). It will select an item in the Target Window's listbox. See section 'Select Item' PowerKey for details. This shortcut is a reserved value (Control+Shift+Z).
- Select Item button - (Figure 4) Pick the Target Window first. Then click this button to pop up a selection dialog to select a target item. The list will be either Media Items or Scripts depending on the Target Window. When you pick an item, the Name, Shortcut, and Parameter values are automatically filled in. The button is only visible when the Is a 'Select Item' PowerKey checkbox is checked.
Setting the Parameter
Reserved PowerKeys perform an action based on the value of the PowerKey Parameter (Figure 3). There are only a few Reserved PowerKeys that require you to change a parameter.
Notes
- Number keys - When you are editing the Shortcut, number digits may appear as key selections D0,D1,D2... for numbers 0,1,2 etc. (Figure 3).
- 'Select Item' PowerKeys - Shortcut Control+Shift+Z is a reserved Shortcut for 'Select Item' PowerKeys only.
- Avoid Menuitems that Prompt for Info - Creating PowerKeys to execute menu items that produce a pop-up dialog is possible, but not recommended since it will require that someone is present to manually handle the dialog.
- PowerKeys can be Offset Timed - See Listing 5 below for an example.
- PowerKeys Timing - Each PowerKey takes approximately 20-30 milliseconds to start executing. Time for the operation to finish will depend on the executed operation. If you are offset timing PowerKeys it may take some testing to get the right timing. A 'Delay' step may be needed between PowerKey steps so that a long running operation can complete before the next PowerKeys executes.
- Picking Shortcut Keys - If you need to pick a Shortcut Key for PowerKeys you create (ie other than a Reserved PowerKey) go to Automator - Tools > Menu Items Shortcut Keys > View. That will list all used Shortcuts including reserved PowerKeys.
'Select Item' PowerKeys
What it does
'Select Item' PowerKey is a Reserved PowerKey. It will select an item in the Target Window's listbox. Many menu items will perform an operation on the item selected in the app window listbox. For example, in the Media List Editor window, menu item Actions > Mute (Control+F7) will mute the Media Screen of the selected Media Item. In the Automator, menu item Actions > Next Step (Control+F) will move to the Next Step the selected Script (if it is running). So a 'Select Item' PowerKey provides a way to select an item, then use another PowerKey to perform an action on that item. In the Media List Editor, there are numerous operations under the Actions and Screens menus that will act on the Media Screen of the selected item.
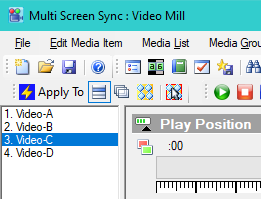
Figure 5 shows the result of executing the PowerKey below. Video-C is selected in the listbox of the Media List Editor.
Example
PowerKey: Select (Video-C)(672714672)
When you create a 'Select Item' PowerKey, you pick a specific Media Item or Script that should be selected (Figure 4 Select Item button). Thus these PowerKeys are tied to a specific Media List (unlike other PowerKeys).
Usage Example
Assume you have 4 videos playing on 4 different displays (ex. videos in Figure 5). You want to mute all videos. Then un-mute Video-C only. This can be accomplished with the script in Listing 2.
Listing 2 Steps Explained
- Sets Actions Apply-To mode to Loaded Screens. List Editor functions now apply to all loaded Media Screens.
- Mute action mutes audio on ALL loaded Media Screens.
- Sets Actions Apply-To mode to Selected Media Item. Now List Editor functions will apply to the Media Item selected in the List Editor listbox (Figure 5).
- Video-C is selected in the List Editor listbox, as in Figure 5.
- Un-Mute action un-mutes audio on Video-C (the selected media item).
Listing 2. Un-Mute One VideoScript: Un-mute Video-C Steps: 1. PowerKey: Actions Apply-To Loaded(1) 2. PowerKey: Mute(0) 3. PowerKey: Actions Apply-To Selected(0) 4. PowerKey: Select (Video-C)(672714672) 5. PowerKey: Un-Mute(0)
Reserved PowerKeys with Parameters
The following PowerKeys with Parameters are predefined with reserved shortcut keys. Do not use these key shortcuts for other purposes.
How to create and use
All Reserved PowerKeys should be created by Automator - Tools > PowerKeys > Add Reserved PowerKeys menu item. Create the PowerKeys you want to use, then add them to scripts.
PowerKeys, Target Window = Automator
- Focus Automator (Target Window=Automator, None, Parameter: N/A). Makes the Automator the focused (active) window.
- Select Script (Target Window=Automator, Control+Shift+Z, Parameter: Script Id). (More Info)
- Ad Hoc Shortcuts (Target Window=Automator, Control+Shift+1, Parameter: 0=Off, 1=Active). (More Info)
PowerKeys, Target Window = List Editor
- Focus List Editor (Target Window=List Editor, None, Parameter: N/A). Makes the Media List Editor the focused (active) window.
- Select MediaItem (Target Window=List Editor, Control+Shift+Z, Parameter: MediaItem Id). (More Info)
- Actions Apply-To Mode (Target Window=List Editor, Control+Shift+A, Parameter: 0=Apply-To Selected, 1=Apply-To Loaded, 2=Apply-To Group ). (More Info)
- Load Templates Source (Target Window=List Editor, Control+Shift+L, Parameter: 0=Not Active, 1=Global Only, 2=Media Item or Global, 3=Media Item Only). (More Info)
- Cross-Fade Mode (Target Window=List Editor, Control+Shift+3, Parameter: 0=Off, 1=Active). (More Info)
- Auto-Fade-In (Target Window=List Editor, Control+Shift+4, Parameter: 0=Off, 1=Active). (More Info)
- Auto-Fade-Out (Target Window=List Editor, Control+Shift+5, Parameter: 0=Off, 1=Active). (More Info)
- Use Global Marquee (Target Window=List Editor, Control+Shift+6, Parameter: 0=Off, 1=Active). (More Info)
- Use Video Effects (Target Window=List Editor, Control+Shift+7, Parameter: 0=Off, 1=Active). (More Info)
- Use Video Filters (Target Window=List Editor, Control+Shift+8, Parameter: 0=Off, 1=Active). (More Info)
- Set Play Position (Target Window=List Editor, Control+Shift+9, Parameter: Milliseconds). Positions playback at specified milliseconds mark. (1 second = 1000 msec) (More Info)
- Go-To Position Marker (Target Window=List Editor, Control+Shift+G, Parameter: 0=Marker A, 1=B, 2=C,... etc). Positions Media Screen playback at specified Go-To Position Marker. Markers are named A,B,C,D,E,F, etc. These are pre-set time markers. No limit to the number of markers that can be created. (More Info)
- Set Volume (Target Window=List Editor, Control+Shift+F9, Parameter: 0-100, Percent(%) of full volume ) Ex. 80=80% of full volume. The Volume Apply Live mode is toggled to Active if needed. (More Info)
- Scheduler (Target Window=List Editor, Control+Shift+S, Parameter: 0=Stop, 1=Start, 2=Pause, 3=Resume, 4=Restart ). (More Info)
Special Notes
- Focus Window - You may have this as a final step in a script to move focus to either Automator or Media List Editor. However, you need to allow other PowerKeys time to finish executing before returning focus. This may require putting a Delay Step in the script prior to moving focus. See Listing 4 example below.
- A Script that mixes PowerKeys with different Target Windows - This is possible but introduces the Focus Window timing issues discussed above. Use Delay Steps between steps that will switch window focus. Remember each PowerKeys step focuses its Target Window before executing.
PowerKeys Examples
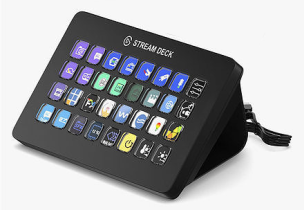
Listing 3 shows an example of using PowerKeys. Consider a remote controller device like a Stream Deck, that allows unattended visitors to play various videos. The visitor can press any button to play a video that is programmed to that button. However, the kiosk designer wants to restrict the kiosk so that the video plays to the end before another video can be started.
So assume the kiosk buttons are implemented with Ad Hoc Shortcuts that run scripts such as Listing 3. The user presses a Stream Deck button that starts the script.
Listing 3 Steps Explained
- Disables Adhoc Shortcuts so any more button press key signals are ignored. PowerKey Parameter 0=Off.
- Plays the video.
- Restores (enables) Adhoc Shortcuts again so Video Mill continues listening for key signals. PowerKey Parameter 1=Active.
Listing 3. Play video uninterruptedScript: Play My-Video Steps: 1. PowerKey: Ad Hoc Shortcuts Off(0) 2. Play (Video-A) 3. PowerKey: Ad Hoc Shortcuts Active(1)
Listing 4 is a quick example showing how to focus the app windows from a script. PowerKeys focus the Target Window when they execute. If you have a remote control device and need the Automator window focused, you can return the window focus with a Window Focus PowerKey. The 'Focus Window' PowerKeys are created with the Automator Tools > PowerKeys > Add Reserved PowerKeys menu item.
Listing 4 Steps Explained
- Selects (Video-B) Media Item in the Media List Editor.
- Mutes the Media Screen of the selected Media Item (Video-B).
- Selects (Video-C) Media Item in the Media List Editor.
- Un-mutes the Media Screen of the selected Media Item (Video-C).
- One second Delay (:01) gives time for other PowerKeys (steps 1 - 4) to finish executing before returning focus to the Automator. Delay time may differ depending on what operations the PowerKeys are executing.
- Returns Focus to the Automator window. (Because the first 4 steps focus the List Editor and your requirement is that Automator needs focus to accept any incoming key press signals.)
Listing 4. How to Focus WindowsScript: Return Window Focus Steps: 1. PowerKey: Select (Video-B)(91820667) 2. PowerKey: Mute(0) 3. PowerKey: Select (Video-C)(672714672) 4. PowerKey: Un-Mute(0) 5. Delay (:01) 6. PowerKey: Focus Automator(0)
Listing 5 shows how PowerKey steps can be offset timed just like any other script step.
Listing 5 Steps Explained
- Selects (Video-C) Media Item in the Media List Editor.
- Mutes the Media Screen of the selected Media Item. It is timed to execute 10 seconds after the script starts.
Listing 5. PowerKeysScript: Offset timed PKs Steps: 1. PowerKey: Select (Video-C)(672714672) 2. PowerKey: Mute(0), Offset: :10