
 Video Mill : User's Guide
 Contents
 Language
 Product Home
Media Screens menu
 Page Bottom
Menu Locator: Media List Editor > Screens .
The Screens menu (Screens menu) has the following functions related to formatting, positioning, and locating loaded Media Screens.
Full Screen Toggle
 Action Apply Mode
Menu Items
- Full Screen Toggle - Toggle Media Screen between Full Screen mode and Normal window size. Note that you can also toggle a Media Screen between Full Screen and Normal window size by right mouse clicking the Media Screen window to bring up the Media Screen context menu. If you 'fullscreen' multiple Media Screens at once, only the last Media Screen will be visible since the other Media Screens are behind it. The Escape key (Esc) will escape a Media Screen out of Full Screen mode back to Normal window size.
Normal window size is generally the Media Natural Size (Width, Height). However, when the Media Screen Size Mode is set to 'Media Item Dimensions Size', then Normal size will be set to the Media Screen Dimensions Size. When using a Load Template, Normal size is sourced from the Template sizes.
 To Page Top
Restore Window to Normal Size
Menu Items
- Restore Window to Normal Size - Exits Media Screen Full Screen mode back to the Normal window size. Also, restores Media Screen windows that have been minimized to Normal window size.
Title Bars Toggle
Menu Items
- Window Title bar - Toggles between 'Showing' and 'Hiding' Media Screen Title Bars. This will show or hide Title Bars of ALL loaded screens. Any subsequent loaded screens will show or hide their Title Bars based on the current mode. To drag a Media Screen with the mouse to locate it manually, or to change its size by dragging one of its sides, the Title Bar must be showing. You can make this function work with Action Apply Mode if desired in the Screen(+) Options. When saving a Media Screens dimensions, note that there is a difference in window Size depending on Title Bar visibility. Media Screens Location is the same regardless of the visibility of the Title Bar.

Move Screen to Display(x)
Menu Items
- Move Screen to Display(x) - You are prompted to pick a target display from the list of current extended displays. Then the Media Screen(s) is moved to the selected display using the same relative Location (X,Y).
Note: It is recommended that you Pause the Media Screen(s) before doing this operation. Video codecs are doing running calculations based the display coordinate system. Moving a screen from one display to another changes the origin point of the coordinate system. This can cause the codec to crash and close the Media Screen. In this event, a 0xC00D11B1 error message gets written to the session log. If the codec crashes, you may need to close and restart the program to reset the codec. In this case, try another codec or don't rely on this function as a performance tool.
Align Screen on Display
Menu Items
- Align Screen on Display - Repositions a Media Screen on the display based on the Alignment type selected. The Screen Alignment Tool is popped up to make the selection.
Resize Screen by Size Mode
Menu Items
-
Resize Screen by Size Mode - Resizes a Media Screen based on the current Size Mode.
To select the Size Mode, on the
Screen Manager
toolbar (see below), click the down arrow on the
Resize Screen
split button. Any subsequent resizing is done based on the selected mode.
Size Modes: Full Screen, Original Recorded Media Size, Display Reference Dimensions Size, Current Reference Dimensions Size, Media Item Dimensions Size.
Auto-Locate
Auto-Locate (Auto-Locate) menu items allow you to locate (position) Screens in a uniform method with one click. Screens are processed in the order that they were Loaded. The first Screen that was loaded will be the first to be positioned (and so on). If you want a different order, simply unload the Screens and reload in the preferred order. Or create a Group with the Media Items ordered as desired and Load the Group. Also, items in a Group can be reordered by editing the Group. The Options -- Screens tab has options that control the spacing, and offsets used by these functions.
Pick a starting location
In all of the Auto-Locate methods, the starting location is determined by the Current Reference Dimensions Location (see below). First, position any loaded Media Screen at the desired starting location. Then set current Reference Dimensions to this screen by Screen > Current Reference Dimensions > Get Dimensions from a Loaded Screen . Then pick one of the Auto-Locate functions below.
Auto-Locate Menu Items
- Tile in Rows - Screens are Tiled across rows. The Number of Screens Per Row is set in the Options -- Screens tab.
- Tile Horizontal in 1 Row - All Screens are tiled horizontally across one (1) row.
- Tile Vertical in 1 Column - All Screens are tiled vertically in one (1) column.
- Cascade - Screens are arranged in a simple Cascade pattern as described above.
- Cascade (No Overlap) - Screens are arranged in a Cascade pattern except that screens will NOT overlap each other (See Figure 4.). The vertical (Y) offset specified in the Options is ignored. Each screen's height is used as the vertical (Y) offset. Also the Tile Vertical Padding is used between each screen. Set the Vertical Padding to zero if you want screens to touch.
- Stack - Screens are stacked, one in front of another at the Reference Dimensions Location . Their X,Y Location on the display is the same. This can be useful to reposition all Screens a one position, then rearrage them manually from that point.
- Move to Primary Display (0,0) - Screens are move to Primary display Location (0,0) (upper left corner of the display). This will recover any Media Screens that have moved outside the viewable bounds of any displays (Primary or secondary displays).
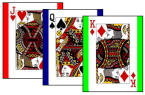
Tile Methods
Screens are tiled (see Figure 2.) starting at the current Reference Dimensions Location . Padding between screens is specified in the Options -- Screens tab. The tiling direction is determined by the current Direction of Placement settings( see Options -- Screens tab).
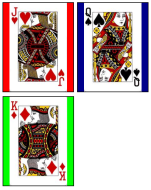
Cascade Methods
Screens are Cascaded (see Figure 3.) starting at the current Reference Dimensions Location . The cascading direction is determined by the current Direction of Placement settings ( see Options -- Screens tab). See horizontal (X) and vertical (Y) offsets that control each subsequent location are specified in the Options -- Screens tab.

Auto-Locate toolbar
- Auto-Locate toolbar - Buttons (Figure c, from left to right): Tile in Rows, Tile Horizontal in 1 Row, Tile Vertical in 1 Column, Cascade, Cascade (No Overlap), Stack, Move Screen to Display(x), Bring to Front, Bring to Front (Reverse Order).
Also see the Docking toolbars section.

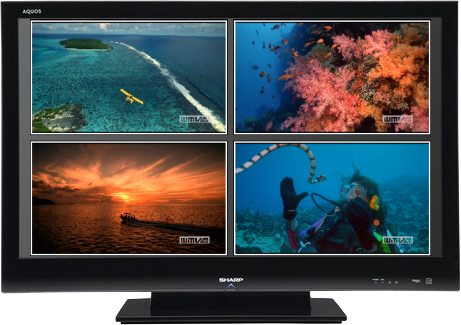
Cascade and Tile Examples
Figures 6 and 7, show 4 videos Tiled and Cascaded (respectively) for different visual impact. The screens have a white border and the Windows Desktop Background is set to Solid Color black.

Auto-Size Screens
Auto-Size Screens (Auto-Size Screens) menu items allow you to resize Screens to a uniform size with one click. Size buttons are also included on the Screen Manager toolbar for quick access.
Auto-Size Screens Menu Items
- Size to Reference Dimensions - The Screen(s) is resized to the current Reference Dimensions Size .
- Size To Natural Video Size - The Screen(s) is resized to the natural recorded size of the video. Stretching the video to larger or smaller sizes can cause some degree of pixel diffuse. Setting to Natural Video Size ensures that the video is viewed the exact recorded quality and resolution.
- Scale Size by Factor - The Screen(s) is resized by a resize factor (multiplier) that you specify. You are prompted to enter the Scale Factor (as a decimal number). Example Scale Factors: 2.0 doubles the current screen size; 0.5 halves the size.
Screen Manager toolbar
- Screen Manager toolbar - Buttons (Figure 8, from left to right): Save Screen Dimensions to Media Item, Full Screen Toggle, Restore Window to Normal Size, Show Screen, Hide Screen, Video Visibility Toggle, Screen Title Bars Toggle, Move Screen to Display(x), Screen Alignment, Resize Screen by Mode, View Loaded Screens.

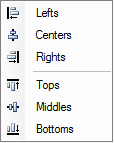
Auto-Align to Reference Dimensions
Align (Align) controls locating Media Screens in relation to the Current Reference Dimensions . Select a Media Screen with the mouse, right click, then pick Use as Reference Dimensions from the context menu. The selected screen will become the reference screen for these positioning operations.
Align Menu Items
- Lefts - All screens are positioned so their left sides are aligned.
- Centers - All screens are positioned so their horizontal centers are aligned.
- Rights - All screens are positioned so their right sides are aligned.
- Tops - All screens are positioned so their top sides are aligned.
- Middles - All screens are positioned so their vertical middles are aligned.
- Bottoms - All screens are positioned so their bottom sides are aligned.
Order
Order (Order) controls the Z-order positioning of Media Screens (front to back order).
Order Menu Items
- Bring to Front - The Screen(s) is brought to the front of other Media Screens windows and any other Windows application windows that are on the screen. Useful for ordering stacked screens. In Media Group mode, Screens are brought to the front in the order that they were loaded.
- Bring to Front (Reverse Order) - Same as "Bring to Front" except screens are brought to the front in the reverse order that they were loaded.
Stacked Media Screens
Media Screens are windows like any other app window. When you load Media Screens on the same physical Target Display, they are Stacked, placed one in front of another (Figure 10). If the Media Screens are all Full Screen or they are the same size and placed at the same X,Y display location, the front most Media Screen will fully hide the Media Screens behind it. There may be cases when you want to show more than one Media Screen on a given display. For example, playing a segment of video-A, then pausing it to show video-B, then resume showing video-A at the point that it was paused. In these cases, you need to bring each Media Screen to the front of the stack at different times.
Bring To Front operation
- You can bring a Media Screen to the front of the stack by these methods:
- Manually - Select a Media Item in the Media List Editor. Then, 1) Click the Bring to Front button on the Auto-Locate toolbar. 2) Or click Screens > Order > Bring to Front menu item.
- Automated - In the Script Editor, add a Bring To Front Step command to your Script.
Visibility
Visibility Menu Items
- Show Screen - The Media Screen(s) are made visible on the windows desktop.
- Hide Screen - The Media Screen(s) are made invisible.
- Video Visibility Toggle - The Media Screen(s) video Visibility is toggled between visible/hidden. The Media Screen visibility remains unchanged. Useful when using a Screen template and provides a way to hide a video portion of a Media Screen without having to unload the Media Screen.
Visibility Tech Notes
A. These above Visibility functions are also available via buttons on the Screen Manager toolbar (Figure 8 above).
B. You can automatically make a video Pause when it becomes invisible, then Resume when it becomes visible again. See the "Pause/Resume Video on Screen Visibility Change" option for details (found in Screens(1) Options panel).
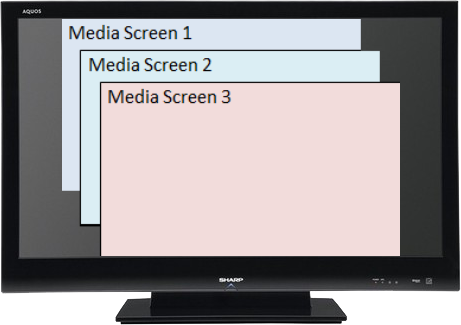
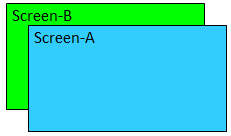
C. There is a subtle difference between "Show/Hide Screen" and "Video Visibility Toggle". The Media Screen is a window like any other program window such as NotePad (see Figure 1). The Screen window simply contains a MediaElement that plays videos or displays images. For this explanation, let's assume you have two Media Screens (Screen-A and Screen-B, see Figure 11 ) stacked on the same display, and Screen-A is in front of Screen-B.
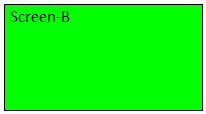
When you "Hide" Screen-A (Figure 12), its window becomes minimized, then Screen-B will become fully visible. When you "Show" Screen-A again, it becomes un-minimized and the window is restored to its previous location and size. Thus Screen-A effectively covers over Screen-B again.
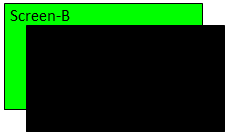
"Video Visibility Toggle" is different in that it only makes the Screen's MediaElement visible or invisible. It does NOT minimize the Media Screen's window. So if you toggle Screen-A's video to invisible, Screen-A's window is still present although it's video has been blacked out (Figure 13).
View Loaded Screens Dimensions
- View Loaded Screens Dimensions - When clicked, it pops up a dialog showing the following for each loaded Media Screens: Dimensions ( location, size); Audio Volume and Mute status.
Listing 1. View Loaded Screens Dimensions___________________________________ Loaded Media Screens ___________________________________ Number of Screens: 1 1. Name: Dolphins_720 On Display: Stage Right Monitor, 1080p Screen Dimensions: {X=540,Y=300} {Width=600, Height=450} Volume: 75% (** Muted) Screen Visible: True, Window State: Normal
Current Reference Dimensions
The Current Reference Dimensions are used for some of the Auto-Locate (Tile and Cascade) and Auto-Size functions that need a starting point and/or a reference size to make calculations. There are several ways to set the Reference Dimensions listed below.
A Reference Dimension
- consists of:
- Target Display - Can be a physical display or Virtual Display.
- Location Point (X,Y) - X,Y (horizontal, vertical) position from the display's upper left corner (which is X=0,Y=0).
- Size Dimension (Width,Height) - Be aware that the Windows title bar height and window borders are included in the Screen's Size dimensions when the Titlebar is showing.
Reference Dimensions Menu Items
- Get Dimensions from a Loaded Screen - This sets the current Reference Dimensions from a selected Loaded screen (via pop-up selector). Reference Dimensions values are retained even after the source screen in unloaded. You can also set Reference Dimensions by mouse right button clicking on a Media Screen and picking the Use as Reference Dimensions menu item from the Screen Context Menu.
- Get Dimensions from a Favorite - This sets the current Reference Dimensions from a selected Favorite Dimensions.
- View - Pops up a viewer showing the values of the current Reference Dimensions .
- Edit - Pops up a dialog to manually change the current Reference Dimensions .
Dimensions Favorites
Dimensions Favorites (Dimensions Favorites) - You may want to reuse various Reference Dimensions. Favorites allows you to save Dimensions for later use. For example you may have different video display for media development system and at the performance venue. So you can use Dimensions Favorites to quickly apply the correct screen sizes and location values for each system. There are several ways to save Favorites. Dimensions Favorites are saved with the Media List itself, not as a general application setting.
Dimensions Favorites Menu Items
- Save Reference Dimensions as a Favorite - Saves a Dimensions Favorite from the current Reference Dimensions values.
- Save a Screen's Dimensions as a Favorite - Saves a Dimensions Favorite from a Loaded Screen. A selector dialog is popped up to make the selection.
- Manage Favorites - Edit, Add, Remove, Reorder or Rename any Favorites.
- View All - Pops up a viewer showing the values of all Favorites.
Save Screen Dimensions to Media Item
The Media Screen's Dimensions (Location (X,Y) and Size (Width, Height)) are saved to the associated Media Item for future use. Location coordinates are relative offset (X,Y) from its containing display's origin (upper left corner). By saving relative offsets, the Media List becomes portable to new display systems at virtually any venues.
The following Media Screen values are saved:
- Dimensions (Location (X,Y) and Size (Width, Height)).
- Current Display where the Media Screen is located.
- Alignment Mode.
- Size Mode.
- Stretch Mode of the video.
Screen Capture
Screen Capture (Screen Capture) - The Media Screen is saved as an image file (ie screen shot). There are Screen Capture Save Options to set file format, add time and date stamps. You can also specify save folder location and image filename. For playing video or live streams, you can save images as fast as you can tap the F5 shortcut key.